For reasons of simplicity in this tutorial, we will assume that you are working as a single developer with a local repository (MASTER).
Implementing a new Feature
Option 1
When you just add one feature after the other, you can make the changes, add them to the Staging Area and commit the changes to the MASTER as explained in the previous blog post. There is nothing wrong with that when you work alone, one feature after the other.
Option 2
Imagine, you have a version of your software released in production. Then you start working on a new feature. When you are half-way through, you discover that you have a bug in production. If you already transferred files in your staging area (git -add .) you can undo them (git reset), fix the bug, add the affected files (git -add [filename], ...) and commit the changes (git commit -m "bugfix ...").
The disadvantage here is that you carefully have to only add the files affected by the bugfix without adding the files that are affected by the new feature development. It can get even more confusing if the file affected by the bugfix, was already changed when implementing the new, but not yet releasable feature. It will get even more confusing if many developers implement new features or functionality on the same code. But we will cover this later.
Branching
Basic Branching with one Branch
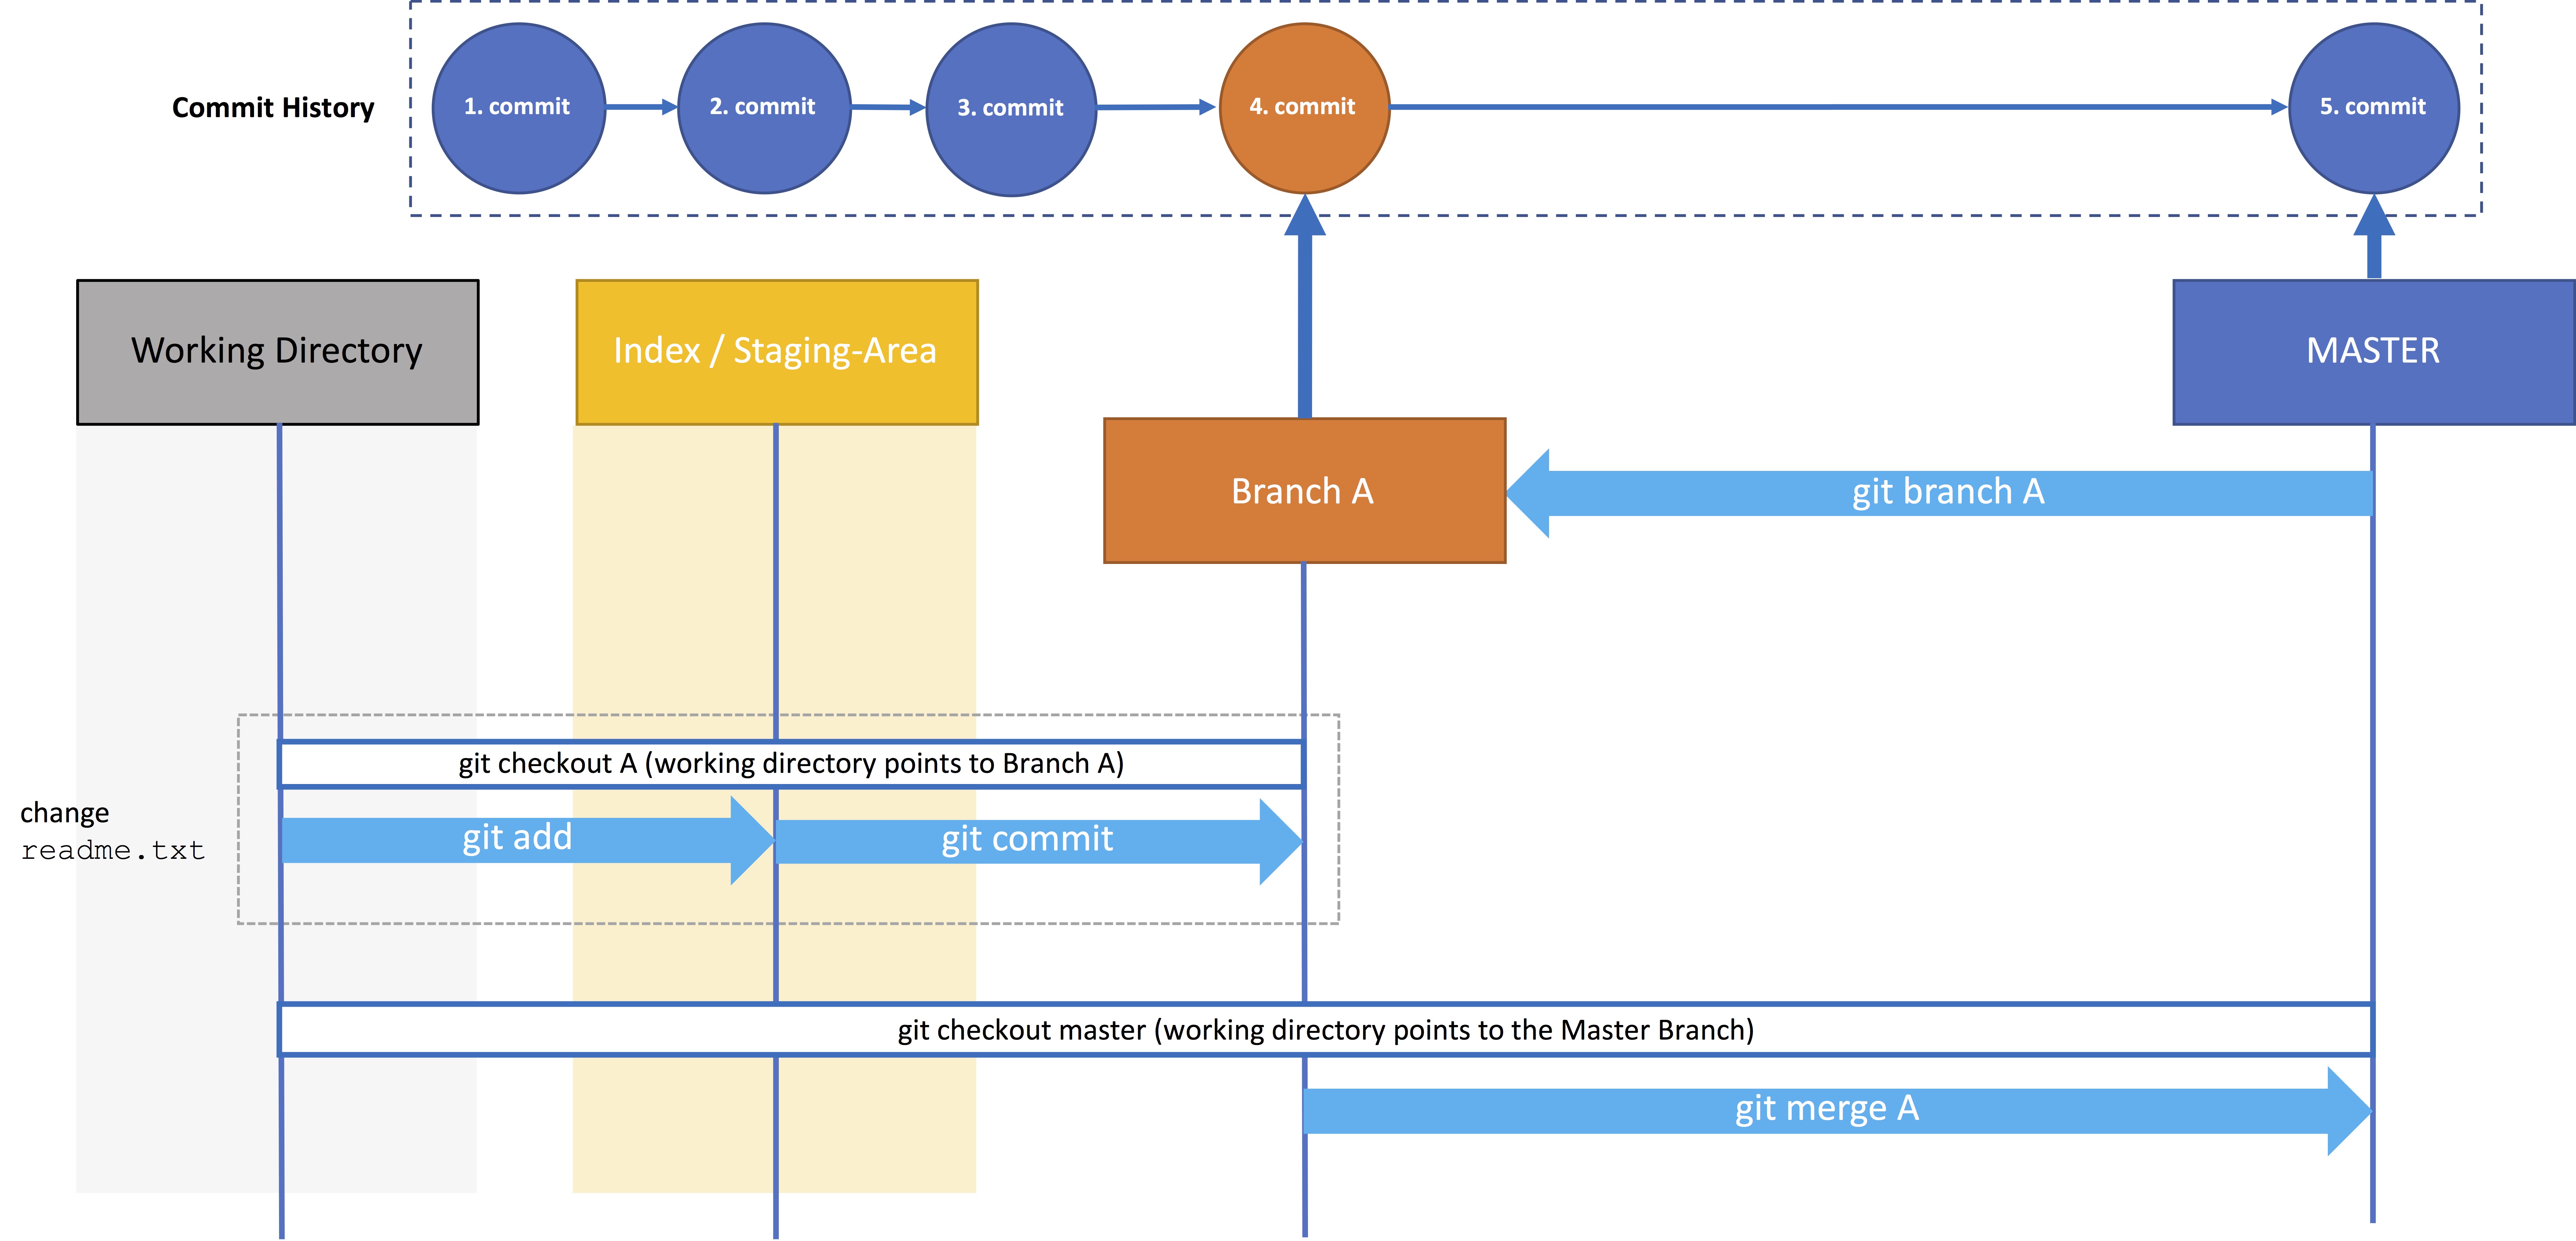
There is a simple clean solution to all the disadvantages mentioned above: branching. Basically branching means, that you branch from the MASTER (your root branch), make your changes in the new branch and subsequently merge your changes back into the MASTER.
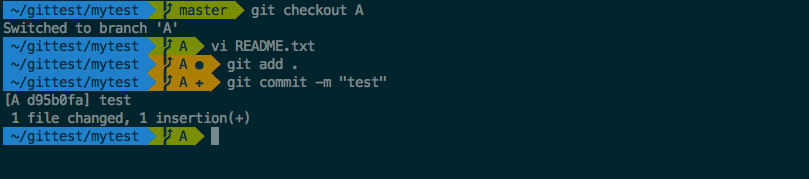
# create a new branch
git branch A

# change the branch
git checkout A

#
# make changes in files ...
#

# add all changes to the staging area
git add .

# commit the changes into branch A
git commit -m "implemented feature A"

# checkout the master branch
git checkout master

# merge the changes in branch A to the master
git merge A

You basically create a new branch from the branch you have currently checked-out. Before you switch branches, you usually have to commit the work in the current branch.
git branch [branch-name]
You change branches with
git checkout [branch-name]
You can use the shortcut git checkout -b [branch-name] to create a new branch and check it out. Each branch will inherit the whole commit-history of the branch it derived from, including all tags. You can check this with git log.
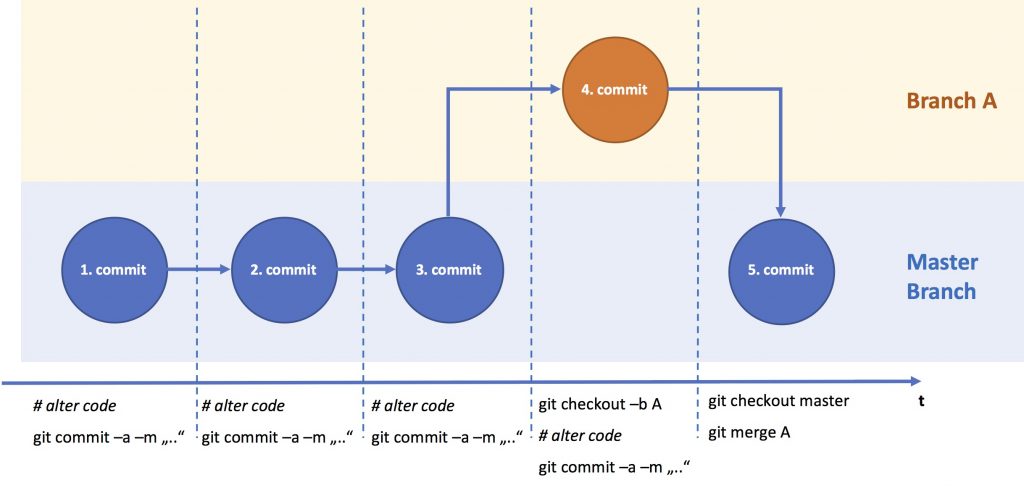
The branch you switch to will look like after your last commitment to that branch, e.g. when you create a branch A from the MASTER, switch to it, make changes and commit these changes to A, and then switch back to the MASTER branch, you won’t see these changes yet (until you merge them).
You basically merge into the branch you have currently checked-out or you define a source and destination branch:
git merge [branch-name]
git merge [source branch-name] [destination branch-name]
git merge also merges the commit history if the branch that was merged and git merge also performs a commit on the destination branch (or the branch you call the merge from). Again, you can check this by using git log.
To show all branches and their commits use
git show-branch
To compare two branches use
git diff [branch-name 1] [branch-name 2]
When you don’t need a branch anymore you can delete it using
git branch -d [branch-name]
You can usually only delete branches that are merged into another branch because otherwise your changes will be lost. You can, of course, force a delete by using
git branch -D [branch-name]
Basic branching with two Branches
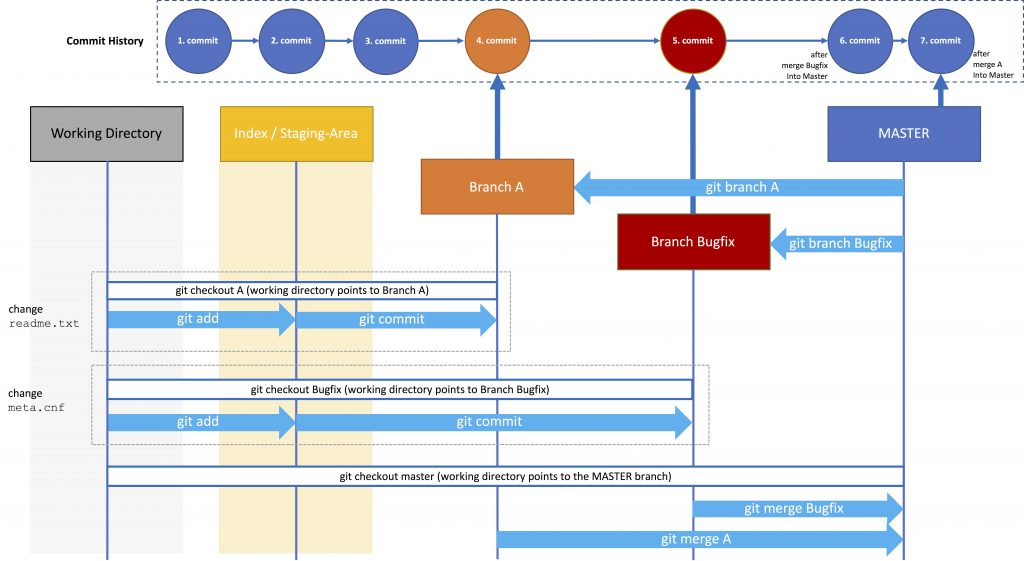
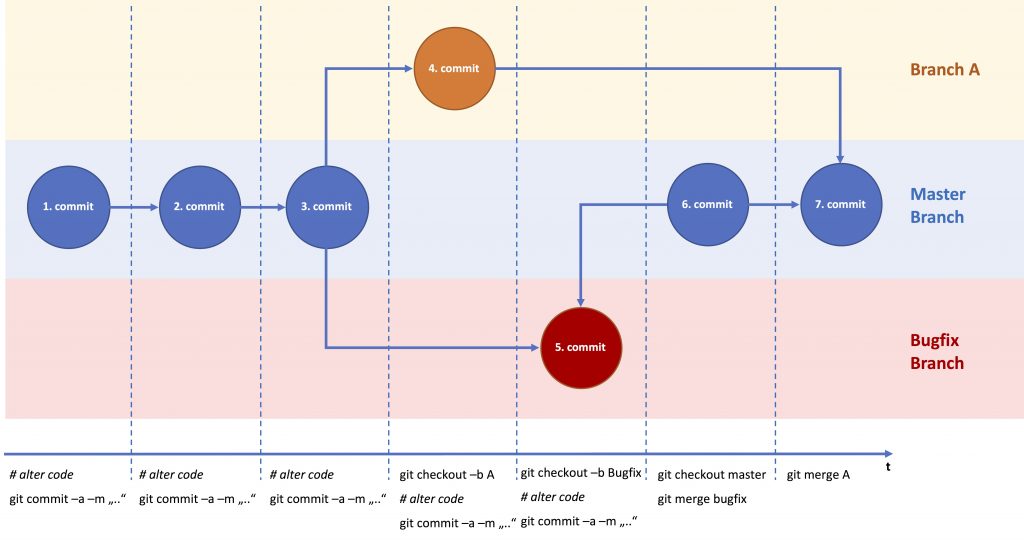
Now imagine the example above where you create a new feature branch to develop a new feature. Then a bug occurs in production. Hence, you create a new branch to fix the bug. Notice, that we are changes two separate files in each branch.
# create a new branch
git branch A

# change the branch
git checkout A

#
# make changes in branch A ...
#

# add all changes to the staging area auf branch A
git add .

# commit the changes into branch A
git commit -m "partly implemented feature A"

# checkout the master branch
git checkout master

# create and checkout Bugfix branch
git checkou -b bugfix

#
# make changes in branch Bugfix ...
#

# add all changes to the staging area auf Bugfix branch
git add .

# commit the changes into the Bugfix branch
git commit -m "fixed bug B in production"

# checkout the master branch
git checkout master

# merge the changes in branch A to the master
git merge Bugfix
git checkout A) to continue working on your feature A and merge the changes into the MASTER when you are finished.Remarks
Again, before using Git in a serious project, I suggest experimenting with branches in a simple setting (one master, two branches, two text-files) to become more familiar with Git.
In the next part, we will discover merge-conflict. What happens if you made changes in the same file and then merging it one by one into the master.
Further Reading
GIT Tutorial – Working with Branches – Part I
Git Branches – Working with Branches – Part II (Merge Conflicts)
Git Branches – Working with Branches – Part III (Merging versus Rebasing)
- Hackintosh – The Hardware - 22/02/2020
- Installing Artifactory with Docker and Ansible - 17/08/2018
- Docker Networking – Overlay Network - 15/08/2018
3 Comments
Comments are closed.