Java Byte-Code
When you compile java-code (.java files and resources), the compiler will generate so-called byte-code (.class files, or packaged .jar files). This byte-code can’t be executed by the local operating system, but only by the Java Runtime Environment (JRE). The JRE is the environment where a Java Virtual Machine (JVM) runs. The benefits are that the byte-code can run on any machine where a JRE is present (providing you haven’t used any operating-system specific code). In addition, the Java application runs in a safe space (sandbox) without having much chance to attack the underlying OS. Another advantage can be that the byte-code is executed by a just-in-time compiler (JIT compiler). A JIT compiler compiles byte-code into machine-code that can be read and executed by the underlying OS on-the-fly, often with using profiling information to optimise the machine-code.
public class HelloWorld {
    public static void main(String[] args) {
        System.out.println("Hello World.");
    }
}
You can see the byte by using
javap -c HelloWorld.class
Hierarchy of Classloaders
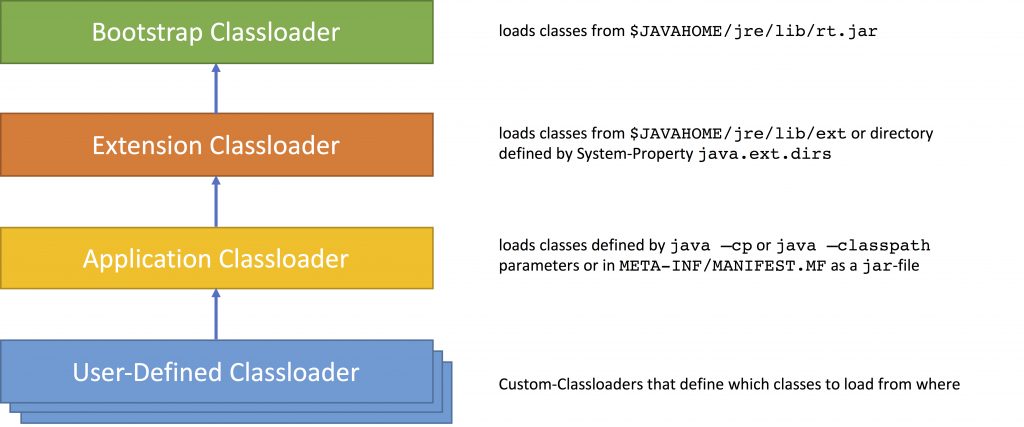
A Java program usually consists of many classes that are linked to each other. These classes are loaded and initialised when they are needed during runtime. Java provides a hierarchy of different ClassLoaders that are responsible for this job
- The Bootstrap Classloader (aka Primordial Classloader) loads the classes of the JRE, classes that can be found in
$JAVAHOME/jre/lib/rt.jar. The Bootstrap Classloader is the root of all other the other Classloaders. Most of the classes are implemented in C. - The Extension Classloader loads classes from Extension API under
$JAVAHOME/jre/lib/ext(or in the directories defined in the System-Propertyjava.ext.dirs). The Extension Classloader is a sub-class of the Bootstrap Classloader. It is implemented in Java. - The Application Classloader (aka System Classloader) is the default Classloader and loads classes from the classpath (
java -cporjava -classpath) orClass-Pathattribute of aMETA-INF/MANIFEST.MFfile inside of ajar-file. The System Classloader is also implemented in Java. - In addition, Custom Classloader can be written that can load classes from any location. These User-Defined Classloaders are derived from
java.lang.ClassLoader. Custom Classloader are organised as a tree, each Custom Classloader has a parent, the System Classloader is the root Classloader for all Custom Classloaders
Finding and Loading a Class
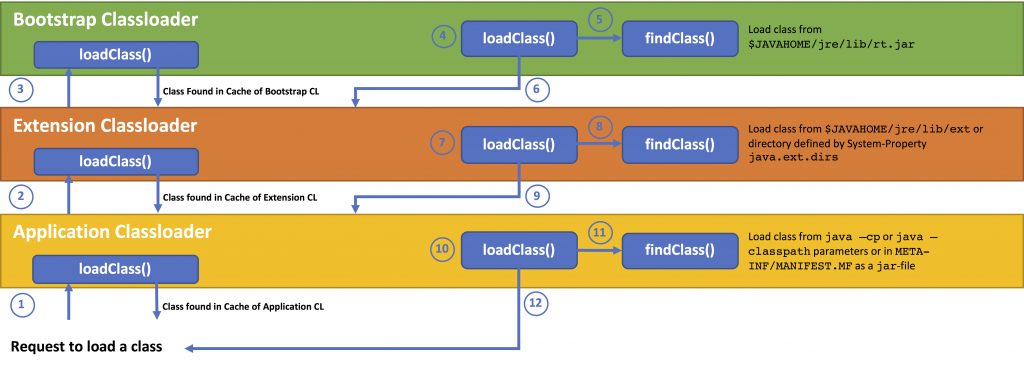
The loading of classes happens hierarchically. To load a class, the loadClass() method of the Application Classloader is called (1).
- If the Application ClassLoader has already loaded the class it simply returns it. Otherwise, the Application Classloader calls
loadClass()on the Extension Classloader (2). - If the Extension Classloader has loaded the class already it returns it. Otherwise, the Extension Classloader calls
loadClass()on the Bootstrap Classloader (3). - If the Bootstrap Classloader has loaded the class already it returns it. Otherwise, the Bootstrap Classloader calls
loadClass()(4) which callsfindClass()(5), which then tries to find the class in$JAVAHOME/jre/lib/rt.jar, caches (stores) and returns it (6). If the Bootstrap Classloader cannot find the class, it delegates it back to the Extension Classloader (6). - The
loadClass()method (7) of the Extension Classloader then callsfindClass()(8), which in turn tries to find the class in$JAVAHOME/jre/lib/ext(or in the directories defined in the System-Propertyjava.ext.dirs), caches (stores) and returns it (9). If the Extension Classloader cannot find the class, it delegates it back to the Application Classloader (9). - The
loadClass()method (10) of the Application Classloader then callsfindClass()(11), which in turn tries to find the class in the application classpath (java -cp or java -classpath), caches (stores) and returns it (12). If the Application Classloader cannot find the class, it throws ajava.lang.ClassNotFoundExceptionto the caller (12).
This principle is also called delegation principle. A child Classloader can see all classes loaded by the parent Classloader (not vice-versa). The parent Classloader cannot see the classes loaded by the child Classloader (visibility principle). Each Classloader contains (loads, caches, stores) the classes it is responsible for (uniqueness principle).
This is a recursive process. To sum it up
- if the Classloader has already loaded the class and returns the class from its cache,
- if not it asks their Parent ClassLoader
- if the Parent ClassLoader doesn’t have the class, the ClassLoader loads it from the associated location
You can see how the Classloading mechanism works when you start an application with
java -verbose:class HelloWorld
Class Loading
A class is loaded as soon as it is referenced by another class or until the class is initialised (lazy loading). The loading occurs by the following sequence:
- The JRE doesn’t know the source of the byte-code. Hence, a couple of checks are performed on the byte-code to ensure it won’t cause any harm when executed (Verification of class Files in the JVM Specification) (verify)
- If the byte-code passes the test, the data structures are prepared that represents attributes, methods and interfaces (prepare)
- Subsequently, the references are resolved (interfaces, super-classes, field-references, references in method-signatures, and local variables in methods) (resolve)
Class Initialisation
A class, or more precise, the static members of this class, are initialised when
- an instance of the class is created
- a static method of the class is invoked
- a static field of the class is assigned
- a static field of a class is used (and not a constant)
- a class is accessed via reflection
Classes are initialised in the following order
- a field declared in a super-class is initialised before a field in a derived class
- a super-class is initialised before a derived class, with the exception of super interfaces
- if a class initialisation is triggered by access to a static field, the corresponding class is initialised (without initialising the super-class)
- static fields are initialised before instance attributes
- instance attributes are initialised when the constructor is called. A constructor of a sub-class calls the identical constructor in the super-class first.
You can experiment this behaviour with some classes like this
public class SuperClass {

    public static int A = 200;

    static {
        System.out.println ("Static part of SuperClass.");
    }

    {
        System.out.println("Non-Static part of SuperClass is initialized");
    }
}
public class SubClass extends SuperClass {

    public static int A = 100;

    static {
        System.out.println ("Static part of SubClass.");
    }

    {
        System.out.println("Non-Static part of SubClass is initialized");
    }
}
public class ClassHierarchyDemo {

    public static void main (String[] args) {
        System.out.println (SubClass.A);
        SubClass subClass = new SubClass();
    }
}
You can have a further look at when the classes are loaded with
java -verbose:class ClassHierarchyDemo
Remarks
You might not need to know how classes are loaded into the JVM when you are writing simple Java programs. However, this knowledge will become useful, when writing large applications that use different libraries, and you e.g. experience version conflicts or wondering why classes and especially members are not initialised in the way you would expect. I recommend experimenting a bit with the examples above. More information can be found in the Java Language and Virtual Machine Specifications.