Schlagwort: swarm

  • Docker Networking – Bridge Network

    Default Bridge Network

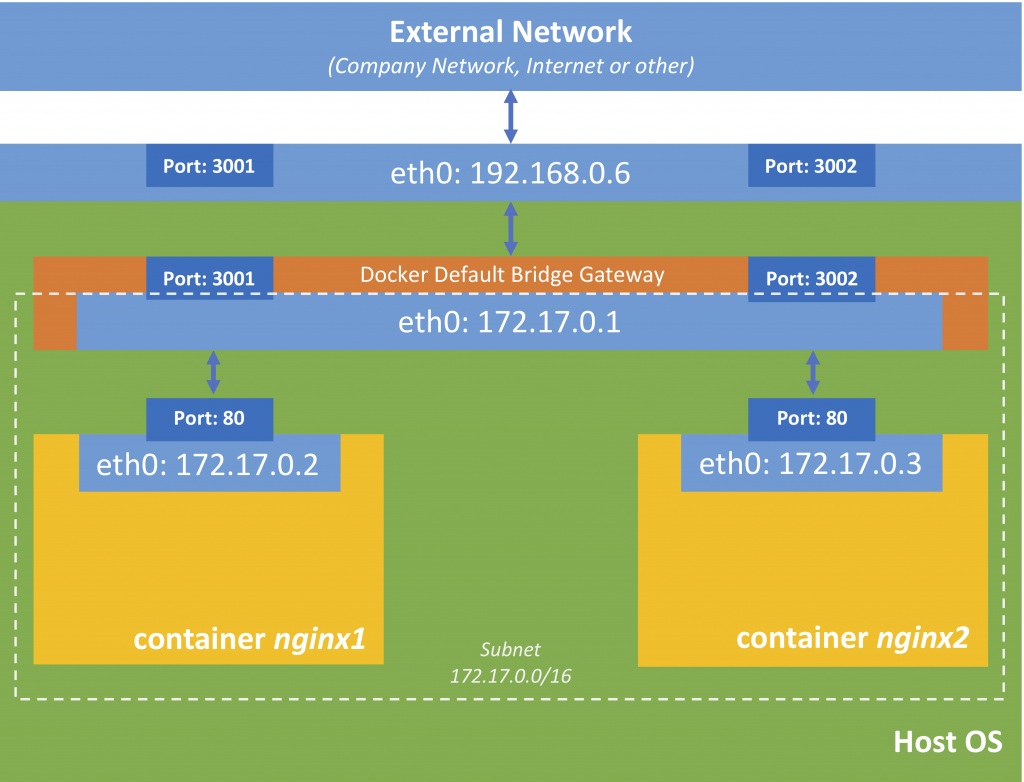
    Containers, that run on the same machine (share the same Docker daemon) and are not part of a swarm use the so-called bridge network (a virtual network) to communicate with each other.

    Let us create two basic containers

    docker container run -d --name nginx2 -p3001:80 nginx:alpine

    docker container run -d --name nginx2 -p3002:80 nginx:alpine

    You can inspect the bridge-network with

    docker network inspect bridge

    and you will see in the container section of this REST response, that the newly created docker-containers belong to this network.

    "Containers": {
        "9b4e3e3ca279518708ed88a629ba5d40bd1e94d5ed316b74b026b12c1034b497": {
            "Name": "nginx2",
            "EndpointID": "5a65daa2976ff986e2a9b4aeb9df8e990b0bf0a45ac60dd05475af20f15cc5c9",
            "MacAddress": "02:42:ac:11:00:03",
            "IPv4Address": "172.17.0.3/16",
            "IPv6Address": ""
        },
        "c57ee29c8babf8ecf20e5c2a9a66b30c49cc6bb94b22cd4daad79b87f7a33358": {
            "Name": "nginx1",
            "EndpointID": "75dc77f5a8677485aaee91c33734e720ebbb61b94917eacba8f50bd4dc7a88e3",
            "MacAddress": "02:42:ac:11:00:02",
            "IPv4Address": "172.17.0.2/16",
            "IPv6Address": ""
        }
    },

    You also see the IP address of container nginx1 (172.17.0.2) and nginx2 (127.17.0.3). We can also see the IP address an subnet of the bridge:

    "IPAM": {
        "Driver": "default",
        "Options": null,
        "Config": [
            {
                "Subnet": "172.17.0.0/16",
                "Gateway": "172.17.0.1"
            }
        ]
    },

    Now let us see if the nginx-containers can see each other, as well as the bridge.

    docker container exec -it nginx1 ping 172.17.0.3

    docker container exec -it nginx1 ping 172.17.0.1

    docker container exec -it nginx2 ping 172.17.0.2

    docker container exec -it nginx2 ping 172.17.0.1

    In each case, you should be able to reach the destination

    PING 172.17.0.1 (172.17.0.1): 56 data bytes
    64 bytes from 172.17.0.1: seq=0 ttl=64 time=0.092 ms
    64 bytes from 172.17.0.1: seq=1 ttl=64 time=0.167 ms
    64 bytes from 172.17.0.1: seq=2 ttl=64 time=0.126 ms
    Default Bridge Network Docker
    Default Bridge Network Docker

    However, what is not working with the default bridge network is name resolution, e.g.

    docker container exec -it nginx1 ping nginx2

    should not work and lead to a

    ping: bad address 'nginx2'

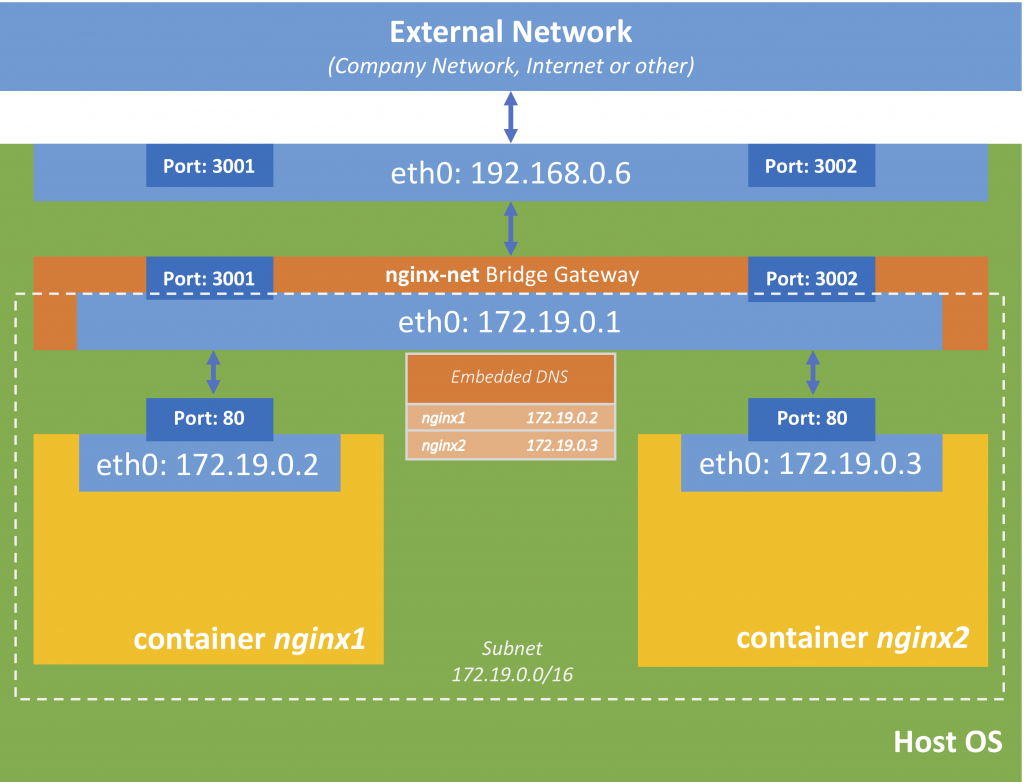
    Custom Bridge Networks (embedded DNS)

    So to make this work, we have to create our own network

    docker network create --driver bridge nginx-net

    You can see the new network (and other networks) by using

    docker network ls

    NETWORK ID          NAME                DRIVER              SCOPE
    1f3e6ded4f9a        bridge              bridge              local
    20fe2ddb80e6        host                host                local
    6d96ed99b06b        nginx-net           bridge              local
    5866618435c1        none                null                local

    Now let us connect our two containers to this network

    docker network connect nginx-net nginx1

    docker network connect nginx-net nginx2

    If you now do a docker network inspect nginx-net you will see that both containers are connected to this network. You will notice, that the IP-addresses of these containers in this network have changed (the subnet is 172.19.0.0/16 compared to 172.17.0.0/16 as in the default-bridge network).

    "Containers": {
         "a1ce9d1f383cf10b3a0cd27d6ef482719ae4e3ae48cb5b8402b2d3d8b897db03": {
             "Name": "nginx2",
             "EndpointID": "49fc6d33e57e909f0f0ea98e00c8d8f2f2db996d001a3359b1a6dcc968254f91",
             "MacAddress": "02:42:ac:13:00:03",
             "IPv4Address": "172.19.0.3/16",
             "IPv6Address": ""
         },
         "c57ee29c8babf8ecf20e5c2a9a66b30c49cc6bb94b22cd4daad79b87f7a33358": {
             "Name": "nginx1",
             "EndpointID": "fb7e9c28e6a5564e9bba182ada2ce8048d9ab5b8ec3620f7e03a2491b18219b2",
             "MacAddress": "02:42:ac:13:00:02",
             "IPv4Address": "172.19.0.2/16",
             "IPv6Address": ""
         }
     },

    Now let run a ping against the other containers by name again

    docker container exec -it nginx1 ping nginx2

    PING nginx2 (172.19.0.3): 56 data bytes
    64 bytes from 172.19.0.3: seq=0 ttl=64 time=0.139 ms
    64 bytes from 172.19.0.3: seq=1 ttl=64 time=0.152 ms
    c64 bytes from 172.19.0.3: seq=2 ttl=64 time=0.100 ms

    The same should work for the other connections. So basically, the name of the container is its host-name.

    Custom Bridge Network Docker
    Custom Bridge Network Docker

    So why is DNS inside of Docker networks so important? As we have especially seen in the tutorials about Docker Swarm, you can’t rely on the IP address of containers, as they may change, especially when a swarm manager has control over the containers. Hence it is much reliable and easier to reference containers by name than their IP address.

    Round-Robin DNS

    Let us take our dataService from the Swarm tutorial and create two Docker containers on the same host

    docker container run --name dataservice1 -d -p4001:8080 vividbreeze/docker-tutorial:version1

    docker container run --name dataservice2 -d -p4002:8080 vividbreeze/docker-tutorial:version1

    So you call these services you should get a response with an id. This id should be different, depending on the port.

    curl 127.0.0.1:4001

    <?xml version="1.0" ?><result><name>hello</name><id>2128</id></result>

    curl 127.0.0.1:4002

    <?xml version="1.0" ?><result><name>hello</name><id>1976</id></result>

    Now let us create a custom bridge-network and assign both containers to this network.

    docker network create --driver bridge dataservice-net

    docker network connect dataservice-net --alias dataservice dataservice1

    docker network connect dataservice-net --alias dataservice dataservice2

    We used a new parameter called --alias. This alias is an alias for the embedded DNS service, i.e. that when I call dataservice inside of the dataservice-net, the embedded DNS will return the IP address from either dataservice1 or dataservice2. Let us test this by running a new container inside this network and executing curl dataservice:8080 (because inside of dataservice-net both containers listen to port 8080 on different IP-addresses).

    docker container run --rm -it --network dataservice-net centos curl dataservice:8080

    This command runs a new Docker container with CentOS, executes a curl (-it) and deletes itself afterwards (–rm).

    If you repeat this command a couple of time, you see that the either one of the containers returns a result (you can see this on the different ids they return).

    $ docker container run --rm -it --network dataservice-net centos curl dataservice:8080
    <?xml version="1.0" ?><result><name>hello</name><id>1976</id></result>
    $ docker container run --rm -it --network dataservice-net centos curl dataservice:8080
    <?xml version="1.0" ?><result><name>hello</name><id>1976</id></result>
    $ docker container run --rm -it --network dataservice-net centos curl dataservice:8080
    <?xml version="1.0" ?><result><name>hello</name><id>2128</id></result>
    $ docker container run --rm -it --network dataservice-net centos curl dataservice:8080
    <?xml version="1.0" ?><result><name>hello</name><id>2128</id></result>
    $ docker container run --rm -it --network dataservice-net centos curl dataservice:8080
    <?xml version="1.0" ?><result><name>hello</name><id>1976</id></result>
    $ docker container run --rm -it --network dataservice-net centos curl dataservice:8080
    <?xml version="1.0" ?><result><name>hello</name><id>2128</id></result>
    Round Robin DNS - Custom Bridge Network Docker
    Round Robin DNS – Custom Bridge Network Docker

    What is the beauty here? The loads (requests) is balanced between the two containers. If you stop one of the containers, a request to dataservice will still return a result.

    docker container stop dataservice1

    docker container run --rm -it --network dataservice-net centos curl dataservice:8080

    $ docker container run --rm -it --network dataservice-net centos curl dataservice:8080
    <?xml version="1.0" ?><result><name>hello</name><id>1976</id></result>
    $ docker container run --rm -it --network dataservice-net centos curl dataservice:8080
    <?xml version="1.0" ?><result><name>hello</name><id>1976</id></result>
    $ docker container run --rm -it --network dataservice-net centos curl dataservice:8080
    <?xml version="1.0" ?><result><name>hello</name><id>1976</id></result>
    $ docker container run --rm -it --network dataservice-net centos curl dataservice:8080
    <?xml version="1.0" ?><result><name>hello</name><id>1976</id></result>
    

    We will later discuss, how we can use this DNS balancing from outside of the network.

    Further Remarks

    A bridge network can be reached by its IP address from the Docker host, when you are working on Linux (or from inside the Docker VM if you are working on MacOSX or Windows), but not by its name.  The way you can access the containers from the host (also MacOSX and Windows) is by its ports on the local machine, e.g.  curl 127.0.0.1:3000 or curl 192.168.0.6:3001.

    If you are not exposing a port when running the container, the container won’t be accessible from outside of the bridge network (which is fine). This makes sense if you e.g have a service that connects to a database. The service should be accessible from the host network, while the database should only be accessed by the service.

    A container can belong to several networks. You can try this by creating more of our small containers and connect them to our nginx-net or newly created networks.


  • Docker Swarm – Multiple Nodes

    In the first part of this series, we built a Docker swarm, consisting of just one node (our local machine). The nodes can act as swarm-managers and (or) swarm-workers. Now we want to create a swarm that spans more than one node (one machine).

    Creating a Swarm

    Creating the Infrastructure

    First, we set up a cluster, consisting of Virtual Machines. We have used Vagrant before to create Virtual Machines on our local machine. Here, we will use docker-machine to create virtual machines on VirtualBox (you should have VirtualBox installed on your computer). docker-machine is a tool to create Docker VMs, however, it should not be used in production, where more configuration of a virtual machine is needed.

    docker-machine create --driver virtualbox vm-manager

    docker-machine create --driver virtualbox vm-worker1

    docker-machine uses a lightweight Linux distribution (boot2docker) including Docker, that will start within seconds (after the image was downloaded). As an alternative, you might use the alpine2docker Vagrant box.

    Let us have a look at our virtual machines

    docker-machine ls

    NAME ACTIVE DRIVER STATE URL SWARM DOCKER ERRORS
    vm-manager - virtualbox Running tcp://192.168.99.104:2376 v18.06.0-ce
    vm-worker1 - virtualbox Running tcp://192.168.99.105:2376 v18.06.0-ce

    Setting Up the Swarm

    As the name suggests, our first vm1 will be a swarm-manager, while the other two machines will be swarm-workers. Let us log into our first Virtual Machine and define it as a swarm-manager

    docker-machine ssh vm-manager

    docker swarm init

    You might run into an error message such as

    Error response from daemon: could not choose an IP address to advertise since this system has multiple addresses on different interfaces (10.0.2.15 on eth0 and 192.168.99.104 on eth1) - specify one with --advertise-addr

    I initialised the swarm with the local address (192.168.99.104) on eth1. You will get the ip address of a machine, using

    docker-machine ip vm-manager (outside of the VM)

    So now let us try to initialise the swarm again

    docker swarm init --advertise-addr 192.168.99.104

    Swarm initialized: current node (9cnhj2swve2rynyh6fx7h72if) is now a manager.
    
    To add a worker to this swarm, run the following command:
    
        docker swarm join --token SWMTKN-1-2k1c6126hvjkch1ub74gea0hkcr1timpqlcxr5p4msm598xxg7-6fj5ccmlqdjgrw36ll2t3zr2t 192.168.99.104:2377
    
    To add a manager to this swarm, run 'docker swarm join-token manager' and follow the instructions.
    

    The output displays the command to add a worker to the swarm. So now we can log into our two worker VMs and execute this command to initialise the swarm mode as a worker. You don’t have to open a secure shell on the VM explicitly; you can also execute a command on the VM directly

    docker-machine ssh vm-worker1 docker swarm join --token SWMTKN-1-2k1c6126hvjkch1ub74gea0hkcr1timpqlcxr5p4msm598xxg7-6fj5ccmlqdjgrw36ll2t3zr2t 192.168.99.104:2377

    You should see something like

    This node joined a swarm as a worker.

    To see if everything ran smoothly, we can list the nodes in our swarm

    docker-machine ssh vm-manager docker node ls

    ID                            HOSTNAME            STATUS              AVAILABILITY        MANAGER STATUS      ENGINE VERSION
    9cnhj2swve2rynyh6fx7h72if *   vm-manager          Ready               Active              Leader              18.06.0-ce
    sfflcyts946pazrr2q9rjh79x     vm-worker1          Ready               Active                                  18.06.0-ce

    The main difference between a worker node and a manager node is that managers are workers that can control the swarm. The node I invoke swarm init, will become the swarm leader (and manager, by default). There can be several managers, but only one swarm leader.

    During initialisation, a root certificate for the swarm is created, a certificate is issued for this first node and the join tokens for new managers and workers are created.

    Most of the swarm data is stored in a so Raft-database (such as certificates, configurations etc.). This database is distributed over all manager nodes. A Raft is a consensus algorithm that insists consistency over the manager nodes (Docker implementation of the Raft algorithm). thesecretliveofdata.com provides a brilliant tutorial about the raft algorithm.

    Most data is stored encrypted on the nodes. The communication inside of the swarm is encrypted.

    Docker Swarm
    Docker Swarm


    Dictate Docker to run Commands against particular Node

    Set environment variables to dictate that docker should run a command against a particular machine.

    Running pre-create checks...
    Creating machine...
    (vm-manager) Copying /Users/vividbreeze/.docker/machine/cache/boot2docker.iso to /Users/vividbreeze/.docker/machine/machines/vm-manager/boot2docker.iso...
    (vm-manager) Creating VirtualBox VM...
    (vm-manager) Creating SSH key...
    (vm-manager) Starting the VM...
    (vm-manager) Check network to re-create if needed...
    (vm-manager) Waiting for an IP...
    Waiting for machine to be running, this may take a few minutes...
    Detecting operating system of created instance...
    Waiting for SSH to be available...
    Detecting the provisioner...
    Provisioning with boot2docker...
    Copying certs to the local machine directory...
    Copying certs to the remote machine...
    Setting Docker configuration on the remote daemon...
    Checking connection to Docker...
    Docker is up and running!
    To see how to connect your Docker Client to the Docker Engine running on this virtual machine, run: docker-machine env vm-manager

    The last line tells you, how to connect your client (your machine), to the virtual machine you just created

    docker-machine env vm-manager

    exports the necessary docker environment variables with the values for the VM vm-manager

    export DOCKER_TLS_VERIFY="1"
    export DOCKER_HOST="tcp://192.168.99.109:2376"
    export DOCKER_CERT_PATH="/Users/vividbreeze/.docker/machine/machines/vm-manager"
    export DOCKER_MACHINE_NAME="vm-manager"
    # Run this command to configure your shell:
    # eval $(docker-machine env vm-manager)

    eval $(docker-machine env vm-manager)

    dictates docker, to run all commands against vm-manager, e.g. the above docker node ls, or  docker image ls etc. will also run against the VM vm-manager.

    So now I can use docker node ls directly, to list the nodes in my swarm, as all docker commands now run against Docker on vm-manager (before I had to usedocker-machine ssh vm-manager docker node ls).

    To reverse this command use docker-machine env -u and subsequently eval $(docker-machine env -u).

    Deploying the Application

    Now we can use the example from part I of the tutorial. Here is a copy of my docker-compose.yml, so you can follow this example (I increase the number of replicas from 3 to 5).

    version: "3"
    services:
      dataservice:
        image: vividbreeze/docker-tutorial:version1
        deploy:
          replicas: 5
          restart_policy:
            condition: on-failure
        ports:
          - "4000:8080"

    Let us deploy our service as describe in docker-compose.yml and name it dataservice

    docker stack deploy -c docker-compose.yml dataapp

    Creating network dataapp_default
    Creating service dataapp_dataservice

    Docker created a new service, called dataapp_dataservice and a network called dataapp_default. The network is a private network for the services that belong to the swarm to communicate with each other. We will have a closer look at networking in the next tutorial. So far nothing new as it seems.

    Let us have a closer look at our dataservice

    docker stack ps dataapp

    ID                  NAME                    IMAGE                                  NODE                    DESIRED STATE       CURRENT STATE                    ERROR               PORTS
    s79brivew6ye        dataapp_dataservice.1   vividbreeze/docker-tutorial:version1   linuxkit-025000000001   Running             Running less than a second ago
    gn3sncfbzc2s        dataapp_dataservice.2   vividbreeze/docker-tutorial:version1   linuxkit-025000000001   Running             Running less than a second ago
    wg5184iug130        dataapp_dataservice.3   vividbreeze/docker-tutorial:version1   linuxkit-025000000001   Running             Running less than a second ago
    i4a90y3hd6i6        dataapp_dataservice.4   vividbreeze/docker-tutorial:version1   linuxkit-025000000001   Running             Running less than a second ago
    b4prawsu81mu        dataapp_dataservice.5   vividbreeze/docker-tutorial:version1   linuxkit-025000000001   Running             Running less than a second ago

    As you can see, the load was distributed to both VMs, no matter which role they have (swarm manager or swarm worker).

    The requests can now go either against the IP of the VM manager or the VM worker. You can obtain its IP-address of the vm-manager with

    docker-machine ip vm-manager

    Now let us fire 10 requests against vm-manager to see if our service works

    repeat 10 { curl 192.168.99.109:4000; echo }

    <?xml version="1.0" ?><result><name>hello</name><id>139</id></result>
    <?xml version="1.0" ?><result><name>hello</name><id>3846</id></result>
    <?xml version="1.0" ?><result><name>hello</name><id>149</id></result>
    <?xml version="1.0" ?><result><name>hello</name><id>2646</id></result>
    <?xml version="1.0" ?><result><name>hello</name><id>847</id></result>

    If everything is working, we should see five different kinds of responses (as five items were deployed in our swarm). The following picture describes shows how services are deployed.

    Docker Stack Deployment Process
    Docker Stack Deployment Process

    When we call docker stack deploy, the command transfers the docker-compose.yml to the swarm manager, the manager creates the services and deploys it to the swarm (as defined in the deploy-part of the docker-compose.yml). Each of the replicas (in our case 5) is called a task. Each task can be deployed on one or nodes (basically the container with the service-image is started on this node); this can be on a swarm-manager or swarm-worker. The result is depicted in the next picture.

    Docker Service Deployment
    Docker Service Deployment

    Managing the Swarm

    Dealing with a Crashed Node

    In the last tutorial, we defined a restart-policy, so the swarm-manger will automatically start a new container, in case one crashes. Let us now see what happens when we remote our worker

    docker-machine rm vm-worker1

    We can see that while the server (vm-worker1) is shutting down, new tasks are created on the vm-manager

    > docker stack ps dataservice
    ID                  NAME                    IMAGE                                  NODE                DESIRED STATE       CURRENT STATE                  ERROR               PORTS
    vc26y4375kbt        dataapp_dataservice.1       vividbreeze/docker-tutorial:version1   vm-manager          Ready               Ready less than a second ago
    kro6i06ljtk6         \_ dataapp_dataservice.1   vividbreeze/docker-tutorial:version1   vm-worker1          Shutdown            Running 12 minutes ago
    ugw5zuvdatgp        dataapp_dataservice.2       vividbreeze/docker-tutorial:version1   vm-manager          Running             Running 12 minutes ago
    u8pi3o4jn90p        dataapp_dataservice.3       vividbreeze/docker-tutorial:version1   vm-manager          Ready               Ready less than a second ago
    hqp9to9puy6q         \_ dataapp_dataservice.3   vividbreeze/docker-tutorial:version1   vm-worker1          Shutdown            Running 12 minutes ago
    iqwpetbr9qv2        dataapp_dataservice.4       vividbreeze/docker-tutorial:version1   vm-manager          Running             Running 12 minutes ago
    koiy3euv9g4h        dataapp_dataservice.5       vividbreeze/docker-tutorial:version1   vm-manager          Ready               Ready less than a second ago
    va66g4n3kwb5         \_ dataapp_dataservice.5   vividbreeze/docker-tutorial:version1   vm-worker1          Shutdown            Running 12 minutes ago

    A moment later you will see all 5 tasks running up again.

    Dealing with Increased Workload in a Swarm

    Increasing the number of Nodes

    Let us now assume that the workload on our dataservice is growing rapidly. Firstly, we can distribute the load to more VMs.

    docker-machine create --driver virtualbox vm-worker2

    docker-machine create --driver virtualbox vm-worker3

    In case we forgot the token that is necessary to join our swarm as a worker, use

    docker swarm join-token worker

    Now let us add our two new machines to the swarm

    docker-machine ssh vm-worker2 docker swarm join --token SWMTKN-1-371xs3hz1yi8vfoxutr01qufa5e4kyy0k1c6fvix4k62iq8l2h-969rhkw0pnwc2ahhnblm4ic1m 192.168.99.109:2377

    docker-machine ssh vm-worker3 docker swarm join --token SWMTKN-1-371xs3hz1yi8vfoxutr01qufa5e4kyy0k1c6fvix4k62iq8l2h-969rhkw0pnwc2ahhnblm4ic1m 192.168.99.109:2377

    As you can see when using docker stack ps dataapp, the tasks were not automatically deployed to the new VMs.

    ID                  NAME                IMAGE                                  NODE                DESIRED STATE       CURRENT STATE            ERROR               PORTS
    0rp9mk0ocil2        dataapp_dataservice.1   vividbreeze/docker-tutorial:version1   vm-manager          Running             Running 18 minutes ago
    3gju7xv20ktr        dataapp_dataservice.2   vividbreeze/docker-tutorial:version1   vm-manager          Running             Running 13 minutes ago
    wwi72sji3k6v        dataapp_dataservice.3   vividbreeze/docker-tutorial:version1   vm-manager          Running             Running 13 minutes ago
    of5uketh1dbk        dataapp_dataservice.4   vividbreeze/docker-tutorial:version1   vm-manager          Running             Running 13 minutes ago
    xzmnmjnpyxmc        dataapp_dataservice.5   vividbreeze/docker-tutorial:version1   vm-manager          Running             Running 13 minutes ago

    The swarm-manager decides when to utilise new nodes. Its main priority is to avoid disruption of running services (even when they are idle). Of course, you can always force an update, which might take some time

    docker service update dataapp_dataservice -f

    Increasing the number of Replicas

    In addition, we can also increase the number of replicas in our docker-compose.xml

    version: "3"
    services:
      dataservice:
        image: vividbreeze/docker-tutorial:version1
        deploy:
          replicas: 10
          restart_policy:
            condition: on-failure
        ports:
          - "4000:8080"

    Now rundocker stack deploy -c docker-compose.yml dataservice

    docker stack ps dataapp shows that 5 new tasks (and respectively containers) have been created. Now the swarm-manager has utilised the new VMs.

    D                  NAME                 IMAGE                                  NODE                DESIRED STATE       CURRENT STATE             ERROR               PORTS
    0rp9mk0ocil2        dataapp_dataservice.1    vividbreeze/docker-tutorial:version1   vm-manager          Running             Running 20 minutes ago
    3gju7xv20ktr        dataapp_dataservice.2    vividbreeze/docker-tutorial:version1   vm-manager          Running             Running 15 minutes ago
    wwi72sji3k6v        dataapp_dataservice.3    vividbreeze/docker-tutorial:version1   vm-manager          Running             Running 15 minutes ago
    of5uketh1dbk        dataapp_dataservice.4    vividbreeze/docker-tutorial:version1   vm-manager          Running             Running 15 minutes ago
    xzmnmjnpyxmc        dataapp_dataservice.5    vividbreeze/docker-tutorial:version1   vm-manager          Running             Running 15 minutes ago
    qn1ilzk57dhw        dataapp_dataservice.6    vividbreeze/docker-tutorial:version1   vm-worker3          Running             Preparing 3 seconds ago
    5eyq0t8fqr2y        dataapp_dataservice.7    vividbreeze/docker-tutorial:version1   vm-worker3          Running             Preparing 3 seconds ago
    txvf6yaq6v3i        dataapp_dataservice.8    vividbreeze/docker-tutorial:version1   vm-worker2          Running             Preparing 3 seconds ago
    b2y3o5iwxmx1        dataapp_dataservice.9    vividbreeze/docker-tutorial:version1   vm-worker3          Running             Preparing 3 seconds ago
    rpov7buw9czc        dataapp_dataservice.10   vividbreeze/docker-tutorial:version1   vm-worker3          Running             Preparing 3 seconds ago

    Further Remarks

    To summarise

    • Use docker-machine (as an alternative to vagrant or others) to create VMs running Docker.
    • Use docker swarm to define a cluster that can run your application. The cluster can span physical machines and virtual machines (also in clouds). A machine can either be a manager or a worker.
    • Define your application in a docker-compose.yml.
    • Use docker stack to deploy your application in the swarm.

    This again was a simple, pretty straightforward example. You can easily use docker-machine to create VMs in AWS E2 or Google Compute Engine and cloud services. Use this script to quickly install Docker on a VM.

    A quick note, please always be aware on which machine you are working. You can easily get the Docker CLI to run against a different machine with docker-machine env vm-manager.  To reverse this command use docker-machine env -u.