Schlagwort: version control

  • GIT Tutorial – Remote Repositories

    I will explain how to connect to set-up and connect to a remote repository (Bitbucket and GitHub) and how to work with these repositories. I don’t want to complicate things, hence this tutorial gives you the basic understanding of how to work with Git. Before you start, you need to generate a SSH key-pair. In the following, I will explain how to set-up a repository at Bitbucket or GitHub. You only need one remote repository, either at Bitbucket or GitHub. Both providers offer free repositories. I prefer BitBucket as it offers free private repositories, which means that no other person can access my code. Nevertheless, you can change your repositories at any time.

    Setting up a Bitbucket Repository

    Bitbucket from Atlassian offers unlimited private repositories and up to 5 users for free. First, you have to create a Bitbucket account.  At some point, you will be asked if you are „Flying solo?“ or „Plan to work with others?“. For this tutorial please choose the first. Next, I am asked to create a repository. I chose the name bb-test in this tutorial. Choose the default-options. Once your repository is created, you should see something like this.

    Bitbucket Repository

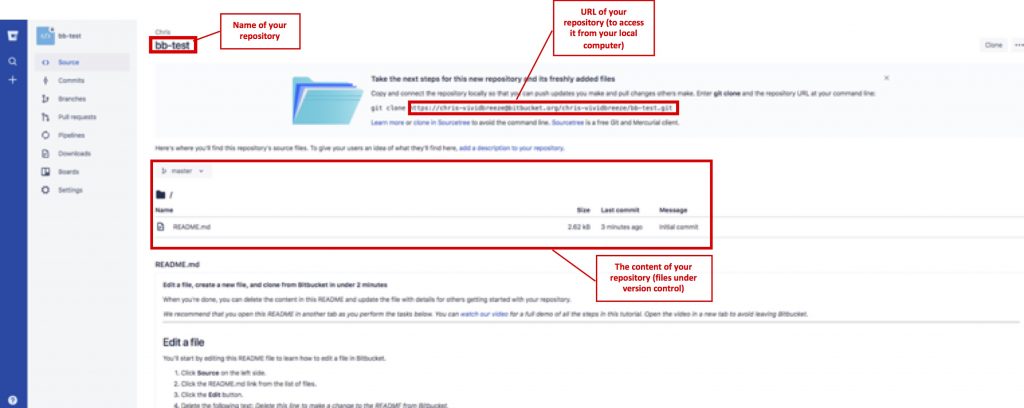
    After creating you see nothing more but an empty folder containing a README.md file. To access your Bitbucket repository you need to deposit your private key. Go to Settings → Access Key and choose Add Key. Copy your private key into your clipboard

    cat ~/.ssh/id_rsa.pub | pbcopy

    and then copy it into the Key-Textfield. As a label, you can add a name like „Chris‘ Dev Environment“ or similar (if you deposit more than one key, it helps you to distinguish them, e.g. when more people access this private repository). Below I will explain how to access this remote repository.

    Setting up a GitHub Repository

    GitHub provides unlimited free repositories for unlimited users, however, all repositories are public. That means anyone has read-access to your repository. If you want to have a private repository you have to get a paid account. Again, please set-up an account first. After a few steps, you are asked to for the name of your new repository. I chose the name gh-test in this tutorial. Also, check the box „Initialize this repository with a README“ which automatically creates a README.md in your repository.

    GitHub Repository

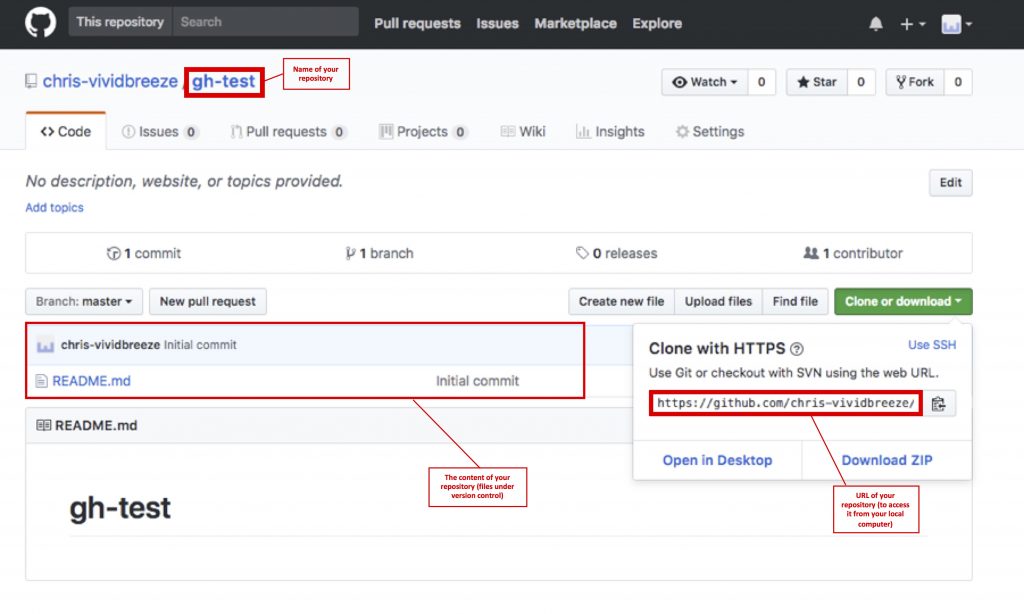
    To access your GitHub repository you need to deposit your private key. Go to Settings → Deploy key and select Add deploy key. Copy your private key into your clipboard

    cat ~/.ssh/id_rsa.pub | pbcopy

    and then copy it into the Key-Textfield. As a label, you can add a name like „Chris‘ Dev Environment“ or similar (if you deposit more than one key, it helps you to distinguish them, e.g. when more people access this private repository). Check Allow write access as we also want to push our code into this repository. Below I will explain how to access this remote repository.

    Cloning a remote repository

    Once you have created a remote repository you want to access it from your computer. You do this by cloning the remote repository using git clone with the URL (see images above) of your remote repositories. Go to an empty directory and use either:

    git clone https://chris-vividbreeze@bitbucket.org/chris-vividbreeze/bb-test.git

    for Bitbucket repository or the following line for your GitHub repository

    git clone https://github.com/chris-vividbreeze/gh-test.git

    As your free Bitbucket account can be a private repository, you have to enter your Bitbucket password (not the passphrase of your private key). The free access to GitHub offers only a public repository, so anyone can clone it without using a password.

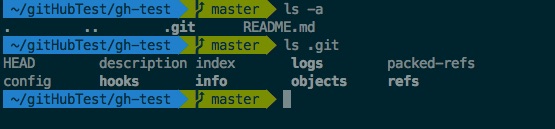
    Basically, git clone calls git init before it copies the files from the remote directory. Thus, you should now find a copy of your remote repository on your local computer. In the directory, you can also see a .git, which is a directory that contains the git-configuration. If you are using the git-Plugin in zsh (or something similar for other command shells) you should see something like this:

    git in zsh

    Alternatively, you can connect to a git Repository by the Git protocol (with no authentication) or via ssh:

    • git://[host-name][:port]/[path-to-repository]
    • ssh://[user@][host-name][:port]/[path-to-repository]

    When you used git clone, your local repository will automatically point to the remote URL is was cloned from. Hence you don’t always have to enter the URL when you push contents from the local to the remote repository. You can also add the remote repository to your local git config with

    git remote add [remote-repository-name] [remote-repository-URL]

    Working with Remote Repositories

    First, you should learn how to use git with local repositories to understand the basics. After you cloned the remote repository, changes will only be made on your local copy of the remote repository (so far). This means you are working with two independent repositories: the remote repository on the remote server and your local repository on your computer. This is contrary to SVN where there is a strong relationship between the remote repository and the working copy. This is why Git is called a distributed version control system.

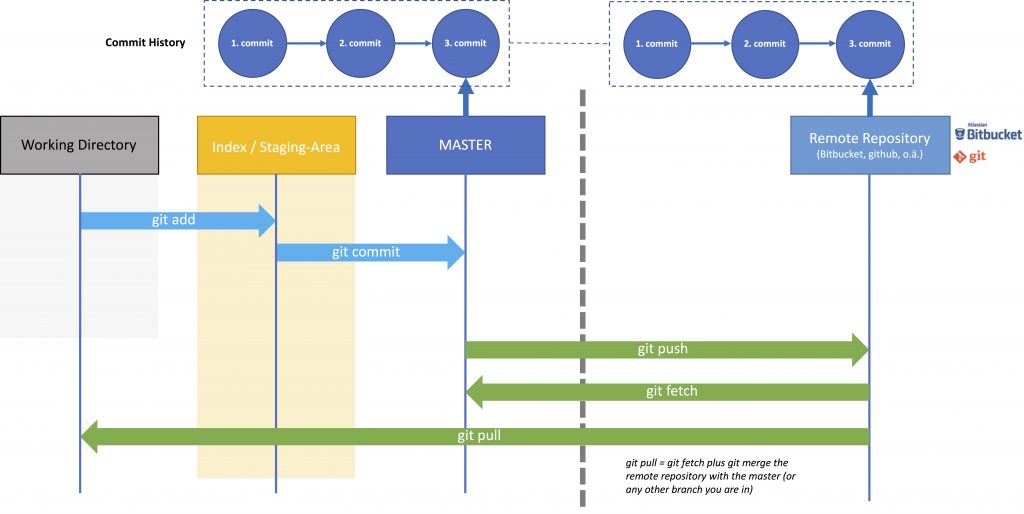
    To work with remote repositories, you mostly will use git push, git pull or git fetch.

    With git fetch you only copy the remote branch to the Local repository, it doesn’t update your Working Branch.

    With git pull you pull the remote branch and merge the contents to your current branch, i.e. you update your local branch with the remote version. git pull is basically a git fetch with a subsequent git merge. So if you Working Directory references to the Master branch (git checkout master), the Master branch will be updated. If it references a branch A (git checkout A), branch A will be updated.

    With git push you push your current local branch to your remote repository, i.e. you update the remote branch with the changes you made locally. You can also push a local branch to a remote-repository by using

    git push -u [remote-repository-name] [local-branchname]

    To delete a branch from the remote repository (e.g. after you made your changes and merged your branch into the master branch) use

    git push origin --delete [branch-name]

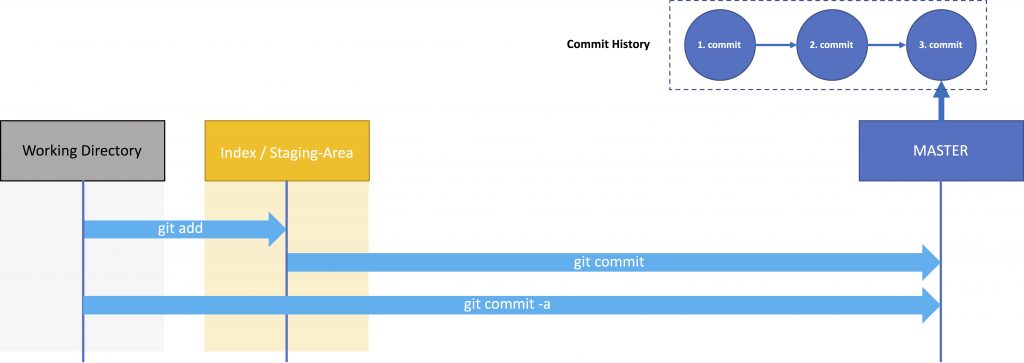
    This image shows the interaction between the remote repository, the local repository (in this case the Master) and the Working Directory.

    Git Remote Workflow
    Git Remote Workflow

    Remarks

    I recommend to get an account at Bitbucket or GitHub and experiment with Git before you are using it real projects. It sometimes can get a bit confusing to work with remote and local repositories, with remote and local branches etc. However, it’s important to understand these basics before working with others. In one of the next posts, I will take a look at different collaboration strategies.

    Further Reading

    GIT Tutorial – Basics

    GIT Tutorial – Working with Branches – Part I

    Git Branches – Working with Branches – Part II (Merge Conflicts)

    Git Branches – Working with Branches – Part III (Merging versus Rebasing)

    GIT Tutorial – Remote Repositories

  • GIT Tutorial – Basics

    Git is a distributed version control system. Distributed means, that each user has a local copy of a (remote) repository on his or her computer. I will dive right into Git using hands-on examples. In this part, I will only focus on local repositories to explain the basics. There are many ways to install git. On MacOSX I prefer using brew:

    brew install git

    Setting Up a Local Repository

    A git repository contains a history of files in your working directory (the directory that is under version control). To put a local directory under version control go into the directory and enter

    git -init

    Now this directory is your Working Directory and the Local Repository was created. If there already are files in the Working Directory they are not yet under version control. You will have to add them first by using

    git -add .
    Git Basic Workflow
    Git Basic Workflow

    With git-add ., the files are initially put in Staging Area (see image above), also called Index. The Staging Area is a container that holds all files about to be committed. You can add single files with git-add [filename].

    If you accidentally put files in your Staging Area you can remove them usegit reset (without the dot, to remove all staged files) or git reset [filename] to remove a specific file.

    To put the files from the Index to the Local Repository use

    git commit -m “[commit message]”

    You can also combine both commands by using

    git commit -a -m "[commit message]"

    The commit message is a message that describes the reason for the commit, e.g. „bug xyz fixed“ or „user story #xyz“. It’s kind of like the name for the container, which holds the collection of files you committed. Each commit creates an entry into the commit history. You can list the commit history with: git log or git log --pretty=oneline for a more compact version.

    [expand title=“Why don’t you commit each file separately, why is there a Staging Area?“]

    In general, when you add a new feature to your software, you have to add and/or change more than one files. Just imagine you want to display the gender as a new field on your website. If this data is not available in the database, you might have to change some .java, .css, .js and other files. You put all these changes together in the Staging area and commit it. The commit history (git log) is clean and clear. Later you will see that you can set the working directory to a previous commit or see the changes you have made. If in contrast, you would commit each file separately, the context (display gender on your webpage) would be lost. In addition, the commit history would be confusing. This might sound simple now, but in a real project, you would work with other team members and the same data, which would make it even more confusing.

    [/expand]

    [expand title=“What is this HEAD?“]

    As we haven’t discussed branches yet, the HEAD basically points to the latest commit in the MASTER (this is not 100% accurate but it gives you a picture).

    [/expand]

    To get a status of the files (untracked files that are not under version control, files that have changed but have not been added, files in the Index that haven’t been committed) use

    git status

    Tagging

    When you perform a git log you will notice that the commit names or references seem very cryptic, e.g.

    commit 2a21b89d44a877b1d5892ef9f12cc89bd0a871f6
    Author: chris <moser.christoph@gmx.de>
    Date: Tue Mar 20 15:39:16 2018 +0100
    
    2. Change to Master
    
    commit dadbf09b4e94c72901f68e65d1440930418eee95
    Author:chris <moser.christoph@gmx.de>
    Date: Tue Mar 20 15:38:51 2018 +0100
    
    1. Change to Master

    Maybe later you want to switch back to an earlier commit or want to see the differences between the current state and an earlier state of your software in Git. With tagging, you can give important versions of your software a name, e.g. you want to release the current version of your Working Directory in production (-a = name (tag), -m = comment)

    git tag -a v1.0 -m "First Release of your software"

    You can list all tags using git tag or git log --decorate. For more detailed information use git show [tag-name].

    The tag we created before is a so-called annotated tag. You can also use lightweight tags. These tags don’t contain much more information than a checksum (no author, comment, changes etc.).

    git tag v1.0.1

    If you want to switch to an earlier version of your code use

    git checkout [tag-name]

    If you use this command, Git will go into the so-called “detached HEAD” state (the HEAD is not pointing to the latest commit but to an earlier commit). There are ways to change earlier versions of your code, but I do not recommend it and hence will not go into detail here. I only recommend using it to look into an earlier version of your code or to deploy an older version of your software.

    With git checkout master you can get back to the latest commit to work as usual.

    If you want to see the differences between two versions use

    git diff [tag-name 1] [tag-name 2]

    or if you want to compare an earlier version with the current version use

    git diff [tag-name] master

    When you have lots of changes (which is the common case), you will use a graphical git-client, as diffs are displayed more structured.

    Configuration

    git config offers options to configure your git repository. Most settings can be applied global (parameter --global) or to your local (current) repository (parameter --local)

    • Change the author in the commit-history in all repositories with: git config --global user.name [name]
    • Change the author in the commit-history in your current local repository with: git config --local user.email [email]

    You will find more options in the Git config documentation.

    Remarks

    You just learned the basics here. I highly recommend experimenting a bit with the command line interface to become more familiar more familiar with Git. Also, have a look at the man pages to use the commands with other parameters. As people learn differently, I also suggest reading other literature than this blog post.

    Further Reading

    GIT Tutorial – Basics

    GIT Tutorial – Working with Branches – Part I

    Git Branches – Working with Branches – Part II (Merge Conflicts)

    Git Branches – Working with Branches – Part III (Merging versus Rebasing)

    GIT Tutorial – Remote Repositories