Kategorie: Configuration Management

  • How to use Ansible Roles

    In the Ansible introduction, we build a Playbook to install Jenkins from scratch on a remote machine. The Playbook was simple (for education purposes), it was designed for Debian Linux distributions (we used apt as a package manager), it just provided an out-of-the-box Jenkins (without any customisation). Thus, the Playbook is not very re-usable or configurable.

    However, if we would have made it more complex, the single-file Playbook would have become difficult to read and maintain and thus more error-prone.

    To overcome these problems, Ansible specified a directory structure where variables, handlers, tasks and more are put into different directories. This grouped content is called an Ansible Role. A Role must include at least one of these directories.

    You can find plenty of these Roles design by the Ansible community in the Ansible Galaxy. Let me show some examples to explain the concept of Ansible Roles.

    How to use Roles

    I highly recommend using popular Ansible Roles to perform provisioning of common software than writing your own Playbooks, as it might be more versatile and less error-prone, e.g. to install Java, Apache or nginxJenkins and other.

    Ansible Galaxy
    Ansible Galaxy

    Let us assume we want to install an Apache HTTP server. The most popular Role with over 300.000 downloads was written by geerlingguy, one of the most popular contributors to the Ansible Galaxy. I will jump right into the GitHub Repository of this Role.

    Firstly, you always have to install the role using the command line,

    ansible-galaxy install [role-name] e.g.

    ansible-galaxy install geerlingguy.apache

    Roles are downloaded from the Ansible Galaxy and stored locally at ~/.ansible/roles or /etc/ansible/roles/ (use ansible --version if you are not sure).

    In most cases, the README.md provides sufficient information on how to use this role. Basically, you define the hosts, on which the play is being executed, the variables to configure the role, and the role itself. In case of the Apache Role, the Playbook (ansible.yml) might look like this

    - name: Install Apache
    
      hosts: web1
    
      become: yes
      become_method: sudo
    
      vars:
        apache_listen_port: 8082
    
      roles:
        - role: geerlingguy.apache

    web1 is a server defined in the Ansible inventory, I set-up with Vagrant before. Now you can run your Ansible Playbook with

    ansible-playbook apache.yml

    In a matter of seconds, Apache should become available at http://[web1]:8082 (in my case: http://172.28.128.3:8082/).

    Since Ansible 2.4 you can also include Roles as simple tasks. The example above would look like this

    - name: Install Apache
    
      hosts: web1
    
      become: yes
      become_method: sudo
    
      tasks:
      - include_role:
           name: geerlingguy.apache
        vars:
           apache_listen_port: 8082

    A short Look inside a Role

    I won’t go too much into how to design Roles, as the Ansible documentation already provides a good documentation. Roles must include at least one of the directories, mentioned in the documentation. In reality, they look less complex, e.g. the Apache Ansible Role we used in this example, looks like

    Directory Structure of Ansible Role to install Apache
    Directory Structure of Ansible Role to install Apache

    The default-variables including a documentation are defined in defaults/main.yml, the tasks to install Apache can be found in /tasks/main.yml, that in turn calls the OS-specific Playbooks for RedHat, Suse, Solaris and Debian.

    Further Remarks

    Ansible Roles give good examples of how to use Ansible Playbooks in general. So if you are new to Ansible and want to understand some of the concepts in more detail, I recommend having a look at the Playbooks in the Ansible Galaxy.

    As mentioned above, I highly recommend using pre-defined roles for installing common software packages. In most cases, it will give you fewer headaches, especially if these Roles are sufficiently tested, which can be assumed for the most popular ones.


  • Installing Jenkins in AWS using Vagrant and Ansible

    This tutorial builds up upon the previous introductions to Vagrant and Ansible. Firstly, we will set up a Vagrant Box with Amazon Web Services (AWS). Subsequently, we will use the Ansible script to configure Jenkins in this Box, using the same Playbook as in the previous blog post.

    Prerequisites

    Setting up an AWS Account

    I assume that you have no AWS account yet. Please register for an AWS account and choose the Basic Plan. If you are new to AWS, Amazon provides a so-called AWS Free Tier that lets you test AWS for 12 months.

    The web-interface can be very confusing at times as AWS is a powerful tool that provides tons of services.  Here we will solely focus on the Elastic Compute Cloud (EC2). Before you configure our Vagrantfile, we will have to set-up AWS. For the sake of simplicity and focus, I will only get into details if necessary.

    Create a new Access Key

    First of all, we need to create an access key. It is not recommended, to work with the root security credentials, as they give full access to your AWS account. Please add a new user using the IAM console (Identity and Access Management).  I added a user named vagrant-user with Programmatic Access. I add this user to a group I call admin and give this group AdministratorAccess (we can change this later).

    AWS Add User
    AWS Add User

    After the user was successfully added, I retrieve the Access Key ID and the Secret Access Key. Please store this information as it won’t be available again. These credentials are needed to create a new EC2 instance with Vagrant.

    Create a new Key Pair

    A new Key-Pair can be created in the EC2 console (Services -> EC2 -> Key Pairs). This Key-Pair is used for SSH access to your EC2 instance, once the instance was created. I choose the name vagrant-key.

    AWS Generate KeyPair
    AWS Create a new Key Pair

    The public key will be stored in AWS, the private key file is automatically downloaded (in this case vagrant-key.pem). Store this key in a safe place and set permission to read-only for the current user (chmod 400 vagrant-key.pem).

    Creating a Security Group

    Next, we have to create a Security Group to allow an SSH (and optionally an HTTP) connection to the EC instance. The connection to the EC2 instance will be created when the EC2 instance is created by Vagrant. You can use the default-group that should already exist or create a new group. I will create a group called vagrant-group and allow SSH and HTTP from anywhere (inbound-traffic).

    Creating a AWS Security Group
    Creating an AWS Security Group

    Choose an Image

    Images in EC2 are called AMI (Amazon Machine Image) and are identified by an ID (e.g. ami-8c122be9). The IDs are region-specific, i.e. not every image is available in any region. This is important as you will set the AMI and the region in the provider configuration in your Vagrantfile later, and you will run into errors if the AMI is not available in your region.

    You will find a list of the available images and their IDs when you launch a new EC2 instance.

    My AWS account is in the us-east-2 region (the region will show up in your EC2 dashboard) and I choose the image Ubuntu Server 16.04 LTS (HVM), SSD Volume Type with the IDami-5e8bb23b (as we used an Ubuntu distribution for our VirtualBox in the Vagrant tutorial). We need this information later in our Vagrantfile.

    Preparing Vagrant

    Adding the Vagrant AWS Provider

    As Vagrant doesn’t come with a built-in AWS provider, it has to be installed manually as a plugin

    vagrant plugin install vagrant-aws

    To check if the plugin was successfully installed use (the plugin should appear in the list)

    vagrant plugin list

    Adding a Vagrant Dummy Box

    The definition of a Vagrant box is mandatory in the Vagrantfile. If you work with AWS you will use Amazon Machine Images (as mentioned above). Hence, the definition of a Vagrant box is only a formality. For this purpose, the author of the AWS plugin for Vagrant has created a dummy-box. To add this box to Vagrant use:

    vagrant box add aws-dummy https://github.com/mitchellh/vagrant-aws/raw/master/dummy.box

    Vagrant Configuration

    I will now use the information I collected above to populate the Vagrantfile

    Vagrant.configure("2") do |config|
    
        config.vm.box = "aws-dummy"
    
        config.vm.provider :aws do |aws, override|
    
           aws.access_key_id = "AKIAJZ3GLCDOCOSTQKZA"
           aws.secret_access_key = "8AbPIrAXP8r14+SqCiM/9kXsvYzqxh9e27+NDoRQ"
           aws.keypair_name = "vagrant-key"
    
           aws.region = "us-east-2"
           aws.instance_type = "t2.micro"
           aws.ami = "ami-5e8bb23b"
    
           aws.security_groups = ['vagrant-group']
    
           # https://github.com/mitchellh/vagrant-aws/issues/365
           config.vm.synced_folder ".", "/vagrant-test", disabled: true
    
           override.ssh.username = "ubuntu"
           override.ssh.private_key_path = "./vagrant-test.pem"
    
           config.vm.provision "shell", inline: "which python || sudo apt -y install python"
    
       end
    
    end
    

    When launching the instance, I encountered the problem that I was asked for SMB credentials (on MacOS!). I solved this problem by disabling folder-sync as mentioned in the support forum.

    config.vm.synced_folder ".", "/vagrant-test", disabled: true

    The ssh-username depends on the AMI, for the selected Ubuntu-AMI, the username is „ubuntu“, for the Amazon Linux 2 AMI (HVM), SSD Volume Type (ami-8c122be9), it is „ec2-user“.

    In addition, I install Python as a pre-requisite for Ansible

    config.vm.provision "shell", inline: "which python || sudo apt -y install python"
    

    As for instance type I chose a small t2.micro instance (1 Virtual CPU, 1 GB RAM), that is included in the AWS Free Tier.

    Launching the EC2 Instance

    To launch the instance, use

    vagrant up --provider=aws

    In the console, you should see an output similar to

    Bringing machine 'default' up with 'aws' provider...
    ==> default: Warning! The AWS provider doesn't support any of the Vagrant
    ==> default: high-level network configurations (`config.vm.network`). They
    ==> default: will be silently ignored.
    ==> default: Launching an instance with the following settings...
    ==> default: -- Type: t2.micro
    ==> default: -- AMI:ami-5e8bb23b
    ==> default: -- Region: us-east-2
    ==> default: -- Keypair: vagrant-key
    ==> default: -- Security Groups: ["vagrant-group"]
    ==> default: -- Block Device Mapping: []
    ==> default: -- Terminate On Shutdown: false
    ==> default: -- Monitoring: false
    ==> default: -- EBS optimized: false
    ==> default: -- Source Destination check:
    ==> default: -- Assigning a public IP address in a VPC: false
    ==> default: -- VPC tenancy specification: default
    ==> default: Waiting for instance to become "ready"...
    ==> default: Waiting for SSH to become available...
    ==> default: Machine is booted and ready for use!

    If you encounter any problems, you can call vagrant up in debug-mode

    vagrant up --provider=aws --debug

    You know should be able to see the EC2 instance in the EC2 console in the state running. The security group we created earlier (vagrant-should) should have been linked. In this view, you can also retrieve the public DNS and IP address to access this instance from the Internet.

    AWS EC2 Instance Overview
    AWS EC2 Instance Overview

    You can now access the instance using

    vagrant ssh

    In addition, you can log into your EC2 instance using SSH and your DNS

    ssh -i "vagrant-key.pem" ubuntu@ec2-18-191-42-181.us-east-2.compute.amazonaws.com

    For a more detailed explanation, just choose your running instance and click on the Connect button (in the Instance Overview Page displayed above).

    Installing Jenkins

    One way to use the Ansible Playbook to provision the EC2 instance with Jenkins is to include it as an Ansible Provisioner in the Vagrantfile

    config.vm.provision "ansible" do |ansible|
        ansible.playbook = "playbook.yml"
    end

    Another way is to include the EC2 instance in the Inventory of Ansible (/etc/ansible/hosts ).

    TASK [Update apt packages] ************************************************************
    web1 ansible_host=127.0.0.1 ansible_user=vagrant ansible_port=2200
    web2 ansible_host=127.0.0.1 ansible_user=vagrant ansible_port=2222
    ec2 ansible_host=18.191.42.181 ansible_user=ubuntu

    Subsequently, add the ec2 host to our Ansible Playbook, we created in the Ansible tutorial

    name: Install Jenkins software
     hosts: web1, web2, ec2
     gather_facts: true
     become: yes
     ...

    To run the Playbook use

    ansible-playbook -l ec2 jenkins.yml

    If everything works smoothly, Jenkins should now be installed on your EC2 instance.

    If you run into an authentification error (access denied) you might have to add the public SSH key of your EC2 instance to the authentication agent with

    ssh-add vagrant-key.pem

    Before you can access Jenkins you have to allow an inbound connection on port 8080 in the Security Group vagrant-group (we previously created).

    Opening Port 8080 to access Jenkins
    Opening Port 8080 to access Jenkins

    If you now call the URL (or IP address) of the EC2 instance in your browser on Port 8080, you should see the Jenkins installation-screen. Voilà.

    http://ec2-18-191-42-181.us-east-2.compute.amazonaws.com:8080/login?from=%2F
    Jenkins Installation Screen
    Jenkins Installation Screen

    Further Remarks

    Of course, there are more elegant ways to construct the Vagrantfile, e.g. by reading the credentials from environment variables or from ~/.aws. I have chosen this format for sake of simplicity. There are also many more configuration options than describe here. Please have a further look at the vagrant-aws documentation.

    Make sure to destroy your EC2 instance when you don’t need it anymore, as it will consume your credits. The Billing Dashboard provides a good summary of your usage.

  • Ansible in a Nutshell

    With Ansible you can configure (aka provision) remote machines by using a simple text file. It uses so-called Playbooks to execute a set of commands on the remote machine. So instead of having a dedicated person executing a set of commands on each machine, with Ansible, this configuration can be collaboratively worked-on, reviewed, versioned and reused. You do not need to update a documentation for setting up your environment elsewhere, as the Playbook is the documentation.

    There are other configuration-tools than Ansible, such as Chef or Puppet. Ansible does not require an agent running on the machines it configures. It only needs an ssh-access to the remote machines. In addition, the remote-machines need to have Python running.

    Prerequisites

    In this tutorial, we will configure one of the two machines, we set-up in the previous tutorial. In the tutorial, we copied the public keys of our local machine to the authorized_keys of the remote machines. Hence our local machine is allowed to access the remote machines using ssh – in my case

    ssh vagrant@127.0.0.1 -p2200

    ssh vagrant@127.0.0.1 -p2222

    (or any other user-name and IP-address and port to establish an ssh-connection to your machines)

    Next, install Ansible on your machine (please consult the Installation Guide). I installed Ansible globally using

    sudo python get-pip.py
    sudo pip install ansible
    
    As a prerequisite, you need to install python before. I used brew
    brew install python

    Subsequently, introduce the remote machines to ansible to adding them to /etc/ansible/hosts (aka Inventory in Ansible terminology). If you can’t find your inventory, please have a look here.

    web1 ansible_host=127.0.0.1 ansible_user=vagrant ansible_port=2200
    web2 ansible_host=127.0.0.1 ansible_user=vagrant ansible_port=2222

    You can also use the YAML-notation:

    all:
      hosts:
        web1:
          ansible_host: 127.0.0.1
          ansible_port: 2200
          ansible_user: vagrant
        web2:
          ansible_host: 127.0.0.1
          ansible_port: 2222
          ansible_user: vagrant


    I had some problems when tabs and spaces for indention are mixed in the configuration. I used spaces instead and it works fine.  Please refer to the Ansible Documentation for more details on the Inventory.

    To see if everything works correctly let us ping the remote machines using Ansible

    ansible all -m ping or ansible all -m ping -u [user-name]

    If everything runs correctly, you should see something like

    web2 | SUCCESS => {
    "changed": false,
    "ping": "pong"
    }
    web1 | SUCCESS => {
    "changed": false,
    "ping": "pong"
    }

    You can now execute commands on the remote machine, e.g.

    ansible all -a "/bin/echo hello”

    As a result, you should see something like

    web2 | SUCCESS | rc=0 >>
    hello
    
    web1 | SUCCESS | rc=0 >>
    hello

    Playbooks

    As mentioned above, Ansible Playbooks are simple text-files in a YAML-syntax. A Playbook contains how a remote-machine should be configured (provisioned).

    • A Playbook consists of one or more Plays.
    • Each Play contains a set of Tasks that are executed on the remote machine.
    • Each task calls an Ansible Module (command). There are simple modules (tasks) to copy files from one location to another or to install software on the remote machine etc. I will focus on a simple set of commands to configure a Jenkins on one remote machine and … on the others. For more on tasks (modules) please refer to the Ansible documentation.

    You can easily set-up Jenkins using predefined Ansible Roles. I will come to this later. Here, I want to explain the basic structure of a Playbook (jenkins.yml). I will go to the different parts of the example in the next chapters.

    - name: Install Jenkins
      hosts: web1, web2
      gather_facts: true
      become: yes
      become_method: sudo
      vars:
        jenkins_port: 8080
    
      tasks:
    
        - name: Populate Service facts
          service_facts:
    
        - debug:
          # var: ansible_facts.services
    
        - name: Stop Jenkins Service
          service:
            name: jenkins
            state: stopped
          when: "'jenkins' in ansible_facts.services"
    
        - name: Clean-Up previous installation
          package:
            name: '{{ item }}'
            state: absent
          loop:
            - jenkins
            - openjdk-8-jdk
            - git
            - wget
    
        - name: Install dependencies
          package:
            name: '{{ item }}'
            state: latest
          loop:
            - openjdk-8-jdk
            - git
            - wget
    
        - name: Download jenkins repo
          apt_repository:
            repo: deb https://pkg.jenkins.io/debian-stable binary/
            state: present
    
        - name: Import Jenkins CI key
          apt_key:
            url: https://pkg.jenkins.io/debian/jenkins-ci.org.key
    
        - name: Update apt packages
          apt:
            upgrade: yes
            update_cache: yes
    
        - name: Install Jenkins
          apt:
            name: jenkins
            state: present
            allow_unauthenticated: yes
    
        - name: Allow port {{jenkins_port}}
          shell: iptables -I INPUT -p tcp --dport {{jenkins_port}} -m state --state NEW,ESTABLISHED -j ACCEPT
    
        - name: Start the server
          service:
            name: jenkins
            state: started
    
        - name: Waiting for Service to start
          wait_for:
            port: 8080


    Basic Configuration

    - name: Install Jenkins software
      hosts: web1, web2

    All Plays in Ansible can start with a minus (), often followed by a name-parameter (optional) or an Ansible Module (command). The name-parameter shows in the log which play is currently executed. So I recommend it for debugging, but also for documentation.

    The hosts-parameter defines on which hosts in Inventory the Playbook should be executed (in this case web1). You can also add the remote-user that runs the modules in the playbook be specifying the remote_user-parameter (e.g. remote_user: root).

    You can execute the whole playbook or specific commands (like the ones below) as a specific user. In this case use become_method or become_user. In this example, we will install Jenkins as superuser.

    become: yes
    become_method: sudo

    The next part of the Playbook are the tasks that will be executed on the remote machines.

    Installation of prerequisite packages

    To run Jenkins with the desired configuration, we need Java 8 and git on the machine, as well as wget to load the Jenkins packages. We will use the Ansible module Package as a generic package manager. In addition, I will introduce the concept of standard loops.

    - name: Install dependencies
          package:
            name: '{{ item }}'
            state: latest
          loop:
            - openjdk-8-jdk
            - git
            - wget

    The Package module uses two mandatory parameters

    • the name defines the name or the name and version of the package
    • the state defines if the packages should be installed or removed or the state of the underlying package module (here apt)

    The parameter name gets the value '{{ item }}'. The curly braces tell Ansible that is get the values from the next loop block.  Here we will put the names of the packages to install. For more on loops, please consult the documentation.

    Installation of Jenkins

    The basic package manager we used above, won’t offer enough flexibility. Hence, as we will be installing Jenkins on a Debian environment, we will use the Module for the Debian package manager APT (Advanced Package Tool).

    The package information for Jenkins can be found in the corresponding Debian Repository for Jenkins.

    - name: Download jenkins repo
      apt_repository: 
         repo: deb https://pkg.jenkins.io/debian-stable binary/
         state: present

    The Ansible Module apt_repository adds an APT repository in Debian. We add the latest stable Debian Repository for Jenkins.

    - name: Import Jenkins CI key 
      apt_key:
         url: https://pkg.jenkins.io/debian/jenkins-ci.org.key

    To be able to use the repository, we need to add the corresponding key. We use the Ansible Module apt_key.

    - name: Update apt packages
      apt:
        upgrade: yes
        update_cache: yes

    Before you install Jenkins, you might want to update the package lists (for upgrades or new packages).

    - name: Install Jenkins
      apt:
         name: jenkins
         state: present

    Now we can finally download and install the Debian Jenkins package using the Ansible Module apt.

    Configuration the Network

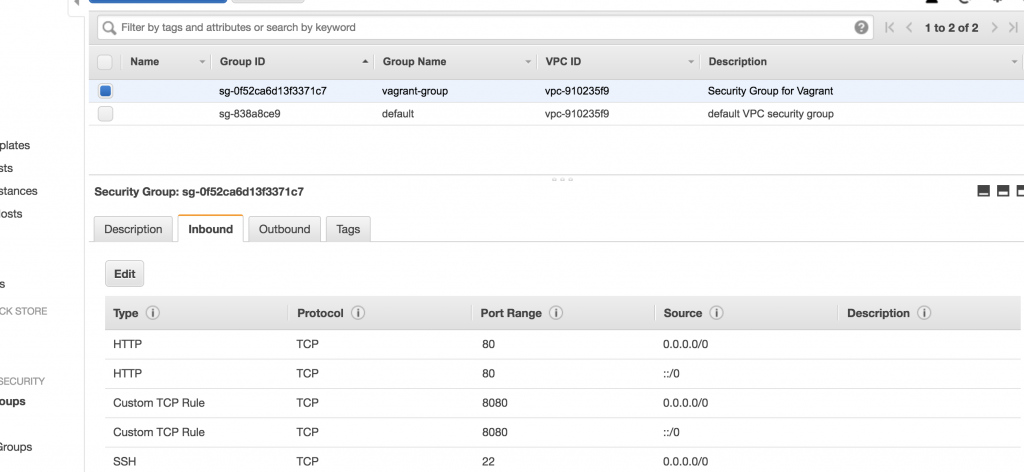
    By default, the Jenkins web interface listens on port 8080. This port has to be accessible from outside the Virtual Machine. Hence, we add a new rule to our iptables by executing a simple shell command.

    - name: Allow port 8080
      shell: iptables -I INPUT -p tcp --dport 8080 -m state --state NEW,ESTABLISHED -j ACCEPT

    Starting the Service

    Finally, we need to start the Jenkins service. Here we can simply use the generic Ansible Module service.

    - name: Start the Service 
      service:
         name: jenkins
         state: started

    Waiting for the Service to run

    The Ansible Module wait_for waits for a condition to continue with the Playbook. In this simple case, we wait for the port to become available.

    - name: Waiting for Jenkins to become available
      wait_for:
         port: 8080

    Idempotency

    Playbooks should be idempotent, i.e. each execution of a Playbook should have the same effect, no matter how often it is executed. Ansible (of course) if not able to verify idempotency, hence you are responsible, e.g. for checking if a task has already been executed. I this example, I will clean-up the packages I want to install first.

    I make use of the ansible_facts.services that contains state information of services on the remote machine. However, I have to populate this variable first by calling the Ansible Module service_facts.

    - name: Populate Service facts
       service_facts:

    To see the contents of services in service_facts use

    - debug:
       var: ansible_facts.services

    Conditionals

    I will shortly introduce conditionals in Ansible, using the when-statement.

    - name: Stop Jenkins Service
      service:
        name: jenkins
        state: stopped
      when: "'jenkins' in ansible_facts.services"

    Basically, I only execute a command (Ansible module) if the when-condition is true.

    In this case, I only stop the service called jenkins, when I can find the service named jenkins in the ansible_facts.services variable (so the service is up and running). Of course, there are different ways to do this – I found this the most elegant.

    Removing previously installed packages

    I clean-up I will further un-install previously installed packages, as I will cleanly install them again below. I use this with caution, as it might not necessarily work, as the Linux distribution might have installed some of the packages using different package managers.

    - name: Clean-Up previous installation
       package:
         name: '{{ item }}'
         state: absent
       loop:
         - jenkins
         - openjdk-8-jdk
         - git
         - wget

    Remarks about Idempotency

    The example above can lead to problems if you use other Ansible Playbooks (or other configuration management tools) on the same machine, or configure the machine manually. Hence, I recommend, only using a single source of truth (way) to configure your remote machine.

    Variables

    As mentioned above, you make use of conditions in your Playbook. These conditions are often based on the state of variables in Ansible. The following command will list the system variables you can use, such as the Unix distribution and version, network configurations, public keys etc.)

    ansible [server-name] -m setup, e.g. ansible web1 -m setup

    You can also define your own variables in a Playbook

    vars:
        jenkins_port: 8080

    and access them using the {{}} notation, I mentioned above (for loops)

    - name: Allow port {{jenkins_port}}
      shell: iptables -I INPUT -p tcp --dport {{jenkins_port}} -m state --state NEW,ESTABLISHED -j ACCEPT

    For more on variables, please consult the Ansible documentation.

    Running the Playbook

    Once you created the Playbook, you can check it with

    ansible-playbook --syntax-check jenkins.yml

    To find out which servers are affected by the Playbook use

    To find out, which hosts are affected by a Playbook, use

    ansible-playbook jenkins.yml --list-hosts

    If everything is correct, you can run the Playbook with

    ansible-playbook jenkins.yml

    For a more detailed output, use

    ansible-playbook jenkins.yml --verbose

    If you want to run several threads use (10 Threads). This is useful to simultaneously run configurations on many different machines, without having to wait for commands to finish on one machine.

    ansible-playbook playbook.yml -f 10

    You can also limit the subset of servers, on which the Playbook should be executed (the name of the servers have to be included in the hosts-parameter of the Playbook.

    ansible-playbook -l web2 jenkins.yml

    Please consult the Ansible documentation for more information on how to use ansible-playbook.

    Execution Order

    Each Task has a name, e.g. “Install Jenkins software”, “Update Software Package Repository” etc. The names are shown when you run a Playbook (especially for debugging purposes).

    The tasks in a Playbook are executed in the following order:

    • Task 1 on Machine 1
    • Task 1 on Machine 2

    If one task can’t be executed on a remote machine, the whole Playbook will be excluded from further execution on this machine. This will not affect the other machines.

    Calling Jenkins

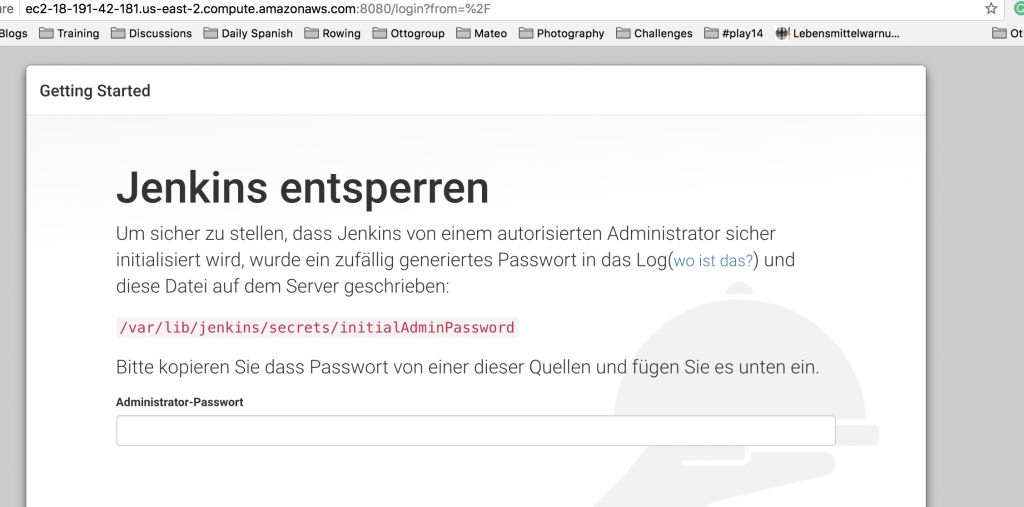
    So now you should be able to call Jenkins in your web browser, using the IP address of the remote machine. You will find the address if you open a secure shell to your machine (in my case ssh vagrant@127.0.0.1 -p2200). You can obtain the IP address by executing ifconfig. In my case, I can access Jenkins calling http://172.28.128.9:8080/ in a web-browser. The rest should be straight-forward.

    You can retrieve the initial admin password for Jenkins by logging into the Jenkins server

    sudo cat /var/lib/jenkins/secrets/initialAdminPassword

    On a side-note – if you don’t always want to type in your ssh password with every login you can store it in the SSH authentication agent.

    ssh-add ~/.ssh/id_rsa

    Configuring Jenkins

    When you search for Jenkins in the Ansible documentation you will find some Ansible Modules that can be used to configure Jenkins. The modules use the Jenkins Remote Access API), so you will configure Jenkins after it is up and running.

    Miscellaneous

    Ansible Roles

    One strength that will become useful is the use of so-called Ansible Roles. I would define a Role as a reusable set of Playbooks. For example, people already wrote re-usable Ansible Roles to install and configure Jenkins on a host (in a more extensible way I used in this example). I will use Ansibles Roles in a blog-post to follow.

    Handlers

    Another interesting concept are Ansible Handlers, i.e. if a state changes, a set of tasks can be performed, e.g. if a configuration has changed within an Ansible Playbook, a service is being restarted. Using handlers is a good practice to ensure idempotency.

    Tags

    Tags are markers on Plays or Tasks that can be explicity executed or omitted when running an Ansible Playbook. I can tag the parts of our Playbook that do the clean-up:

    - name: Populate Service facts
         service_facts:
         tags:
           cleanup
    
    - name: Stop Jenkins Service
         service:
           name: jenkins
           state: stopped
         when: "'jenkins' in ansible_facts.services"
         tags: 
           cleanup
    
    - name: Clean-Up previous installation
         package:
           name: '{{ item }}'
           state: absent
         loop:
           - jenkins
           - openjdk-8-jdk
           - git
           - wget
         tags: 
           cleanup
    

    If I only want to call the Ansible Plays tagged with cleanup, I run the Playbook with

    ansible-playbook jenkins.yml --tags cleanup
    

    In contrast, if I want to skip the Ansible Plays tagged with cleanup, I run the Playbook with

    ansible-playbook jenkins.yml --skip-tags cleanup

    Further Remarks

    If you have configured systems by executing a set of commands by hand you might have noticed that it can be a tedious work. Especially if you are not familiar with the command shell or Unix In general, you might run into a lot of trial-and-error that leave the system in an inconsistent and possibly insecure state.

    Of course, editing and testing a configuration in an Ansible Playbook can also be time-consuming and frustrating. However, by using a Playbook, you have a documented way of how you configured your system. An Ansible Playbook can be written in collaboration with others, it can be reviewed by others and serves as a documentation. In addition, Ansible Playbooks are re-usable. This means I can use a Playbook to configure several environments.

    Hence, I highly recommend Ansible or similar tools for configuration (provisioning), such as Chef, SaltStack, Puppet or other configuration management tools.