This tutorial builds up upon the previous introductions to Vagrant and Ansible. Firstly, we will set up a Vagrant Box with Amazon Web Services (AWS). Subsequently, we will use the Ansible script to configure Jenkins in this Box, using the same Playbook as in the previous blog post.
Prerequisites
Setting up an AWS Account
I assume that you have no AWS account yet. Please register for an AWS account and choose the Basic Plan. If you are new to AWS, Amazon provides a so-called AWS Free Tier that lets you test AWS for 12 months.
The web-interface can be very confusing at times as AWS is a powerful tool that provides tons of services. Here we will solely focus on the Elastic Compute Cloud (EC2). Before you configure our Vagrantfile, we will have to set-up AWS. For the sake of simplicity and focus, I will only get into details if necessary.
Create a new Access Key
First of all, we need to create an access key. It is not recommended, to work with the root security credentials, as they give full access to your AWS account. Please add a new user using the IAM console (Identity and Access Management). I added a user named vagrant-user with Programmatic Access. I add this user to a group I call admin and give this group AdministratorAccess (we can change this later).
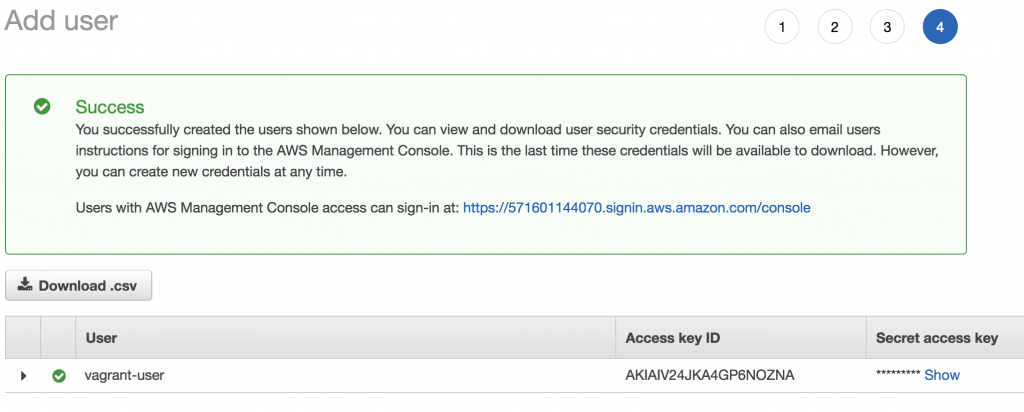
After the user was successfully added, I retrieve the Access Key ID and the Secret Access Key. Please store this information as it won’t be available again. These credentials are needed to create a new EC2 instance with Vagrant.
Create a new Key Pair
A new Key-Pair can be created in the EC2 console (Services -> EC2 -> Key Pairs). This Key-Pair is used for SSH access to your EC2 instance, once the instance was created. I choose the name vagrant-key.
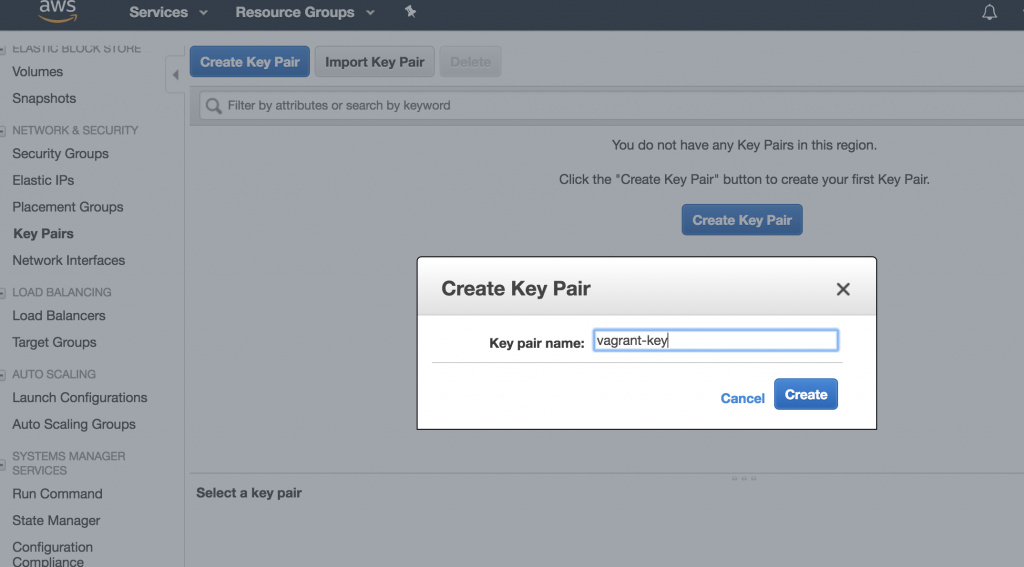
The public key will be stored in AWS, the private key file is automatically downloaded (in this case vagrant-key.pem). Store this key in a safe place and set permission to read-only for the current user (chmod 400 vagrant-key.pem).
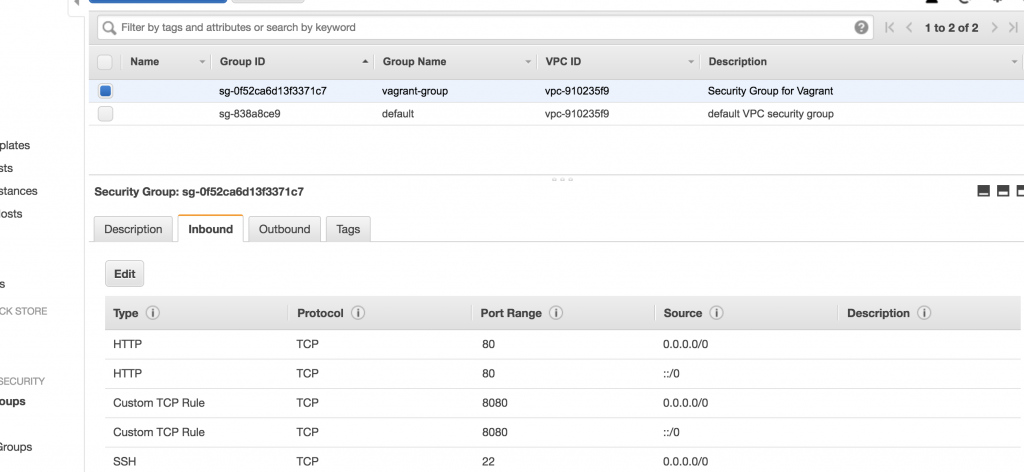
Creating a Security Group
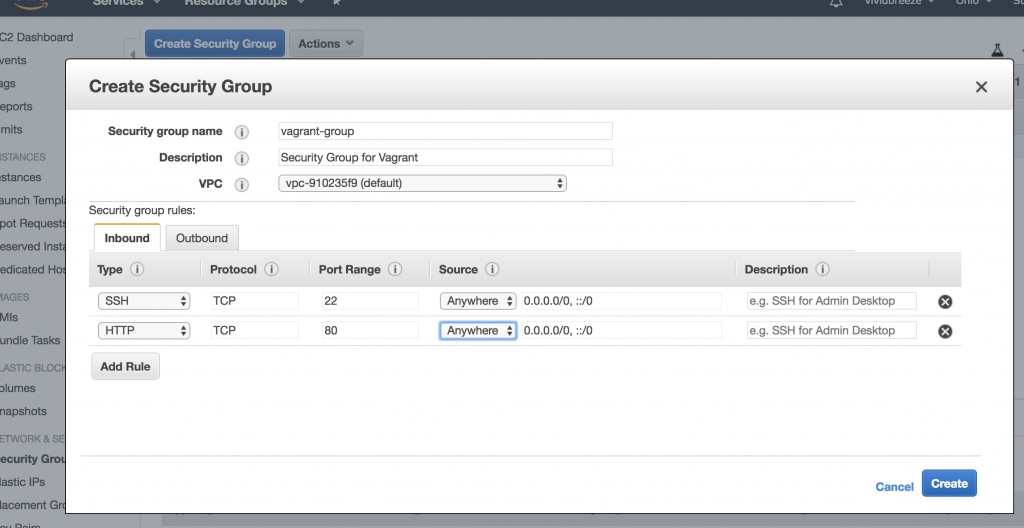
Next, we have to create a Security Group to allow an SSH (and optionally an HTTP) connection to the EC instance. The connection to the EC2 instance will be created when the EC2 instance is created by Vagrant. You can use the default-group that should already exist or create a new group. I will create a group called vagrant-group and allow SSH and HTTP from anywhere (inbound-traffic).
Choose an Image
Images in EC2 are called AMI (Amazon Machine Image) and are identified by an ID (e.g. ami-8c122be9). The IDs are region-specific, i.e. not every image is available in any region. This is important as you will set the AMI and the region in the provider configuration in your Vagrantfile later, and you will run into errors if the AMI is not available in your region.
You will find a list of the available images and their IDs when you launch a new EC2 instance.
My AWS account is in the us-east-2 region (the region will show up in your EC2 dashboard) and I choose the image Ubuntu Server 16.04 LTS (HVM), SSD Volume Type with the IDami-5e8bb23b (as we used an Ubuntu distribution for our VirtualBox in the Vagrant tutorial). We need this information later in our Vagrantfile.
Preparing Vagrant
Adding the Vagrant AWS Provider
As Vagrant doesn’t come with a built-in AWS provider, it has to be installed manually as a plugin
vagrant plugin install vagrant-aws
To check if the plugin was successfully installed use (the plugin should appear in the list)
vagrant plugin list
Adding a Vagrant Dummy Box
The definition of a Vagrant box is mandatory in the Vagrantfile. If you work with AWS you will use Amazon Machine Images (as mentioned above). Hence, the definition of a Vagrant box is only a formality. For this purpose, the author of the AWS plugin for Vagrant has created a dummy-box. To add this box to Vagrant use:
vagrant box add aws-dummy https://github.com/mitchellh/vagrant-aws/raw/master/dummy.box
Vagrant Configuration
I will now use the information I collected above to populate the Vagrantfile
Vagrant.configure("2") do |config|

    config.vm.box = "aws-dummy"

    config.vm.provider :aws do |aws, override|

       aws.access_key_id = "AKIAJZ3GLCDOCOSTQKZA"
       aws.secret_access_key = "8AbPIrAXP8r14+SqCiM/9kXsvYzqxh9e27+NDoRQ"
       aws.keypair_name = "vagrant-key"

       aws.region = "us-east-2"
       aws.instance_type = "t2.micro"
       aws.ami = "ami-5e8bb23b"

       aws.security_groups = ['vagrant-group']

       # https://github.com/mitchellh/vagrant-aws/issues/365
       config.vm.synced_folder ".", "/vagrant-test", disabled: true

       override.ssh.username = "ubuntu"
       override.ssh.private_key_path = "./vagrant-test.pem"

       config.vm.provision "shell", inline: "which python || sudo apt -y install python"

   end

end
When launching the instance, I encountered the problem that I was asked for SMB credentials (on MacOS!). I solved this problem by disabling folder-sync as mentioned in the support forum.
config.vm.synced_folder ".", "/vagrant-test", disabled: true
The ssh-username depends on the AMI, for the selected Ubuntu-AMI, the username is „ubuntu“, for the Amazon Linux 2 AMI (HVM), SSD Volume Type (ami-8c122be9), it is „ec2-user“.
In addition, I install Python as a pre-requisite for Ansible
config.vm.provision "shell", inline: "which python || sudo apt -y install python"
As for instance type I chose a small t2.micro instance (1 Virtual CPU, 1 GB RAM), that is included in the AWS Free Tier.
Launching the EC2 Instance
To launch the instance, use
vagrant up --provider=aws
In the console, you should see an output similar to
Bringing machine 'default' up with 'aws' provider...
==> default: Warning! The AWS provider doesn't support any of the Vagrant
==> default: high-level network configurations (`config.vm.network`). They
==> default: will be silently ignored.
==> default: Launching an instance with the following settings...
==> default: -- Type: t2.micro
==> default: -- AMI:ami-5e8bb23b
==> default: -- Region: us-east-2
==> default: -- Keypair: vagrant-key
==> default: -- Security Groups: ["vagrant-group"]
==> default: -- Block Device Mapping: []
==> default: -- Terminate On Shutdown: false
==> default: -- Monitoring: false
==> default: -- EBS optimized: false
==> default: -- Source Destination check:
==> default: -- Assigning a public IP address in a VPC: false
==> default: -- VPC tenancy specification: default
==> default: Waiting for instance to become "ready"...
==> default: Waiting for SSH to become available...
==> default: Machine is booted and ready for use!
If you encounter any problems, you can call vagrant up in debug-mode
vagrant up --provider=aws --debug
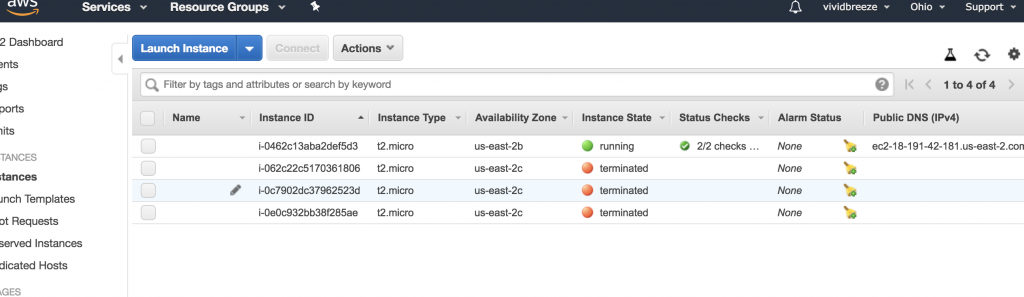
You know should be able to see the EC2 instance in the EC2 console in the state running. The security group we created earlier (vagrant-should) should have been linked. In this view, you can also retrieve the public DNS and IP address to access this instance from the Internet.
You can now access the instance using
vagrant ssh
In addition, you can log into your EC2 instance using SSH and your DNS
ssh -i "vagrant-key.pem" ubuntu@ec2-18-191-42-181.us-east-2.compute.amazonaws.com
For a more detailed explanation, just choose your running instance and click on the Connect button (in the Instance Overview Page displayed above).
Installing Jenkins
One way to use the Ansible Playbook to provision the EC2 instance with Jenkins is to include it as an Ansible Provisioner in the Vagrantfile
config.vm.provision "ansible" do |ansible|
    ansible.playbook = "playbook.yml"
end
Another way is to include the EC2 instance in the Inventory of Ansible (/etc/ansible/hosts ).
TASK [Update apt packages] ************************************************************
web1 ansible_host=127.0.0.1 ansible_user=vagrant ansible_port=2200
web2 ansible_host=127.0.0.1 ansible_user=vagrant ansible_port=2222
ec2 ansible_host=18.191.42.181 ansible_user=ubuntu
Subsequently, add the ec2 host to our Ansible Playbook, we created in the Ansible tutorial
name: Install Jenkins software
 hosts: web1, web2, ec2
 gather_facts: true
 become: yes
 ...
To run the Playbook use
ansible-playbook -l ec2 jenkins.ymlIf everything works smoothly, Jenkins should now be installed on your EC2 instance.
If you run into an authentification error (access denied) you might have to add the public SSH key of your EC2 instance to the authentication agent with
ssh-add vagrant-key.pem
Before you can access Jenkins you have to allow an inbound connection on port 8080 in the Security Group vagrant-group (we previously created).
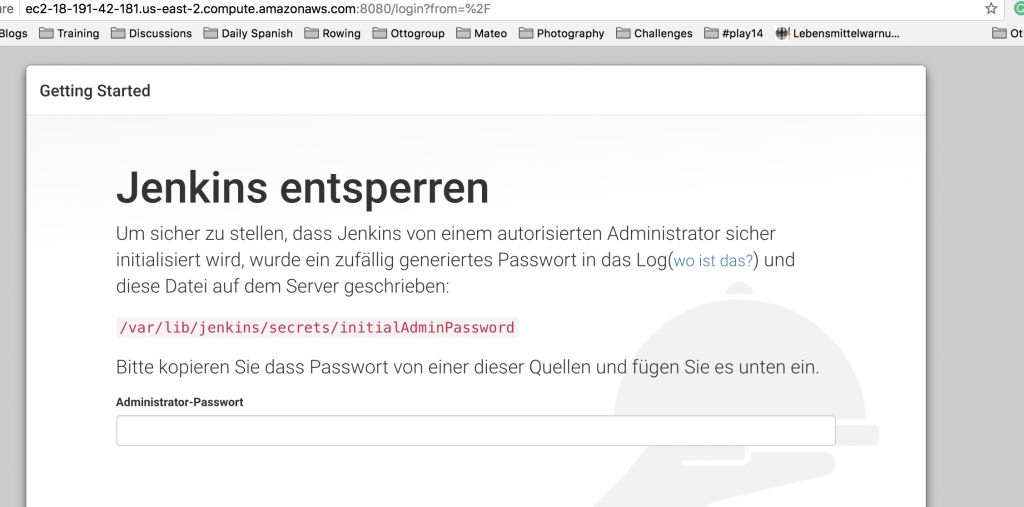
If you now call the URL (or IP address) of the EC2 instance in your browser on Port 8080, you should see the Jenkins installation-screen. Voilà.
http://ec2-18-191-42-181.us-east-2.compute.amazonaws.com:8080/login?from=%2F
Further Remarks
Of course, there are more elegant ways to construct the Vagrantfile, e.g. by reading the credentials from environment variables or from ~/.aws. I have chosen this format for sake of simplicity. There are also many more configuration options than describe here. Please have a further look at the vagrant-aws documentation.
Make sure to destroy your EC2 instance when you don’t need it anymore, as it will consume your credits. The Billing Dashboard provides a good summary of your usage.