Schlagwort: branches

  • Git Branches – Working with Branches – Part III – Merging versus Rebasing

    You have learned how to merge two branches and how to deal with merge-conflicts. When you develop new features it makes sense to develop them on a branch that is based on the latest version of your Master branch. If the feature branches are based on the non-current version of the Master branch than

    • you might run into merge conflicts when merging your feature branch into your Master or
    • you will discover that your application might not behave as you expected, i.e. different than when you tested it on your feature branch.

    So when the Master branch changes (e.g. because another feature branch or bugfix was merged into the Master) it makes sense to update the feature branch you are currently working on. There are two ways of doing this.

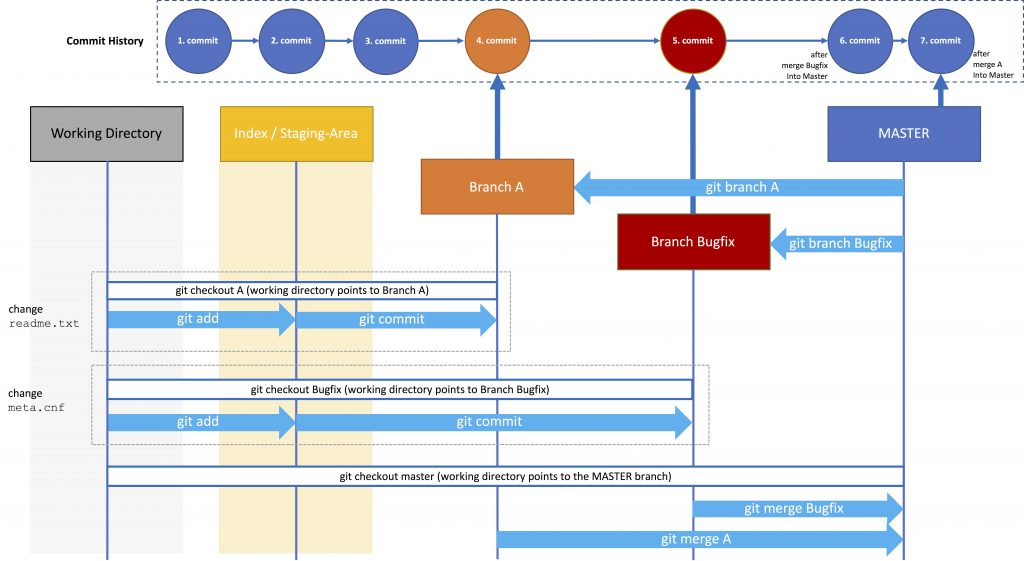
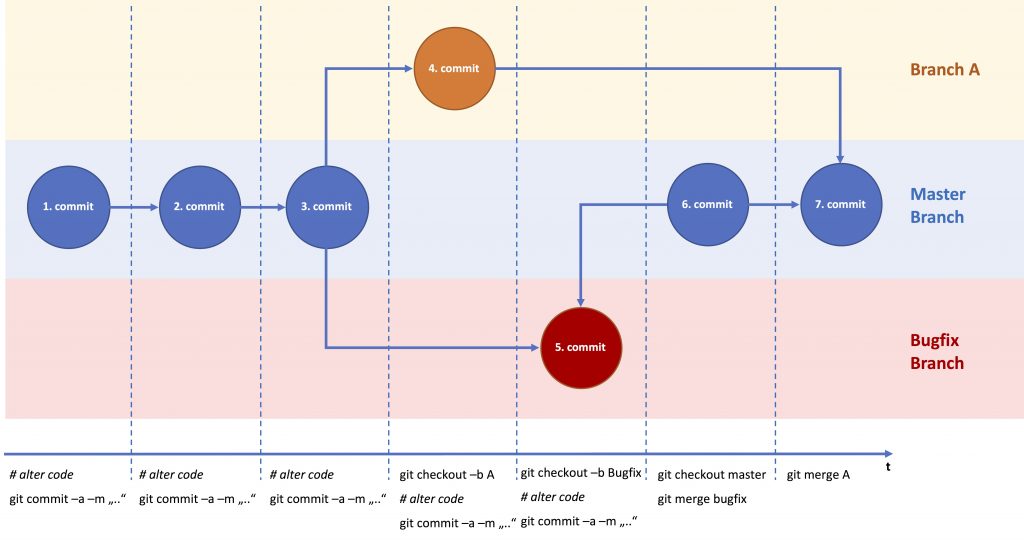
    The next chapters are based on the following example:

    • Feature Branch A based on the 3. commit of the Master Branch (git checkout -b A)
    • Debug Branch based on the 3. commit on the Master Branch (git checkout -b debug)
    • Alter file in the Debug branch
    • Merge Debug Branch into Master branch (git checkout master, git merge debug)
    Git Basic Branching Commit View (2 Commits)
    Git Basic Branching Commit View (2 Commits)

    Merging the latest Master Branch into your Feature Branch (Merging)

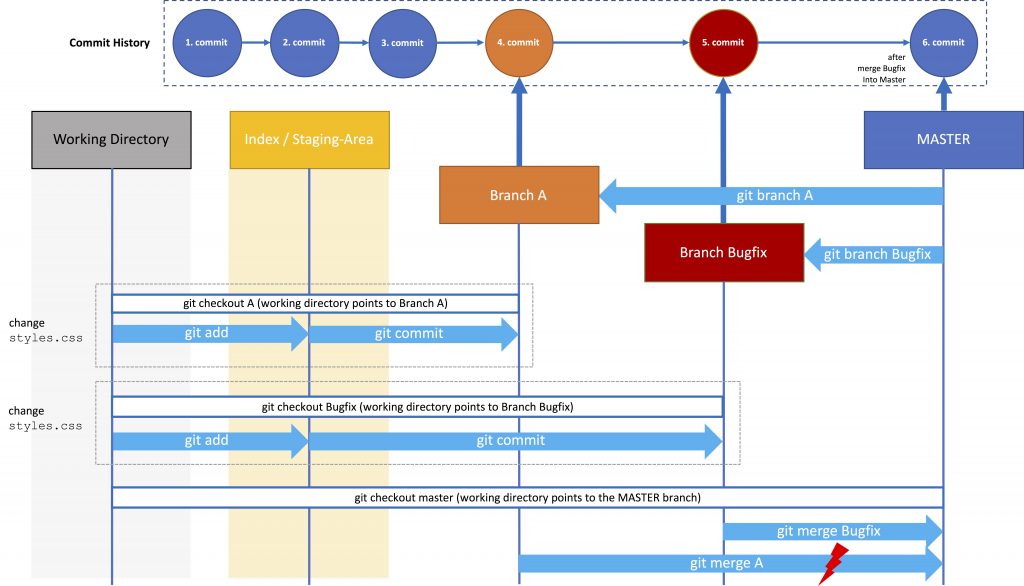
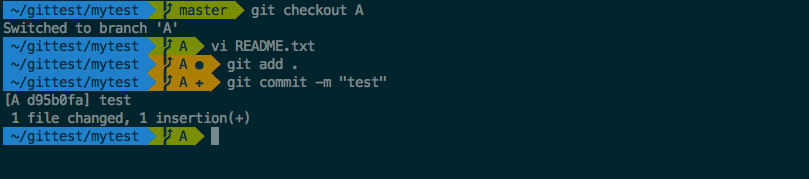
    We will assume that the files that were changed in the Bugfix branch and branch A are different, so that we won’t run into merge-conflicts. You can now checkout your feature branch and merge your new Master into your feature branch.

    git checkout A
    
    git merge master
    Git Commit View - Merge Master Back Into Feature Branch
    Git Commit View – Merge Master Back Into Feature Branch

    In this case the editor will open with a default commit message („Merge branch ‚master‘ into A“). You can alter this message in the editor, save and quit (in the case of vi use: iinsert, esccommand mode, then enter „:wq“ for write and quit).

    You could also merge the Bugfix branch into your feature branch (git checkout A, git merge bugfix). But when working with others (as we will see later), you might not have the latest version of the Master branch.

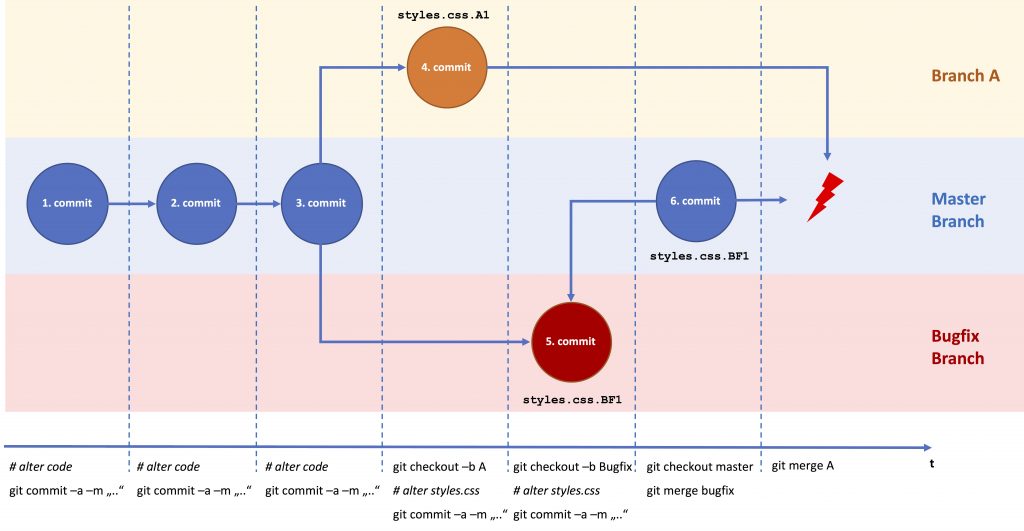
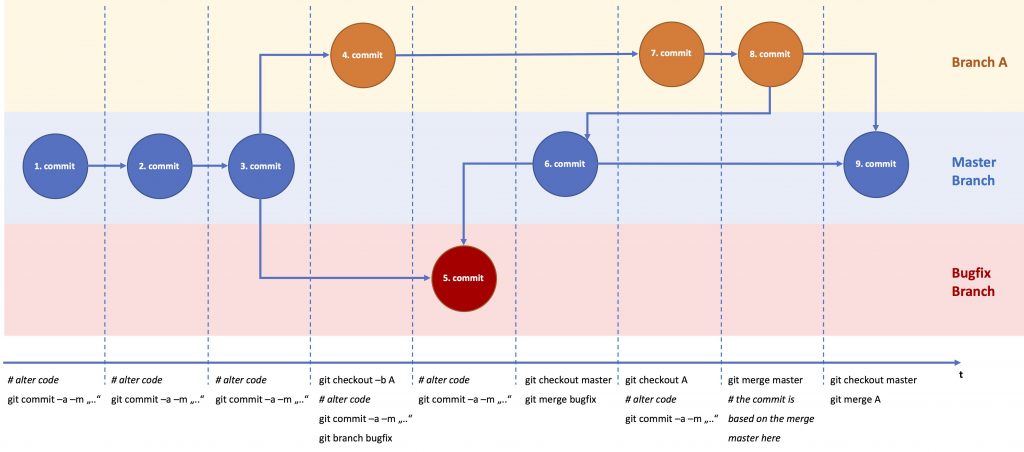
    If you have a look at the commit history (git log) you will see something like the above, which can be pretty exhausting to look through. It will look even more confusing, if you work with other developers on the same Master (which we will explore later). But basically, confusing or not, the history reflects exactly what happened.

    Merge Conflicts

    Let’s imaging you change a file in your Debug branch that you changed before in your feature branch A (say styles.css).

    > git merge master
    Auto-merging styles.css
    CONFLICT (content): Merge conflict in styles.css
    Automatic merge failed; fix conflicts and then commit the result.
    >

    The styles.css might look something like this

    body {background-color: powderblue;}
    <<<<<<< HEAD
    h1   {color: blue;}
    =======
    h1   {color: red;}
    >>>>>>> master
    

    Then alter styles.css to the preferred state, and add and commit the changes:

    git commit -a -m "resolved merge conflict in styles.css"

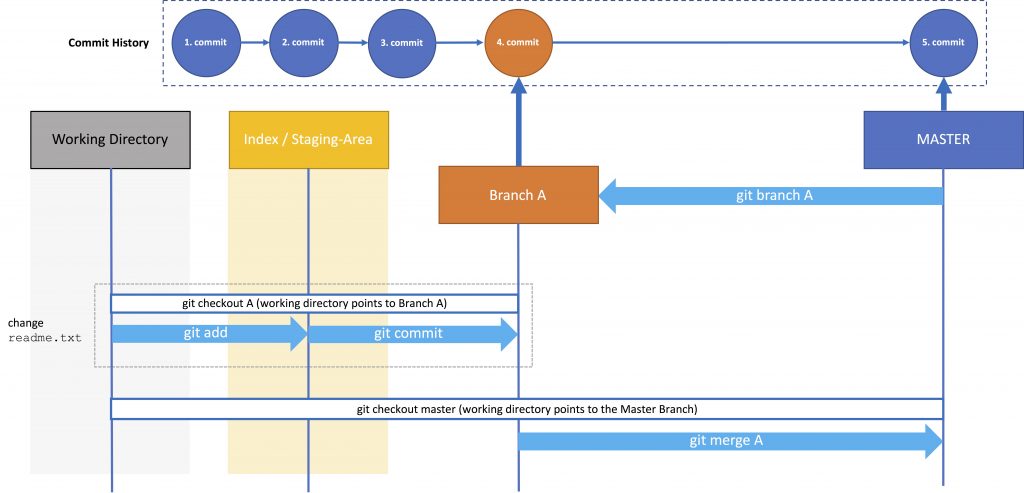
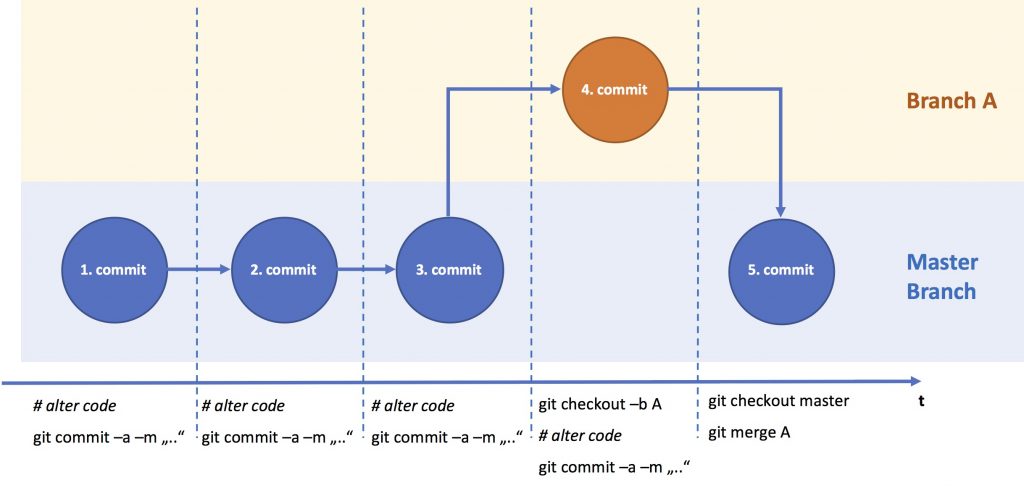
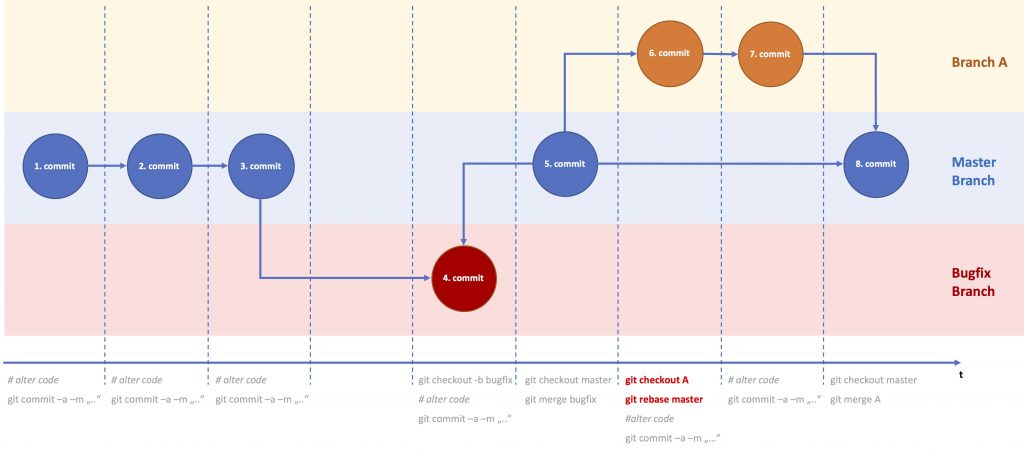
    Using the latest Master Branch as a new Base for your Feature Branch (Rebasing)

    Rebase means, that you change the base of the branch to the latest state of the branch it derived from. In the example above, branch A originally derives from the 3rd commit of the Master branch. Now the Master branch is altered by the bugfix. If you subsequently checkout branch A, you set the base to the current version of the Master branch:

    git rebase master
    Git Rebase Sequential View
    Git Rebase Sequential View

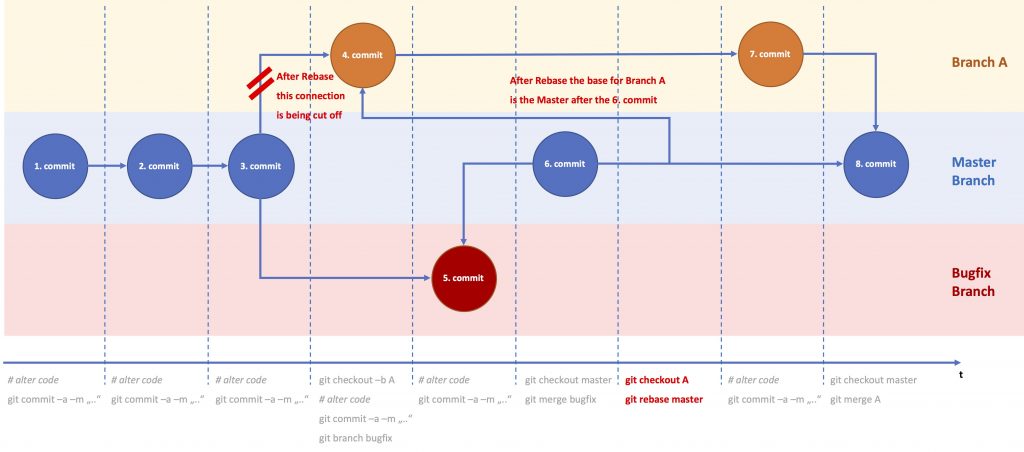
    In this case the commit-history will be changed and won’t reflect what has really happened. However, it is much easier to read (compared to the merge in the previous chapter).

    Git Rebase Clean View
    Git Rebase Clean View

    Merge Conflicts

    Again, let us use the same example as above, style.css was changed in branch A (git checkout A, vi style.css, git commit -a -m "...") and in the debug branch (git checkout debug, vi style.css, git commit -a -m "..."). Then the debug branch was merged into the master (git checkout master, git merge debug). When we switched to branch A to subsequently rebase it (git checkout A, git rebase master), we get an error message like this

    First, rewinding head to replay your work on top of it...
    Applying: new feature implemented
    Using index info to reconstruct a base tree...
    M	styles.css
    Falling back to patching base and 3-way merge...
    Auto-merging styles.css
    CONFLICT (content): Merge conflict in styles.css
    error: Failed to merge in the changes.
    Patch failed at 0001 new feature implemented
    The copy of the patch that failed is found in: .git/rebase-apply/patch
    
    When you have resolved this problem, run "git rebase --continue".
    If you prefer to skip this patch, run "git rebase --skip" instead.
    To check out the original branch and stop rebasing, run "git rebase --abort".

    So Git tells you how to continue. You can either

    • resolve the merge-conflict in styles.css and use git rebase --continue.
    • abort the rebase operation by using git rebase --abort as if nothing has happened (like an undo operation)
    • skip the patch by using git rebase --skip. This basically means, that the rebase is done, and the file where is merge-conflict occurred will be overwritten with the version from the master. I rarely use this command and just tested it for the first time, with the result just mentioned.

    Remarks

    So which one should you use: merge or rebase? There has been lot of debate on this one. I explained the advantages and disadvantages of both. In the Atlassian Git Tutorial you will find some suggestions. Personally, I prefer merge over rebase, to merge the current version of the branch my feature branch derived from into my feature branch. I occasionally use a merge when I know that lots of changes have been made by other developers that affect the functioning of the feature I am implementing. Otherwise I use a merge just before testing my feature and merging it into the branch it derived from (the master branch or similar). I use graphical tools when I work with Git so the commit history becomes readable.

    As I mentioned before, this short tutorial covers the basics. It gives you the tools to understand how to use Git in the most common way. Again, I suggest that you play with Git to become more familiar with merging and rebasing. You just need to branches and two or more files, nothing more.

    Further Reading

    GIT Tutorial – Basics

    GIT Tutorial – Working with Branches – Part I

    Git Branches – Working with Branches – Part II (Merge Conflicts)

    Git Branches – Working with Branches – Part III (Merging versus Rebasing)

    GIT Tutorial – Remote Repositories

  • Git Branches – Working with Branches – Part II (Merge Conflicts)

    Branching sounds fine, but quite often so-called merge-conflicts occur, even in a single-user local-git-repository environment.

    • You created a feature branch A to develop a new feature. To implement the new feature you have to add and change a lot of the CSS in styles.css
    • Suddenly a bug appears on your website. To fix the bug, you also have to make changes in styles.css.

    As we learned in the previous part of the tutorial this might not be a problem at all. This is what branching is for. You create a bugfix branch, fix the bug in styles.css, merge it into the MASTER and then deploy the MASTER into production.

    So far this is not a problem. The problem will occur when you finished developing your new feature (that also affected styles.css) and merge it into the MASTER. So far changes from the bugfix were only merged with the MASTER. Branch A has no knowledge of this change. With the merge from Branch A into the MASTER, Git doesn’t know which is the correct version. Hence, Git responds with an error: merge-conflict. You have to resolve this conflict manually.

    Git Branches - Merge Conflict
    Git Branches – Merge Conflict
    Git Merge Conflict Commit View
    Git Merge Conflict Commit View

    So after merging branch A into the MASTER using git merge A, Git will provide a message like

     ~/test/gitTest git merge A
    
    error: Merging is not possible because you have unmerged files.
    hint: Fix them up in the work tree, and then use 'git add/rm <file>'
    hint: as appropriate to mark resolution and make a commit.
    fatal: Exiting because of an unresolved conflict.


    The whole merge process has put on halt. The data of branch A that was about to be merge is now in the Staging Area of the Master Branch (the Local Repository). You now have to manually resolve the conflict in styles.css manually.

    When you edit styles.css you will discover that git added a few lines to the files (the version of styles.css that is currently in the Local Repository (HEAD) and the version with your changes in branch A:

    /** Registration page */
    .fieldError {
        border: 4px solid red;
    <<<<<<< HEAD
        font-size: 12px;
    =======
        font-weight: 20;
    >>>>>>> A
    }
    

    You now have to manually the correct version of styles.css, e.g.

    /** Registration page */
    .fieldError {
        border: 4px solid red;
        font-size: 12px;
        font-weight: 20;
    }

    Then you have to add and commit the changes with git commit -a -m "conflict in styles.css resolved"

    If you have a look at the Git-commit-history you will recognise that the master has also inherited the whole commit history

    commit 31bf689a2f754f8154d66ae776fd80698a7c9174
    Merge: 6186303 9c0a9b8
    Author: chris <moser.christoph@gmx.de>
    Date:   Fri Mar 23 12:43:01 2018 +0100
    
        conflict in styles.css resolved
    
    commit 9c0a9b8c37d162207947f2a22e8bdaca89ec39c4
    Author: chris <moser.christoph@gmx.de>
    Date:   Fri Mar 23 12:27:16 2018 +0100
    
        feature A
    
    commit 61863036a5d0f09f52e994be90a04527404f8646
    Author: chris <moser.christoph@gmx.de>
    Date:   Fri Mar 23 12:25:57 2018 +0100
    
        bug fixed in styles.css
    
    ...

    Remarks

    I haven’t covered all the possible things that can happen, e.g. try to make changes in branch A without adding/committing them and check-out the Bugfix branch and other things. Again, before using Git in a serious project, I highly recommend experimenting a bit more with this simple setting (one master, two branches, two text-files) to become more familiar with Git. When you are using Git to develop larger projects, you might have more than one merge-conflict at once. It can be difficult to keep track of all the changes. Hence, in this case, I recommend using Git GUI clients, such as SourceTree and others.
  • GIT Tutorial – Working with Branches – Part I

    For reasons of simplicity in this tutorial, we will assume that you are working as a single developer with a local repository (MASTER).

    Implementing a new Feature

    Option 1

    When you just add one feature after the other, you can make the changes, add them to the Staging Area and commit the changes to the MASTER as explained in the previous blog post. There is nothing wrong with that when you work alone, one feature after the other.

    Option 2

    Imagine, you have a version of your software released in production. Then you start working on a new feature. When you are half-way through, you discover that you have a bug in production. If you already transferred files in your staging area (git -add .) you can undo them (git reset), fix the bug, add the affected files (git -add [filename], ...) and commit the changes (git commit -m "bugfix ...").

    The disadvantage here is that you carefully have to only add the files affected by the bugfix without adding the files that are affected by the new feature development.  It can get even more confusing if the file affected by the bugfix, was already changed when implementing the new, but not yet releasable feature.  It will get even more confusing if many developers implement new features or functionality on the same code. But we will cover this later.

    Branching

    Basic Branching with one Branch

    There is a simple clean solution to all the disadvantages mentioned above: branching. Basically branching means, that you branch from the MASTER (your root branch), make your changes in the new branch and subsequently merge your changes back into the MASTER.

    # create a new branch
    git branch A
    
    # change the branch
    git checkout A
    
    #
    # make changes in files ...
    #
    
    # add all changes to the staging area
    git add .
    
    # commit the changes into branch A
    git commit -m "implemented feature A"
    
    # checkout the master branch
    git checkout master
    
    # merge the changes in branch A to the master
    git merge A


    Git Basic Branching
    Git Basic Branching
    Git Basic Branching Commit View
    Git Basic Branching Commit View

    You basically create a new branch from the branch you have currently checked-out. Before you switch branches, you usually have to commit the work in the current branch.

    git branch [branch-name]

    You change branches with

    git checkout [branch-name]

    You can use the shortcut git checkout -b [branch-name] to create a new branch and check it out. Each branch will inherit the whole commit-history of the branch it derived from, including all tags. You can check this with git log.

    The branch you switch to will look like after your last commitment to that branch, e.g. when you create a branch A from the MASTER, switch to it, make changes and commit these changes to A, and then switch back to the MASTER branch, you won’t see these changes yet (until you merge them).

    You basically merge into the branch you have currently checked-out or you define a source and destination branch:

    git merge [branch-name]
    git merge [source branch-name] [destination branch-name]

    git merge also merges the commit history if the branch that was merged and  git merge also performs a commit on the destination branch (or the branch you call the merge from). Again, you can check this by using git log.

    To show all branches and their commits use

    git show-branch

    To compare two branches use

    git diff [branch-name 1] [branch-name 2]

    When you don’t need a branch anymore you can delete it using

    git branch -d [branch-name]

    You can usually only delete branches that are merged into another branch because otherwise your changes will be lost. You can, of course, force a delete by using

    git branch -D [branch-name]
    

    Basic branching with two Branches

    Now imagine the example above where you create a new feature branch to develop a new feature. Then a bug occurs in production. Hence, you create a new branch to fix the bug. Notice, that we are changes two separate files in each branch.

    # create a new branch
    git branch A
    
    # change the branch
    git checkout A
    
    #
    # make changes in branch A ...
    #
    
    # add all changes to the staging area auf branch A
    git add .
    
    # commit the changes into branch A
    git commit -m "partly implemented feature A"
    
    # checkout the master branch
    git checkout master
    
    # create and checkout Bugfix branch
    git checkou -b bugfix
    
    #
    # make changes in branch Bugfix ...
    # 
    
    # add all changes to the staging area auf Bugfix branch
    git add . 
    
    # commit the changes into the Bugfix branch
    git commit -m "fixed bug B in production" 
    
    # checkout the master branch 
    git checkout master 
    
    # merge the changes in branch A to the master
    git merge Bugfix


    Git Basic Branching (2 Branches)
    Git Basic Branching (2 Branches)
    Git Basic Branching Commit View (2 Commits)
    Git Basic Branching Commit View (2 Branches)
    As you can see, Branch A is not affected by the changes made on the Bugfix branch or the master branch. You can now checkout branch A again (git checkout A) to continue working on your feature A and merge the changes into the MASTER when you are finished.

    Remarks

    If you are using the git-Plugin in zsh (or something similar for other command shells) you can see of what branch you are in and what status the branch has (see image below). In addition the git-Plugin also provides aliases for most git-commands.

    git zsh plugin

    Again, before using Git in a serious project, I suggest experimenting with branches in a simple setting (one master, two branches, two text-files) to become more familiar with Git.

    In the next part, we will discover merge-conflict. What happens if you made changes in the same file and then merging it one by one into the master.