As we have seen in the tutorial about Docker swarm, the IP addresses of our services can change, e.g. every time we deploy new services to a swarm or containers are restarted or newly created by the swarm-manager etc. So services better address other services by using their name instead of their IP-address.
Default Overlay Network
As we have seen in the Docker Swarm Tutorial, an application can span several nodes (physical and virtual machines) that contain services that communicate with each other. To allow services to communicate with each other, Docker provides so-called overlay networks.
Creating network dataapp_default
Creating service dataapp_web
Now let us show all the networks with the scope on a swarm
docker network ls
NETWORK ID          NAME                  DRIVER              SCOPE
515f5972c61a        bridge                bridge              local
uvbm629gioga        dataapp_default       overlay             swarm
a40cd6f03e65        docker_gwbridge       bridge              local
c789c6be4aca        host                  host                local
p5a03bvnf92t        ingress               overlay             swarm
efe5622e25bf        none                  null                local
If a container joins a swarm, two networks are created on the host the container runs on
ingress network, as the default overlay-network. This network will route requests for services to a task for that service. You can find more about ingress filtering on wikipedia.
docker_gwbrige, which connects stand-alone Docker containers (like the two alpine containers we created earlier) to containers inside of a swarm.
You can specify a user-defined overlay network in the docker-compose.yml. We haven’t done this so far, so Docker creates one for use with the name of the service and an extension, in this case, dataservice_default.
Let us verify which containers belong to our network dataservice_default.
docker-machine ssh vm-manager docker container ls
CONTAINER ID        IMAGE                                  COMMAND              CREATED             STATUS              PORTS               NAMES
99e248ad51bc        vividbreeze/docker-tutorial:version1   "java DataService"   19 minutes ago      Up 19 minutes                           dataapp_dataservice.1.osci7tq58ag6o444ymldv6usm
f12dea1973da        vividbreeze/docker-tutorial:version1   "java DataService"   19 minutes ago      Up 19 minutes                           dataapp_dataservice.3.2m6674gdu8mndivpio008ylf5
We see that two containers of our service are running on the vm-manager. Let us now have a look at the dataservice_default network on the vm-manager
In the Containers-section of the REST response, you will see three containers that belong to the dataservice_default network, the two containers above, as well as a default-endpoint. You can verify vm-worker1 on your own.
User-Defined Overlay Network
So far our application consists of only one service. Let us add another service to our application (a database). In addition, we define our own network.
We added a database service (a Redis in-memory data storage service). In addition, we defined a network (data-network) and added both services to this network. You will also see a constraint for the Redis service, which defines that it should only run on the vm-manager. Now let us deploy our altered service
Creating network dataapp_data-network
Creating service dataapp_dataservice
Creating service dataapp_redis
As expected, the new network (dataapp_data-network) and the new service (dataapp_redis) were created, our existing service was updated.
docker network ls -f "scope=swarm"
NETWORK ID          NAME                       DRIVER              SCOPE
dobw7ifw63fo        dataapp_data-network       overlay             swarm
uvbm629gioga        dataapp_default            overlay             swarm
p5a03bvnf92t        ingress                    overlay             swarm
The network is listed in our list of available networks (notice that the dataapp_default network still exists. As we don’t need it anymore and can delete it with
docker network rm dataservice_default
Let us now log into our containers and see if we could ping the other containers using their name. First get a list of containers on vm-worker1 (the container ids are sufficient here)
docker-machine ssh vm-worker1 docker container ls -q
cf7fd10d88be
9ea79f754419
6cd939350f74
Now let us execute a ping to the service dataservice and to the redisservice that runs on the vm-manager from one of these containers.
PING web (10.0.2.6) 56(84) bytes of data.
64 bytes from 10.0.2.6: icmp_seq=1 ttl=64 time=0.076 ms
64 bytes from 10.0.2.6: icmp_seq=2 ttl=64 time=0.064 ms

PING redis (10.0.2.4) 56(84) bytes of data.
64 bytes from 10.0.2.4: icmp_seq=1 ttl=64 time=0.082 ms
64 bytes from 10.0.2.4: icmp_seq=2 ttl=64 time=0.070 ms
Routing Mesh
The nodes in our swarm now the IP-address 192.168.99.124 (vm-manager) and 192.168.99.123 (vm-worker1)
docker-machine ip vm-manager
docker-machine ip vm-worker1
We can reach our webservice from both(!) machines
curl 192.168.99.124:4000
curl 192.168.99.123:4000
It doesn’t matter if the machine is a manager-node or a worker-mode. Why is this so?
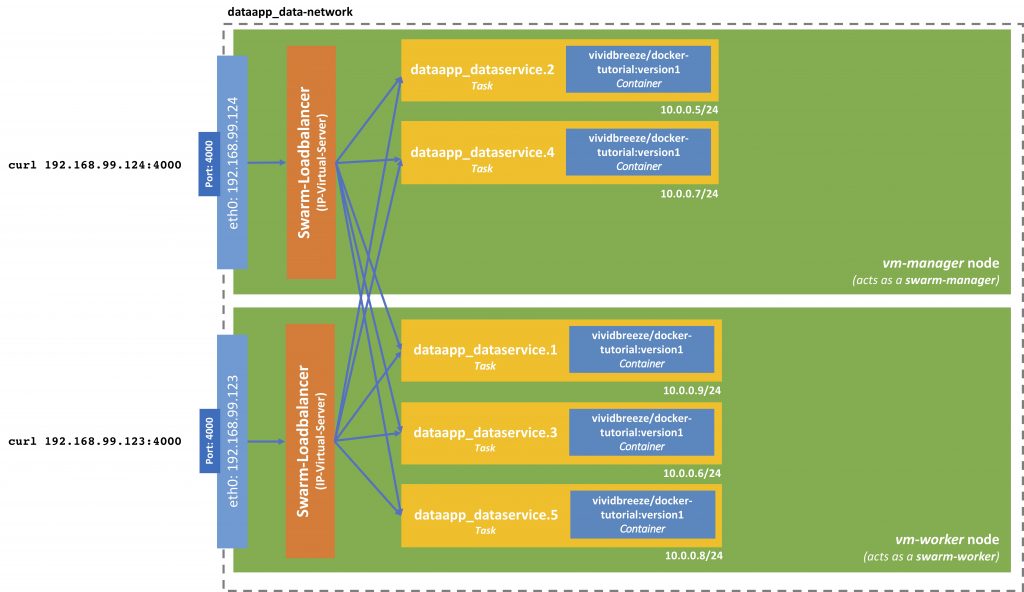
Docker Swarm Ingress Network
Earlier, I mentioned the so-called ingress network or ingress filtering. This network receives a service request and routes it to the corresponding task. The load-balancing is present on each node and uses the IP virtual server from the Linux kernel. This load-balancer is stateless and routes packages on the TCP-Layer.
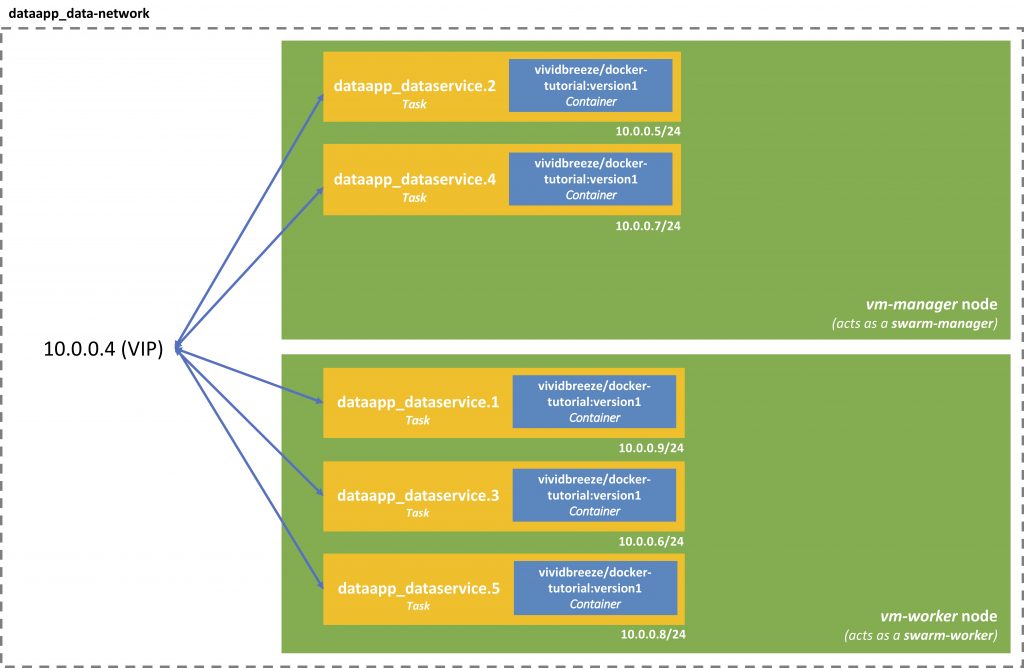
Internally the containers communicate via a virtual IP. The beauty here is that if one container/task crashes, the other containers won’t notice, as they communicate with each other via the Virtual IP.
Docker Swarm Inter-Container Communication via Virtual IP
You can find this virtual IP by using
docker service inspect dataapp_dataservice
Further Remarks
Of course, every container can also connect to the outside world. In inherits the DNS settings from the Docker daemon (/etc/hosts and /etc/resolv.conf).
The name service provided by Docker only works within the Docker space, e.g. within a Docker swarm, between containers. From outside of a container, you can’t reference the services by their name. Often this isn’t necessary and even not desired for security reasons (like the Redis datastore in our example). Here you might want to have a closer look at Zookeeper or Consul or similar tools.
However, if you have applications running with many services running, you might consider Docker management tools, such as Portainer, Docker ToolBox, or Dockstation.
In the first part of this series, we built a Docker swarm, consisting of just one node (our local machine). The nodes can act as swarm-managers and (or) swarm-workers. Now we want to create a swarm that spans more than one node (one machine).
Creating a Swarm
Creating the Infrastructure
First, we set up a cluster, consisting of Virtual Machines. We have used Vagrant before to create Virtual Machines on our local machine. Here, we will use docker-machine to create virtual machines on VirtualBox(you should have VirtualBox installed on your computer). docker-machine is a tool to create Docker VMs, however, it should not be used in production, where more configuration of a virtual machine is needed.
docker-machine uses a lightweight Linux distribution (boot2docker) including Docker, that will start within seconds (after the image was downloaded). As an alternative, you might use the alpine2docker Vagrant box.
Let us have a look at our virtual machines
docker-machine ls
NAME ACTIVE DRIVER STATE URL SWARM DOCKER ERRORS
vm-manager - virtualbox Running tcp://192.168.99.104:2376 v18.06.0-ce
vm-worker1 - virtualbox Running tcp://192.168.99.105:2376 v18.06.0-ce
Setting Up the Swarm
As the name suggests, our first vm1 will be a swarm-manager, while the other two machines will be swarm-workers. Let us log into our first Virtual Machine and define it as a swarm-manager
docker-machine ssh vm-manager
docker swarm init
You might run into an error message such as
Error response from daemon: could not choose an IP address to advertise since this system has multiple addresses on different interfaces (10.0.2.15 on eth0 and 192.168.99.104 on eth1) - specify one with --advertise-addr
I initialised the swarm with the local address (192.168.99.104) on eth1. You will get the ip address of a machine, using
docker-machine ip vm-manager(outside of the VM)
So now let us try to initialise the swarm again
docker swarm init --advertise-addr 192.168.99.104
Swarm initialized: current node (9cnhj2swve2rynyh6fx7h72if) is now a manager.

To add a worker to this swarm, run the following command:

    docker swarm join --token SWMTKN-1-2k1c6126hvjkch1ub74gea0hkcr1timpqlcxr5p4msm598xxg7-6fj5ccmlqdjgrw36ll2t3zr2t 192.168.99.104:2377

To add a manager to this swarm, run 'docker swarm join-token manager' and follow the instructions.
The output displays the command to add a worker to the swarm. So now we can log into our two worker VMs and execute this command to initialise the swarm mode as a worker. You don’t have to open a secure shell on the VM explicitly; you can also execute a command on the VM directly
To see if everything ran smoothly, we can list the nodes in our swarm
docker-machine ssh vm-manager docker node ls
ID                            HOSTNAME            STATUS              AVAILABILITY        MANAGER STATUS      ENGINE VERSION
9cnhj2swve2rynyh6fx7h72if *   vm-manager          Ready               Active              Leader              18.06.0-ce
sfflcyts946pazrr2q9rjh79x     vm-worker1          Ready               Active                                  18.06.0-ce
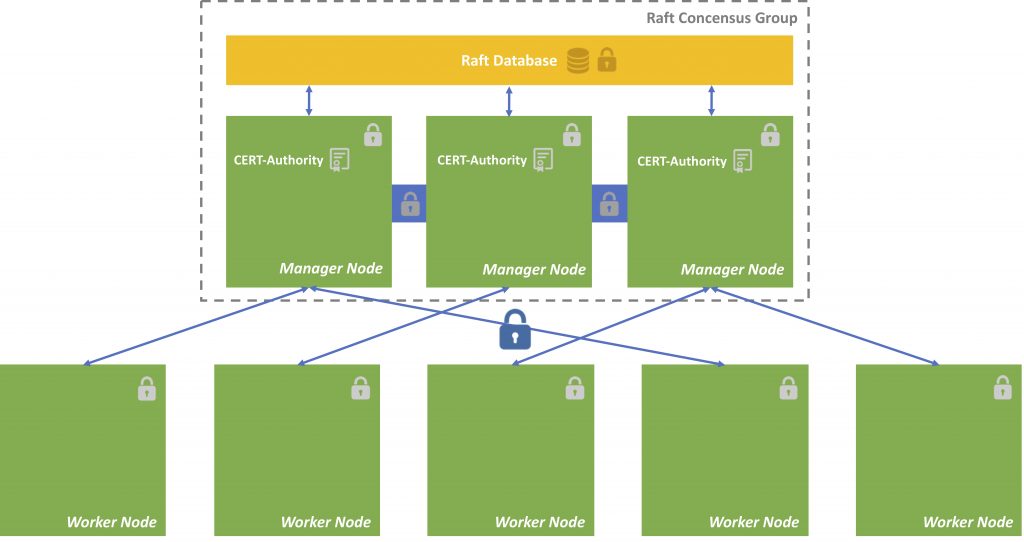
The main difference between a worker node and a manager node is that managers are workers that can control the swarm. The node I invoke swarm init, will become the swarm leader (and manager, by default). There can be several managers, but only one swarm leader.
During initialisation, a root certificate for the swarm is created, a certificate is issued for this first node and the join tokens for new managers and workers are created.
Most data is stored encrypted on the nodes. The communication inside of the swarm is encrypted.
Docker Swarm
Dictate Docker to run Commands against particular Node
Set environment variables to dictate that docker should run a command against a particular machine.
Running pre-create checks...
Creating machine...
(vm-manager) Copying /Users/vividbreeze/.docker/machine/cache/boot2docker.iso to /Users/vividbreeze/.docker/machine/machines/vm-manager/boot2docker.iso...
(vm-manager) Creating VirtualBox VM...
(vm-manager) Creating SSH key...
(vm-manager) Starting the VM...
(vm-manager) Check network to re-create if needed...
(vm-manager) Waiting for an IP...
Waiting for machine to be running, this may take a few minutes...
Detecting operating system of created instance...
Waiting for SSH to be available...
Detecting the provisioner...
Provisioning with boot2docker...
Copying certs to the local machine directory...
Copying certs to the remote machine...
Setting Docker configuration on the remote daemon...
Checking connection to Docker...
Docker is up and running!
To see how to connect your Docker Client to the Docker Engine running on this virtual machine, run: docker-machine env vm-manager
The last line tells you, how to connect your client (your machine), to the virtual machine you just created
docker-machine env vm-manager
exports the necessary docker environment variables with the values for the VM vm-manager
export DOCKER_TLS_VERIFY="1"
export DOCKER_HOST="tcp://192.168.99.109:2376"
export DOCKER_CERT_PATH="/Users/vividbreeze/.docker/machine/machines/vm-manager"
export DOCKER_MACHINE_NAME="vm-manager"
# Run this command to configure your shell:
# eval $(docker-machine env vm-manager)
eval $(docker-machine env vm-manager)
dictates docker, to run all commands against vm-manager, e.g. the above docker node ls, or docker image ls etc. will also run against the VM vm-manager.
So now I can use docker node ls directly, to list the nodes in my swarm, as all docker commands now run against Docker on vm-manager (before I had to usedocker-machine ssh vm-manager docker node ls).
To reverse this command use docker-machine env -u and subsequently eval $(docker-machine env -u).
Deploying the Application
Now we can use the example from part I of the tutorial. Here is a copy of my docker-compose.yml, so you can follow this example (I increase the number of replicas from 3 to 5).
Let us deploy our service as describe in docker-compose.yml and name it dataservice
docker stack deploy -c docker-compose.yml dataapp
Creating network dataapp_default
Creating service dataapp_dataservice
Docker created a new service, called dataapp_dataservice and a network called dataapp_default. The network is a private network for the services that belong to the swarm to communicate with each other. We will have a closer look at networking in the next tutorial. So far nothing new as it seems.
Let us have a closer look at our dataservice
docker stack ps dataapp
ID                  NAME                    IMAGE                                  NODE                    DESIRED STATE       CURRENT STATE                    ERROR               PORTS
s79brivew6ye        dataapp_dataservice.1   vividbreeze/docker-tutorial:version1   linuxkit-025000000001   Running             Running less than a second ago
gn3sncfbzc2s        dataapp_dataservice.2   vividbreeze/docker-tutorial:version1   linuxkit-025000000001   Running             Running less than a second ago
wg5184iug130        dataapp_dataservice.3   vividbreeze/docker-tutorial:version1   linuxkit-025000000001   Running             Running less than a second ago
i4a90y3hd6i6        dataapp_dataservice.4   vividbreeze/docker-tutorial:version1   linuxkit-025000000001   Running             Running less than a second ago
b4prawsu81mu        dataapp_dataservice.5   vividbreeze/docker-tutorial:version1   linuxkit-025000000001   Running             Running less than a second ago
As you can see, the load was distributed to both VMs, no matter which role they have (swarm manager or swarm worker).
The requests can now go either against the IP of the VM manager or the VM worker. You can obtain its IP-address of the vm-manager with
docker-machine ip vm-manager
Now let us fire 10 requests against vm-manager to see if our service works
If everything is working, we should see five different kinds of responses (as five items were deployed in our swarm). The following picture describes shows how services are deployed.
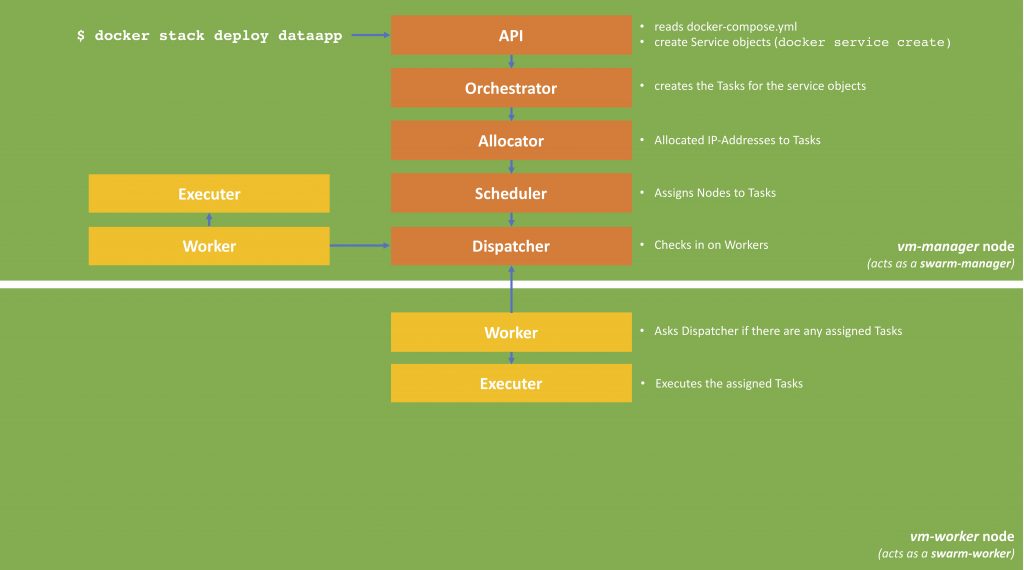
Docker Stack Deployment Process
When we call docker stack deploy, the command transfers the docker-compose.yml to the swarm manager, the manager creates the services and deploys it to the swarm (as defined in the deploy-part of the docker-compose.yml). Each of the replicas (in our case 5) is called a task. Each task can be deployed on one or nodes (basically the container with the service-image is started on this node); this can be on a swarm-manager or swarm-worker. The result is depicted in the next picture.
Docker Service Deployment
Managing the Swarm
Dealing with a Crashed Node
In the last tutorial, we defined a restart-policy, so the swarm-manger will automatically start a new container, in case one crashes. Let us now see what happens when we remote our worker
docker-machine rm vm-worker1
We can see that while the server (vm-worker1) is shutting down, new tasks are created on the vm-manager
> docker stack ps dataservice
ID                  NAME                    IMAGE                                  NODE                DESIRED STATE       CURRENT STATE                  ERROR               PORTS
vc26y4375kbt        dataapp_dataservice.1       vividbreeze/docker-tutorial:version1   vm-manager          Ready               Ready less than a second ago
kro6i06ljtk6         \_ dataapp_dataservice.1   vividbreeze/docker-tutorial:version1   vm-worker1          Shutdown            Running 12 minutes ago
ugw5zuvdatgp        dataapp_dataservice.2       vividbreeze/docker-tutorial:version1   vm-manager          Running             Running 12 minutes ago
u8pi3o4jn90p        dataapp_dataservice.3       vividbreeze/docker-tutorial:version1   vm-manager          Ready               Ready less than a second ago
hqp9to9puy6q         \_ dataapp_dataservice.3   vividbreeze/docker-tutorial:version1   vm-worker1          Shutdown            Running 12 minutes ago
iqwpetbr9qv2        dataapp_dataservice.4       vividbreeze/docker-tutorial:version1   vm-manager          Running             Running 12 minutes ago
koiy3euv9g4h        dataapp_dataservice.5       vividbreeze/docker-tutorial:version1   vm-manager          Ready               Ready less than a second ago
va66g4n3kwb5         \_ dataapp_dataservice.5   vividbreeze/docker-tutorial:version1   vm-worker1          Shutdown            Running 12 minutes ago
A moment later you will see all 5 tasks running up again.
Dealing with Increased Workload in a Swarm
Increasing the number of Nodes
Let us now assume that the workload on our dataservice is growing rapidly. Firstly, we can distribute the load to more VMs.
As you can see when using docker stack ps dataapp, the tasks were not automatically deployed to the new VMs.
ID                  NAME                IMAGE                                  NODE                DESIRED STATE       CURRENT STATE            ERROR               PORTS
0rp9mk0ocil2        dataapp_dataservice.1   vividbreeze/docker-tutorial:version1   vm-manager          Running             Running 18 minutes ago
3gju7xv20ktr        dataapp_dataservice.2   vividbreeze/docker-tutorial:version1   vm-manager          Running             Running 13 minutes ago
wwi72sji3k6v        dataapp_dataservice.3   vividbreeze/docker-tutorial:version1   vm-manager          Running             Running 13 minutes ago
of5uketh1dbk        dataapp_dataservice.4   vividbreeze/docker-tutorial:version1   vm-manager          Running             Running 13 minutes ago
xzmnmjnpyxmc        dataapp_dataservice.5   vividbreeze/docker-tutorial:version1   vm-manager          Running             Running 13 minutes ago
The swarm-manager decides when to utilise new nodes. Its main priority is to avoid disruption of running services (even when they are idle). Of course, you can always force an update, which might take some time
docker service update dataapp_dataservice -f
Increasing the number of Replicas
In addition, we can also increase the number of replicas in our docker-compose.xml
Now rundocker stack deploy -c docker-compose.yml dataservice
docker stack ps dataapp shows that 5 new tasks (and respectively containers) have been created. Now the swarm-manager has utilised the new VMs.
D                  NAME                 IMAGE                                  NODE                DESIRED STATE       CURRENT STATE             ERROR               PORTS
0rp9mk0ocil2        dataapp_dataservice.1    vividbreeze/docker-tutorial:version1   vm-manager          Running             Running 20 minutes ago
3gju7xv20ktr        dataapp_dataservice.2    vividbreeze/docker-tutorial:version1   vm-manager          Running             Running 15 minutes ago
wwi72sji3k6v        dataapp_dataservice.3    vividbreeze/docker-tutorial:version1   vm-manager          Running             Running 15 minutes ago
of5uketh1dbk        dataapp_dataservice.4    vividbreeze/docker-tutorial:version1   vm-manager          Running             Running 15 minutes ago
xzmnmjnpyxmc        dataapp_dataservice.5    vividbreeze/docker-tutorial:version1   vm-manager          Running             Running 15 minutes ago
qn1ilzk57dhw        dataapp_dataservice.6    vividbreeze/docker-tutorial:version1   vm-worker3          Running             Preparing 3 seconds ago
5eyq0t8fqr2y        dataapp_dataservice.7    vividbreeze/docker-tutorial:version1   vm-worker3          Running             Preparing 3 seconds ago
txvf6yaq6v3i        dataapp_dataservice.8    vividbreeze/docker-tutorial:version1   vm-worker2          Running             Preparing 3 seconds ago
b2y3o5iwxmx1        dataapp_dataservice.9    vividbreeze/docker-tutorial:version1   vm-worker3          Running             Preparing 3 seconds ago
rpov7buw9czc        dataapp_dataservice.10   vividbreeze/docker-tutorial:version1   vm-worker3          Running             Preparing 3 seconds ago
Further Remarks
To summarise
Use docker-machine (as an alternative to vagrant or others) to create VMs running Docker.
Use docker swarm to define a cluster that can run your application. The cluster can span physical machines and virtual machines (also in clouds). A machine can either be a manager or a worker.
Define your application in a docker-compose.yml.
Use docker stack to deploy your application in the swarm.
This again was a simple, pretty straightforward example. You can easily use docker-machine to create VMs in AWS E2 or Google Compute Engine and cloud services. Use this script to quickly install Docker on a VM.
A quick note, please always be aware on which machine you are working. You can easily get the Docker CLI to run against a different machine with docker-machine env vm-manager. To reverse this command use docker-machine env -u.
In the previous tutorial, we created one small service, and let it run in an isolated Docker container. In reality, your application might consist of many of different services. An e-commerce application encompasses services to register new customers, search for products, list products, show recommendations and so on. These services might even exist more than one time when they are heavily requested. So an application can be seen as a composition of different services (that run in containers).
In this first part of the tutorial, we will work with the simple application of the Docker Basics Tutorial, that contains only one service. We will deploy this service more than one time and let run on only one machine. In part II we will scale this application over many machines.
Prerequisites
Before we start, you should have completed the first part of the tutorial series. As a result, you should an image uploaded to the DockerHub registry. In my case, the image name is vividbreeze/docker-tutorial:version1.
Docker Swarm
As mentioned above, a real-world application consists of many containers spread over different hosts. Many hosts can be grouped to a so-called swarm (mainly hosts that run Docker in swarm-mode). A swarm is managed by one or more swarm managers and consists of one or many workers. Before we continue, we have to initial a swarm on our machine.
docker swarm init
Swarm initialized: current node (pnb2698sy8gw3c82whvwcrd77) is now a manager.

To add a worker to this swarm, run the following command:

    docker swarm join --token SWMTKN-1-39y3w3x0iiqppn57pf2hnrtoj867m992xd9fqkd4c3p83xtej0-9mpv98zins5l0ts8j62ociz4w 192.168.65.3:2377

To add a manager to this swarm, run 'docker swarm join-token manager' and follow the instructions.
The swarm was initialised with one node (our machine) as a swarm manager.
Docker Stack
We now have to design our application. We do this in a file called docker-compose.yml. So far, we have just developed one service, and that runs inside one Docker container. In this part of the tutorial, our application will only consist of one service. Now let us assume this service is heavily used and we want to scale it.
The file contains the name of our service and the number of instances (or replicas) that should be deployed. We now do the port mapping here. The port 8080 that is used by the service inside of our container will be mapped to the port 4000 on our host.
To create our application use (you have to invoke this command from the vm-manager node)
docker stack deploy -c docker-compose.yml dataapp
Creating network dataapp_default
Creating service dataapp_dataservice
Docker now has created a network dataservice_web and a network dataservice_webnet. We will come to networking in the last part of this tutorial. By „stack“, Docker means a stack of (scaled) services that together form an application. A stack can be deployed on one swarm. It has to be called from a Swarm manager.
Let us now have a look, of how many containers were created
docker container ls
ONTAINER ID        IMAGE                                  COMMAND              CREATED                  STATUS              PORTS                    NAMES
bb18e9d71530        vividbreeze/docker-tutorial:version1   "java DataService"   Less than a second ago   Up 8 seconds                                 dataapp_dataservice.3.whaxlg53wxugsrw292l19gm2b
441fb80b9476        vividbreeze/docker-tutorial:version1   "java DataService"   Less than a second ago   Up 7 seconds                                 dataapp_dataservice.4.93x7ma6xinyde9jhearn8hjav
512eedb2ac63        vividbreeze/docker-tutorial:version1   "java DataService"   Less than a second ago   Up 6 seconds                                 dataapp_dataservice.1.v1o32qvqu75ipm8sra76btfo6
In Docker terminology, each of these containers is called a task. Now each container cannot be accessed directly through the localhost and the port (they have no port), but through a manager, that listens to port 4000 on the localhost. These five containers, containing the same service, are bundled together and appear as one service. This service is listed by using
docker service ls
ID                  NAME                  MODE                REPLICAS            IMAGE                                  PORTS
zfbbxn0rgksx        dataapp_dataservice   replicated          5/5                 vividbreeze/docker-tutorial:version1   *:4000->8080/tcp
You can see the tasks (containers) that belong to this services with
docker service ps dataservice_web
ID                  NAME                    IMAGE                                  NODE                    DESIRED STATE       CURRENT STATE            ERROR                         PORTS
lmw0gnxcs57o        dataapp_dataservice.1       vividbreeze/docker-tutorial:version1   linuxkit-025000000001   Running             Running 13 minutes ago
fozpqkmrmsb3        dataapp_dataservice.2       vividbreeze/docker-tutorial:version1   linuxkit-025000000001   Running             Running 13 minutes ago
gc6dccwxw53f        dataapp_dataservice.3       vividbreeze/docker-tutorial:version1   linuxkit-025000000001   Running             Running 13 minutes ago
Now let us call the service 10 times
repeat 10 { curl localhost:4000; echo }(zsh) for ((n=0;n<10;n++)); do curl localhost:4000; echo; done (bash)
Now you can see, that our service is called ten times, each time one of the services running inside of the containers were used to handle the request (you see three different ids). The service manager (dataservice-web) acts as a load-balancer. In this case, the load balancer uses a round-robin strategy.
To sum it up, in the docker-compose.yml, we defined our desired state (3 replicas of one service). Docker tries to maintain this desired state using the resources that are available. In our case, one host (one node). A swarm-manager manages the service, including the containers, we have just created. The service can be reached at port 4000 on the localhost.
Restart Policy
This can be useful for updating the number of replicas or changing other parameters. Let us play with some of the parameters. Let us add a restart policy to our docker-compose.yml
docker container ls -f "name=dataservice_web"

CONTAINER ID        IMAGE                                  COMMAND              CREATED             STATUS              PORTS               NAMES
953e010ab4e5        vividbreeze/docker-tutorial:version1   "java DataService"   15 minutes ago      Up 15 minutes                           dataapp_dataservice.1.pb0r4rkr8wzacitgzfwr5fcs7
f732ffccfdad        vividbreeze/docker-tutorial:version1   "java DataService"   15 minutes ago      Up 15 minutes                           dataapp_dataservice.3.rk7seglslg66cegt6nrehzhzi
8fb716ef0091        vividbreeze/docker-tutorial:version1   "java DataService"   15 minutes ago      Up 15 minutes                           datasapp_dataservice.2.0mdkfpjxpldnezcqvc7gcibs8
Now let us kill one of these containers, to see if our manager will start a new one again
docker container rm -f 953e010ab4e5
It may take a few seconds, but then you will see a newly created container created by the swarm manager (the container-id of the first container is now different).
docker container ls -f "name=dataservice_web"

CONTAINER ID        IMAGE                                  COMMAND              CREATED             STATUS              PORTS               NAMES
bc8b6fa861be        vividbreeze/docker-tutorial:version1   "java DataService"   53 seconds ago      Up 48 seconds                           dataapp_dataservice.1.5aminmnu9fx8qnbzoklfbzyj5
f732ffccfdad        vividbreeze/docker-tutorial:version1   "java DataService"   17 minutes ago      Up 17 minutes                           dataapp_dataservice.3.rk7seglslg66cegt6nrehzhzi
8fb716ef0091        vividbreeze/docker-tutorial:version1   "java DataService"   18 minutes ago      Up 17 minutes                           dataapp_datavervice.2.0mdkfpjxpldnezcqvc7gcibs8
The id in the response of one of the replicas of the service has changed
The service will be allocated to at most 50% CPU-time and 50 MBytes of memory, and at least 25% CPU-time and 5 MBytes of memory.
Docker Compose
Instead of docker stack, you can also use docker-compose. docker-compose is a program, written in Python, that does the container orchestration for you on a local machine, e.g. it ignores the deploy-part in the docker-compose.yml.
However, docker-compose uses some nice debugging and clean-up functionality, e.g. if you start our application with
docker-compose -f docker-compose.yml up
you will see the logs of all services (we only have one at the moment) colour-coded in your terminal window.
WARNING: Some services (web) use the 'deploy' key, which will be ignored. Compose does not support 'deploy' configuration - use `docker stack deploy` to deploy to a swarm.
WARNING: The Docker Engine you're using is running in swarm mode.

Compose does not use swarm mode to deploy services to multiple nodes in a swarm. All containers will be scheduled on the current node.

To deploy your application across the swarm, use `docker stack deploy`.

Creating network "docker_default" with the default driver
Pulling web (vividbreeze/docker-tutorial:version1)...
version1: Pulling from vividbreeze/docker-tutorial
Digest: sha256:39e30edf7fa8fcb15112f861ff6908c17d514af3f9fcbccf78111bc811bc063d
Status: Downloaded newer image for vividbreeze/docker-tutorial:version1
Creating docker_web_1 ... done
Attaching to docker_web_1
You can see in the warning, that the deploy part of your docker-compose.yml is ignored, as docker-compose focusses on the composition of services on your local machine, and not across a swarm.
If you want to clean up (containers, volumes, networks and other) just use
docker-compose down
docker-compose also allows you to build your images (docker stack won’t) in case it hasn’t been built before, e.g.
You might notice on the output of many commands, that docker-compose is different from the Docker commands. So again, use docker-compose only for Docker deployments on one host or to verify a docker-compose.yml on your local machine before using it in production.
Further Remarks
To summarise
Use docker swarm to define a cluster that runs our application. In our case the swarm consisted only of one machine (no real cluster). In the next part of the tutorial, we will see that a cluster can span various physical and virtual machines.
Define your application in a docker-compose.yml.
Use docker stack to deploy your application in the swarm in a production environment or docker-compose to test and deploy your application in a development environment.
Of course, there is more to Services, than I explained in this tutorial. However, I hope it helped as a starting point to go into more depth.