Schlagwort: vagrant

  • Installing Artifactory with Docker and Ansible

    The aim of this tutorial is to provision Artifactory stack in Docker on a Virtual Machine using Ansible for the provisioning. I separated the different concerns so that they can be tested, changed and run separately. Hence, I recommend you run the parts separately, as I explain them here, in case you run into some problems.

    Prerequisites

    On my machine, I created a directory artifactory-install. I will later push this folder to a git repository. The directory structure inside of this folder will look like this.

    artifactory-install
    ├── Vagrantfile
    ├── artifactory
    │   ├── docker-compose.yml
    │   └── nginx-config
    │       ├── reverse_proxy_ssl.conf
    │       ├── cert.pem
    │       └── key.pem 
    ├── artifactory.yml
    ├── docker-compose.yml
    └── docker.yml

    Please create the subfolders artifactory (the folder that we will copy to our VM) and nginx-config subfolder (which contains the nginx-configuration for the reverse-proxy as well as the certificate and key).

    Installing a Virtual Machine with Vagrant

    I use the following Vagrantfile. The details are explained in Vagrant in a Nutshell. You might want to experiment with the virtual box parameters.

    agrant.configure("2") do |config|
    
        config.vm.define "artifactory" do |web|
    
            # Resources for this machine
            web.vm.provider "virtualbox" do |vb|
               vb.memory = "2048"
               vb.cpus = "1"
            end
    
            web.vm.box = "ubuntu/xenial64"
    
            web.vm.hostname = "artifactory"
    
            # Define public network. If not present, Vagrant will ask.
            web.vm.network "public_network", bridge: "en0: Wi-Fi (AirPort)"
    
            # Disable vagrant ssh and log into machine by ssh
            web.vm.provision "file", source: "~/.ssh/id_rsa.pub", destination: "~/.ssh/authorized_keys"
    
            # Install Python to be able to provision machine using Ansible
            web.vm.provision "shell", inline: "which python || sudo apt -y install python"
    
        end
    
    end

    Installing Docker

    As Artifactory will run as a Docker container, we have to install the docker environment first. In my Playbook (docker.yml), I use the Ansible Role to install Docker and docker-compose from Jeff Geerling. The role variables are explained in the README.md. You might have to adopt this yaml-file, e.g. defining different users etc.

    - name: Install Docker
    
      hosts: artifactory
    
      become: yes
      become_method: sudo
    
      tasks:
      - name: Install Docker and docker-compose
        include_role:
           name: geerlingguy.docker
        vars:
           - docker_edition: 'ce'
           - docker_package_state: present
           - docker_install_compose: true
           - docker_compose_version: "1.22.0"
           - docker_users:
              - vagrant

    Before you run this playbook you have to install the Ansible role

    ansible-galaxy install geerlingguy.docker

    In addition, make sure you have added the IP-address of the VM to your Ansible inventory

    sudo vi /etc/ansible/hosts

    Then you can run this Docker Playbook with

    ansible-playbook docker.yml

    Installing Artifactory

    I will show the Artifactory Playbook (artifactory.yml) first and then we go through the different steps.

    - name: Install Docker
    
      hosts: artifactory
    
      become: yes
      become_method: sudo
    
      tasks:
    
      - name: Check is artifactory folder exists
        stat:
          path: artifactory
        register: artifactory_home
    
      - name: Clean up docker-compose
        command: >
           docker-compose down
        args:
           chdir: ./artifactory/
        when: artifactory_home.stat.exists
    
      - name: Delete artifactory working-dir
        file:
           state: absent
           path: artifactory
        when: artifactory_home.stat.exists
    
      - name: Copy artifactory working-dir
        synchronize:
           src: ./artifactory/
           dest: artifactory
      - name: Generate a Self Signed OpenSSL certificate
        command: >
           openssl req -subj '/CN=localhost' -x509 -newkey rsa:4096 -nodes
           -keyout key.pem -out cert.pem -days 365
        args:
           chdir: ./artifactory/nginx-config/
    
      - name: Call docker-compose to run artifactory-stake
        command: >
           docker-compose -f docker-compose.yml up -d
        args:
           chdir: ./artifactory/


    Clean-Up a previous Artifactory Installation

    As we will see later, the magic happens in the ~/artifactory folder on the VM. So first we will clean-up a previous installation, e.g. stopping and removing the running containers. There are different ways to achieve this. I will use a docker-compose down, which will terminate without an error, even if no container is running. In addition, I will delete the artifactory-folder with all subfolders (if they are present).

    Copy nginx-Configuration and docker-compose.yml

    The artifactory-folder includes the docker-compose.yml to install the Artifactory stack (see below) and the nginx-configuration (see below). They will be copied in a directory with the same name to the remote host.

    I use the synchronise module to copy the files, as currently since Python 3.6 there seems to be a problem that doesn’t allow to copy a directory recursively with the copy module. Unfortunately, synchronise demands your SSH password again. There are workarounds that make sense but don’t look elegant to me, so I avoid them ;).

    Set-Up nginx Configuration

    I will use nginx as a reverse-proxy that also allows a secure connection. The configuration-file is static and located in the nginx-config subfolder (reverse_proxy_ssl.conf)

    server {
      listen 443 ssl;
      listen 8080;
    
      ssl_certificate /etc/nginx/conf.d/cert.pem;
      ssl_certificate_key /etc/nginx/conf.d/key.pem;
    
      location / {
         proxy_pass http://artifactory:8081;
      }
    }

    The configuration is described in the nginx-docs. You might have to adopt this file for your needs.

    The proxy_pass is set to the service-name inside of the Docker overlay-network (as defined in the docker-compose.yml). I will open port 443 for an SSL connection and 8080 for a non-SSL connection.

    Create a Self-Signed Certificate

    We will create a self-signed certificate on the remote-host inside of the folder nginx-config

    openssl req -subj '/CN=localhost' -x509 -newkey rsa:4096 -nodes- keyout key.pem -out cert.pem -days 365

    The certificate and key are referenced in the reverse_proxy_ssl.conf, as explained above. You might run into problems, that your browser won’t accept this certificate. A Google search might provide some relief.

    Run Artifactory

    As mentioned above, we will run Artifactory with a reverse-proxy and a PostgreSQL as its datastore.

    version: "3"
    services:
    
      postgresql:
        image: postgres:latest
        deploy:
          replicas: 1
          restart_policy:
            condition: on-failure
        environment:
          - POSTGRES_DB=artifactory
          - POSTGRES_USER=artifactory
          - POSTGRES_PASSWORD=artifactory
        volumes:
          - ./data/postgresql:/var/lib/postgresql/data
    
      artifactory:
        image: docker.bintray.io/jfrog/artifactory-oss:latest
        user: "${UID}:${GID}"
        deploy:
          replicas: 1
          restart_policy:
            condition: on-failure
        environment:
          - DB_TYPE=postgresql
          - DB_USER=artifactory
          - DB_PASSWORD=artifactory
        volumes:
          - ./data/artifactory:/var/opt/jfrog/artifactory
        depends_on:
          - postgresql
    
      nginx:
        image: nginx:latest
        deploy:
          replicas: 1
          restart_policy:
            condition: on-failure
        volumes:
          - ./nginx-config:/etc/nginx/conf.d
        ports:
          - "443:443"
          - "8080:8080"
        depends_on:
          - artifactory
          - postgresql
    

    Artifactory

    I use the image artifactory-oss:latest from JFrog (as found on JFrog BinTray). On GitHub,  you find some examples of how to use the Artifactory Docker image.

    I am not super satisfied, as out-of-the-box I receive a „Mounted directory must be writable by user ‚artifactory‘ (id 1030)“ error when I bind /var/opt/jfrog/artifactory inside of the container to the folder ./data/artifactory on the VM. Inside of the Dockerfile for this image, they use a few tasks with a user „artifactory“. I don’t have such a user on my VM (and don’t want to create one). A workaround seems to be to set the user-id and group-id inside of the docker-compose.yml as described here.

    Alternatively, you can use the Artifactory Docker image from Matt Grüter provided on DockerHub. However, it doesn’t work with PostgreSQL out-of-the-box and you have to use the internal database of Artifactory (Derby). In addition, the latest image from Matt is built on version 3.9.2 (the current version is 6.2.0, 18/08/2018). Hence, you have to build a new image and upload it to your own repository. Sure if we use docker-compose to deploy our services, we could add a build-segment in the docker-compose.yml. But if we use docker stack to run our services, the build-part will be ignored.

    I do not publish a port (default is 8081) as I want users to access Artifactory only by the reverse-proxy.

    PostgreSQL

    I use the official PostgreSQL Docker image from DockerHub. The data-volume inside of the container will be bound to the postgresql folder in ~/artifactory/data/postgresql on the VM. The credentials have to match the credentials for the artifactory-service. I don’t publish a port, as I don’t want to use the database outside of the Docker container.

    The benefits of using a separate database are when you have intensive usage or a high load on your database, as the embedded database (Derby) might then slow things down.

    Nginx

    I use Nginx as described above. The custom configuration in ~/artifactory/nginx-config/reverse_proxy_ssl.conf is bound to /etc/nginx/conf.d inside of the Docker container. I publish port 443 (SSL) and 8080 (non-SSL) to the world outside of the Docker container.

    Summary

    To get the whole thing started, you have to

    1. Create a VM (or have some physical or virtual machine where you want to install Artifactory) with Python (as needed by Ansible)
    2. Register the VM in the Ansible Inventory (/etc/ansible/hosts)
    3. Start the Ansible Playbook docker.yml to install Docker on the VM (as a prerequisite to run Artifactory)
    4. Start the Ansible Playbook artifactory.yml to install Artifactory (plus PostgreSQL and a reverse-proxy).

    I recommend adopting the different parts for your needs. I am sure you could also improve a lot. Of course, you can include the Ansible Playbooks (docker.yml and artifactory.yml) directly in the provision-part of your Vagrantfile. In this case, you have to only run  vagrant up.

    Integrating Artifactory with Maven

    This article describes how to configure Maven with Artifactory. In my case, the automatic generation of the settings.xml in ~/.m2/ for Maven didn’t include the encrypted password. You can retrieve the encrypted password, as described here. Make sure you update your Custom Base URL in the General Settings, as it will be used to generate the settings.xml.

    Possible Error: Broken Pipe

    I ran into an authentification problem when I first tried to deploy a snapshot archive from my project to Artifactory. It appeared when I ran mvn deploy as (use -X parameter for a more verbose output)

    Caused by: org.eclipse.aether.transfer.ArtifactTransferException: Could not transfer artifact com.vividbreeze.springboot.rest:demo:jar:0.0.1-20180818.082818-1 from/to central (http://artifactory.intern.vividbreeze.com:8080/artifactory/ext-release-local): Broken pipe (Write failed)

    A broken pipe can mean everything, and you will find a lot when you google it. A closer look in the access.log on the VM running Artifactory revealed an

    2018-08-18 08:28:19,165 [DENIED LOGIN]  for chris/192.168.0.5.
    

    The reason was that I provided a wrong encrypted password (see above) in ~/.m2/settings. You should be aware, that the encrypted password changes everytime you deploy a new version of Artifactory.

    Possible Error: Request Entity Too Large

    Another error I ran into when I deployed a very large jar (this can happen with Spring Boot apps that carry a lot of luggage): Return code is: 413, ReasonPhrase: Request Entity Too Large.

    [ERROR] Failed to execute goal org.apache.maven.plugins:maven-deploy-plugin:2.8.2:deploy (default-deploy) on project demo: Failed to deploy artifacts: Could not transfer artifact com.vividbreeze.springboot.rest:demo:jar:0.0.1-20180819.092431-3 from/to snapshots (http://artifactory.intern.vividbreeze.com:8080/artifactory/libs-snapshot): Failed to transfer file: http://artifactory.intern.vividbreeze.com:8080/artifactory/libs-snapshot/com/vividbreeze/springboot/rest/demo/0.0.1-SNAPSHOT/demo-0.0.1-20180819.092431-3.jar. Return code is: 413, ReasonPhrase: Request Entity Too Large. -> [Help 1]
    

    I wasn’t able to find anything in the Artifactory logs, nor the STDIN/ERR of the nginx-container. However, I assumed that there might a limit on the maximum request body size. As the was over 20M large, I added the following line to the ~/artifactory/nginx-config/reverse_proxy_ssl.conf:

    server {
      ...
      client_max_body_size 30M;
      ...
    }

    Further Remarks

    So basically you have to run three scripts, to run Artifactory on a VM. Of course, you can add the two playbooks to the provision-part of the Vagrantfile. For the sake of better debugging (something will go probably wrong), I recommend running them separately.

    The set-up here is for a local or small team installation of Artifactory, as Vagrant and docker-compose are tools made for development. However, I added a deploy-part in the docker-compose.yml, so you can easily set up a swarm and run the docker-compose.yml with docker stack without any problems. Instead of Vagrant, you can use Terraform or Apache Mesos or other tools to build an infrastructure in production.

    To further pre-configure Artifactory, you can use the Artifactory REST API or provide custom configuration files in artifactory/data/artifactory/etc/.


  • How to use Ansible Roles

    In the Ansible introduction, we build a Playbook to install Jenkins from scratch on a remote machine. The Playbook was simple (for education purposes), it was designed for Debian Linux distributions (we used apt as a package manager), it just provided an out-of-the-box Jenkins (without any customisation). Thus, the Playbook is not very re-usable or configurable.

    However, if we would have made it more complex, the single-file Playbook would have become difficult to read and maintain and thus more error-prone.

    To overcome these problems, Ansible specified a directory structure where variables, handlers, tasks and more are put into different directories. This grouped content is called an Ansible Role. A Role must include at least one of these directories.

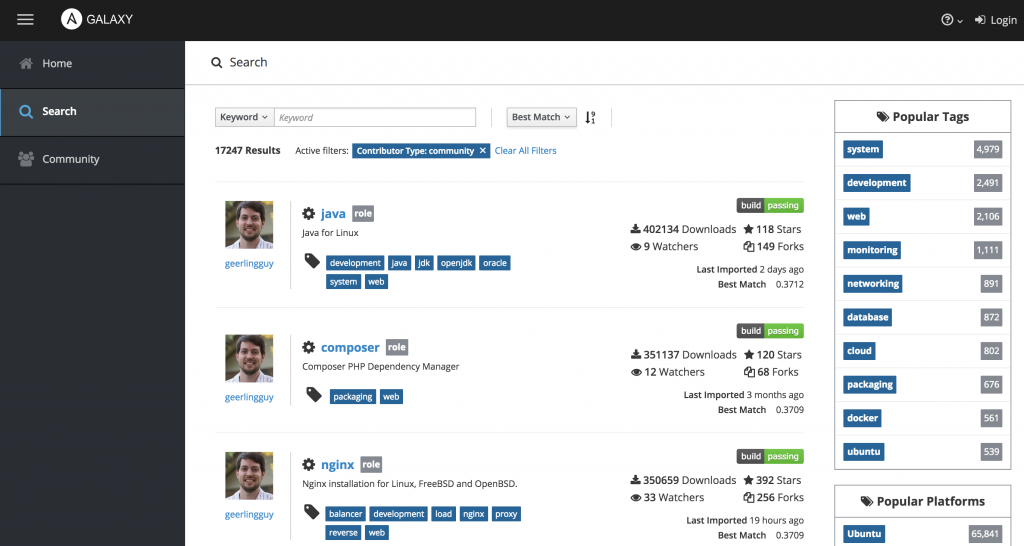
    You can find plenty of these Roles design by the Ansible community in the Ansible Galaxy. Let me show some examples to explain the concept of Ansible Roles.

    How to use Roles

    I highly recommend using popular Ansible Roles to perform provisioning of common software than writing your own Playbooks, as it might be more versatile and less error-prone, e.g. to install Java, Apache or nginxJenkins and other.

    Ansible Galaxy
    Ansible Galaxy

    Let us assume we want to install an Apache HTTP server. The most popular Role with over 300.000 downloads was written by geerlingguy, one of the most popular contributors to the Ansible Galaxy. I will jump right into the GitHub Repository of this Role.

    Firstly, you always have to install the role using the command line,

    ansible-galaxy install [role-name] e.g.

    ansible-galaxy install geerlingguy.apache

    Roles are downloaded from the Ansible Galaxy and stored locally at ~/.ansible/roles or /etc/ansible/roles/ (use ansible --version if you are not sure).

    In most cases, the README.md provides sufficient information on how to use this role. Basically, you define the hosts, on which the play is being executed, the variables to configure the role, and the role itself. In case of the Apache Role, the Playbook (ansible.yml) might look like this

    - name: Install Apache
    
      hosts: web1
    
      become: yes
      become_method: sudo
    
      vars:
        apache_listen_port: 8082
    
      roles:
        - role: geerlingguy.apache

    web1 is a server defined in the Ansible inventory, I set-up with Vagrant before. Now you can run your Ansible Playbook with

    ansible-playbook apache.yml

    In a matter of seconds, Apache should become available at http://[web1]:8082 (in my case: http://172.28.128.3:8082/).

    Since Ansible 2.4 you can also include Roles as simple tasks. The example above would look like this

    - name: Install Apache
    
      hosts: web1
    
      become: yes
      become_method: sudo
    
      tasks:
      - include_role:
           name: geerlingguy.apache
        vars:
           apache_listen_port: 8082

    A short Look inside a Role

    I won’t go too much into how to design Roles, as the Ansible documentation already provides a good documentation. Roles must include at least one of the directories, mentioned in the documentation. In reality, they look less complex, e.g. the Apache Ansible Role we used in this example, looks like

    Directory Structure of Ansible Role to install Apache
    Directory Structure of Ansible Role to install Apache

    The default-variables including a documentation are defined in defaults/main.yml, the tasks to install Apache can be found in /tasks/main.yml, that in turn calls the OS-specific Playbooks for RedHat, Suse, Solaris and Debian.

    Further Remarks

    Ansible Roles give good examples of how to use Ansible Playbooks in general. So if you are new to Ansible and want to understand some of the concepts in more detail, I recommend having a look at the Playbooks in the Ansible Galaxy.

    As mentioned above, I highly recommend using pre-defined roles for installing common software packages. In most cases, it will give you fewer headaches, especially if these Roles are sufficiently tested, which can be assumed for the most popular ones.


  • Installing Jenkins in AWS using Vagrant and Ansible

    This tutorial builds up upon the previous introductions to Vagrant and Ansible. Firstly, we will set up a Vagrant Box with Amazon Web Services (AWS). Subsequently, we will use the Ansible script to configure Jenkins in this Box, using the same Playbook as in the previous blog post.

    Prerequisites

    Setting up an AWS Account

    I assume that you have no AWS account yet. Please register for an AWS account and choose the Basic Plan. If you are new to AWS, Amazon provides a so-called AWS Free Tier that lets you test AWS for 12 months.

    The web-interface can be very confusing at times as AWS is a powerful tool that provides tons of services.  Here we will solely focus on the Elastic Compute Cloud (EC2). Before you configure our Vagrantfile, we will have to set-up AWS. For the sake of simplicity and focus, I will only get into details if necessary.

    Create a new Access Key

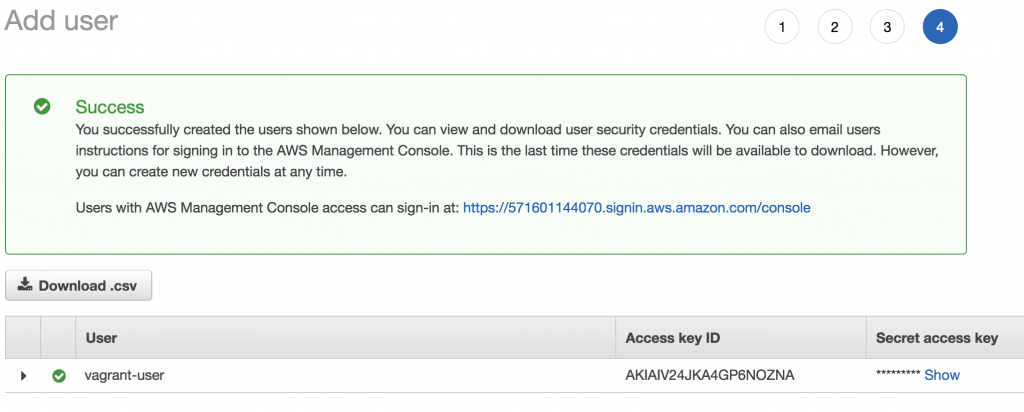
    First of all, we need to create an access key. It is not recommended, to work with the root security credentials, as they give full access to your AWS account. Please add a new user using the IAM console (Identity and Access Management).  I added a user named vagrant-user with Programmatic Access. I add this user to a group I call admin and give this group AdministratorAccess (we can change this later).

    AWS Add User
    AWS Add User

    After the user was successfully added, I retrieve the Access Key ID and the Secret Access Key. Please store this information as it won’t be available again. These credentials are needed to create a new EC2 instance with Vagrant.

    Create a new Key Pair

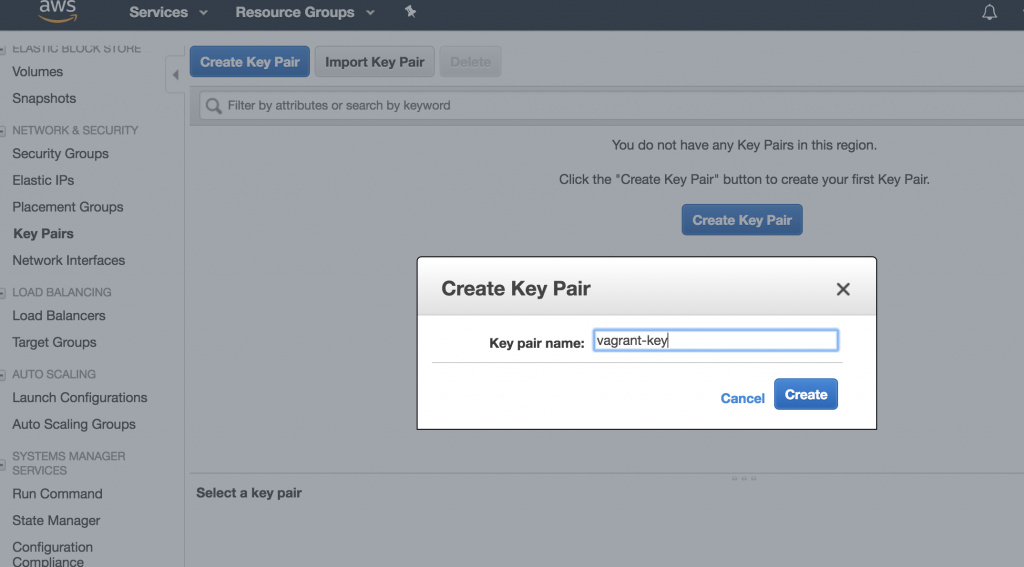
    A new Key-Pair can be created in the EC2 console (Services -> EC2 -> Key Pairs). This Key-Pair is used for SSH access to your EC2 instance, once the instance was created. I choose the name vagrant-key.

    AWS Generate KeyPair
    AWS Create a new Key Pair

    The public key will be stored in AWS, the private key file is automatically downloaded (in this case vagrant-key.pem). Store this key in a safe place and set permission to read-only for the current user (chmod 400 vagrant-key.pem).

    Creating a Security Group

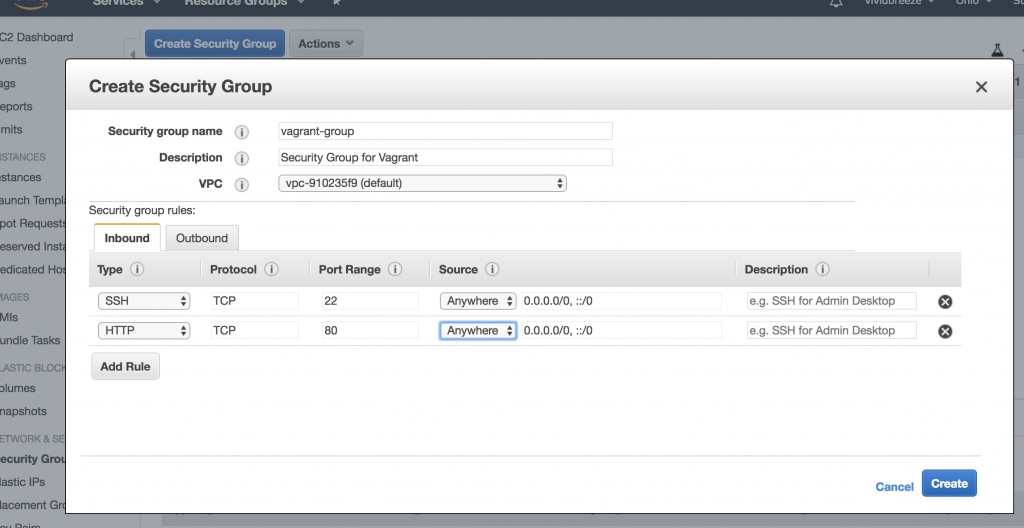
    Next, we have to create a Security Group to allow an SSH (and optionally an HTTP) connection to the EC instance. The connection to the EC2 instance will be created when the EC2 instance is created by Vagrant. You can use the default-group that should already exist or create a new group. I will create a group called vagrant-group and allow SSH and HTTP from anywhere (inbound-traffic).

    Creating a AWS Security Group
    Creating an AWS Security Group

    Choose an Image

    Images in EC2 are called AMI (Amazon Machine Image) and are identified by an ID (e.g. ami-8c122be9). The IDs are region-specific, i.e. not every image is available in any region. This is important as you will set the AMI and the region in the provider configuration in your Vagrantfile later, and you will run into errors if the AMI is not available in your region.

    You will find a list of the available images and their IDs when you launch a new EC2 instance.

    My AWS account is in the us-east-2 region (the region will show up in your EC2 dashboard) and I choose the image Ubuntu Server 16.04 LTS (HVM), SSD Volume Type with the IDami-5e8bb23b (as we used an Ubuntu distribution for our VirtualBox in the Vagrant tutorial). We need this information later in our Vagrantfile.

    Preparing Vagrant

    Adding the Vagrant AWS Provider

    As Vagrant doesn’t come with a built-in AWS provider, it has to be installed manually as a plugin

    vagrant plugin install vagrant-aws

    To check if the plugin was successfully installed use (the plugin should appear in the list)

    vagrant plugin list

    Adding a Vagrant Dummy Box

    The definition of a Vagrant box is mandatory in the Vagrantfile. If you work with AWS you will use Amazon Machine Images (as mentioned above). Hence, the definition of a Vagrant box is only a formality. For this purpose, the author of the AWS plugin for Vagrant has created a dummy-box. To add this box to Vagrant use:

    vagrant box add aws-dummy https://github.com/mitchellh/vagrant-aws/raw/master/dummy.box

    Vagrant Configuration

    I will now use the information I collected above to populate the Vagrantfile

    Vagrant.configure("2") do |config|
    
        config.vm.box = "aws-dummy"
    
        config.vm.provider :aws do |aws, override|
    
           aws.access_key_id = "AKIAJZ3GLCDOCOSTQKZA"
           aws.secret_access_key = "8AbPIrAXP8r14+SqCiM/9kXsvYzqxh9e27+NDoRQ"
           aws.keypair_name = "vagrant-key"
    
           aws.region = "us-east-2"
           aws.instance_type = "t2.micro"
           aws.ami = "ami-5e8bb23b"
    
           aws.security_groups = ['vagrant-group']
    
           # https://github.com/mitchellh/vagrant-aws/issues/365
           config.vm.synced_folder ".", "/vagrant-test", disabled: true
    
           override.ssh.username = "ubuntu"
           override.ssh.private_key_path = "./vagrant-test.pem"
    
           config.vm.provision "shell", inline: "which python || sudo apt -y install python"
    
       end
    
    end
    

    When launching the instance, I encountered the problem that I was asked for SMB credentials (on MacOS!). I solved this problem by disabling folder-sync as mentioned in the support forum.

    config.vm.synced_folder ".", "/vagrant-test", disabled: true

    The ssh-username depends on the AMI, for the selected Ubuntu-AMI, the username is „ubuntu“, for the Amazon Linux 2 AMI (HVM), SSD Volume Type (ami-8c122be9), it is „ec2-user“.

    In addition, I install Python as a pre-requisite for Ansible

    config.vm.provision "shell", inline: "which python || sudo apt -y install python"
    

    As for instance type I chose a small t2.micro instance (1 Virtual CPU, 1 GB RAM), that is included in the AWS Free Tier.

    Launching the EC2 Instance

    To launch the instance, use

    vagrant up --provider=aws

    In the console, you should see an output similar to

    Bringing machine 'default' up with 'aws' provider...
    ==> default: Warning! The AWS provider doesn't support any of the Vagrant
    ==> default: high-level network configurations (`config.vm.network`). They
    ==> default: will be silently ignored.
    ==> default: Launching an instance with the following settings...
    ==> default: -- Type: t2.micro
    ==> default: -- AMI:ami-5e8bb23b
    ==> default: -- Region: us-east-2
    ==> default: -- Keypair: vagrant-key
    ==> default: -- Security Groups: ["vagrant-group"]
    ==> default: -- Block Device Mapping: []
    ==> default: -- Terminate On Shutdown: false
    ==> default: -- Monitoring: false
    ==> default: -- EBS optimized: false
    ==> default: -- Source Destination check:
    ==> default: -- Assigning a public IP address in a VPC: false
    ==> default: -- VPC tenancy specification: default
    ==> default: Waiting for instance to become "ready"...
    ==> default: Waiting for SSH to become available...
    ==> default: Machine is booted and ready for use!

    If you encounter any problems, you can call vagrant up in debug-mode

    vagrant up --provider=aws --debug

    You know should be able to see the EC2 instance in the EC2 console in the state running. The security group we created earlier (vagrant-should) should have been linked. In this view, you can also retrieve the public DNS and IP address to access this instance from the Internet.

    AWS EC2 Instance Overview
    AWS EC2 Instance Overview

    You can now access the instance using

    vagrant ssh

    In addition, you can log into your EC2 instance using SSH and your DNS

    ssh -i "vagrant-key.pem" ubuntu@ec2-18-191-42-181.us-east-2.compute.amazonaws.com

    For a more detailed explanation, just choose your running instance and click on the Connect button (in the Instance Overview Page displayed above).

    Installing Jenkins

    One way to use the Ansible Playbook to provision the EC2 instance with Jenkins is to include it as an Ansible Provisioner in the Vagrantfile

    config.vm.provision "ansible" do |ansible|
        ansible.playbook = "playbook.yml"
    end

    Another way is to include the EC2 instance in the Inventory of Ansible (/etc/ansible/hosts ).

    TASK [Update apt packages] ************************************************************
    web1 ansible_host=127.0.0.1 ansible_user=vagrant ansible_port=2200
    web2 ansible_host=127.0.0.1 ansible_user=vagrant ansible_port=2222
    ec2 ansible_host=18.191.42.181 ansible_user=ubuntu

    Subsequently, add the ec2 host to our Ansible Playbook, we created in the Ansible tutorial

    name: Install Jenkins software
     hosts: web1, web2, ec2
     gather_facts: true
     become: yes
     ...

    To run the Playbook use

    ansible-playbook -l ec2 jenkins.yml

    If everything works smoothly, Jenkins should now be installed on your EC2 instance.

    If you run into an authentification error (access denied) you might have to add the public SSH key of your EC2 instance to the authentication agent with

    ssh-add vagrant-key.pem

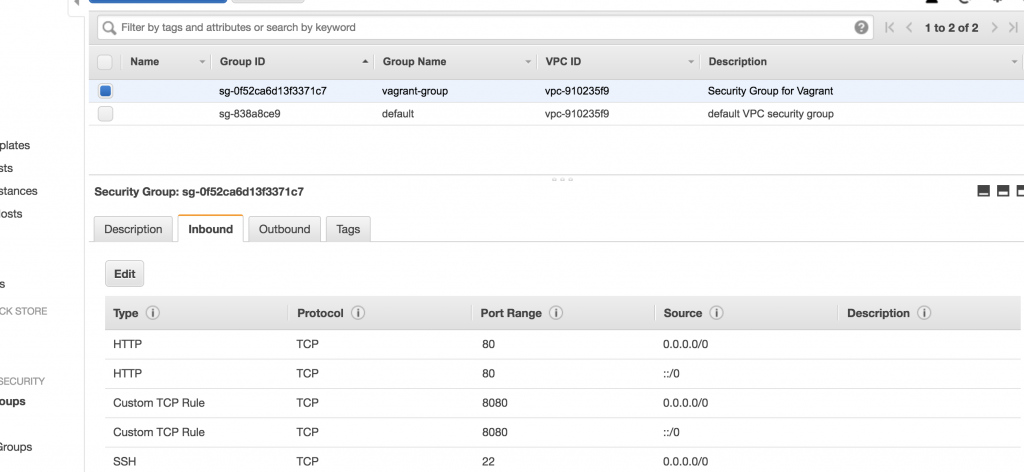
    Before you can access Jenkins you have to allow an inbound connection on port 8080 in the Security Group vagrant-group (we previously created).

    Opening Port 8080 to access Jenkins
    Opening Port 8080 to access Jenkins

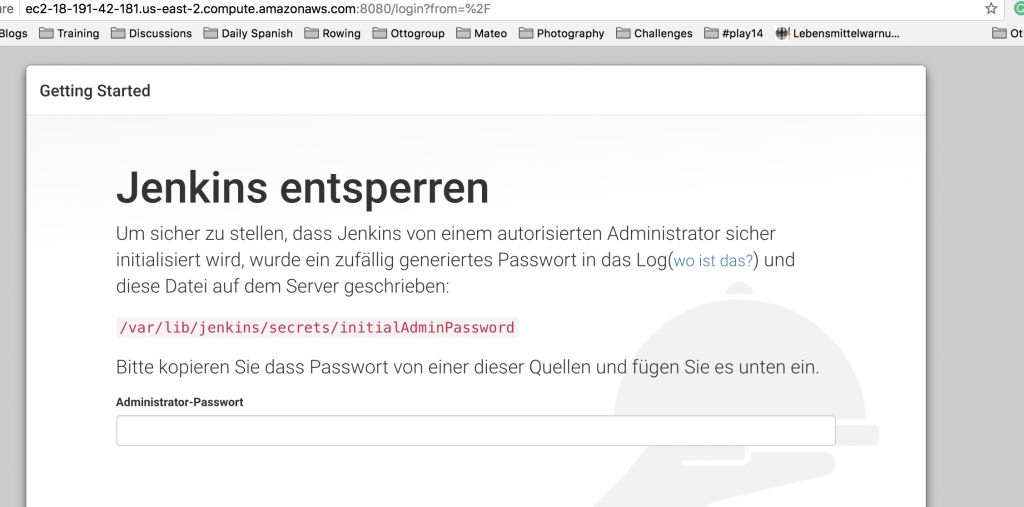
    If you now call the URL (or IP address) of the EC2 instance in your browser on Port 8080, you should see the Jenkins installation-screen. Voilà.

    http://ec2-18-191-42-181.us-east-2.compute.amazonaws.com:8080/login?from=%2F
    Jenkins Installation Screen
    Jenkins Installation Screen

    Further Remarks

    Of course, there are more elegant ways to construct the Vagrantfile, e.g. by reading the credentials from environment variables or from ~/.aws. I have chosen this format for sake of simplicity. There are also many more configuration options than describe here. Please have a further look at the vagrant-aws documentation.

    Make sure to destroy your EC2 instance when you don’t need it anymore, as it will consume your credits. The Billing Dashboard provides a good summary of your usage.

  • Vagrant in a Nutshell

    Vagrant is a command-line tool to create virtual environments using a scripting language, i.e. with Vagrant you can create and configure virtual machines by using a text editor. The use of a text-file for configuration makes it easy to document the configuration, to work in collaboration and to store the configuration in a version control system. Vagrant makes it easy for developers to simulate a production environment on their local development machines.

    Vagrant supports different providers out-of-the-box, such as VirtualBox and Hyper-V, others, such as VMWare, Docker, Google Cloud Platform or Amazon Webservices via plugins.

    In this short tutorial, we will create a script to set-up two virtual machines, each with a different configuration to run them in a Virtual Box. We will later configure these two machines using Ansible to set-up a Jenkins server and an Integration environment.

    Prerequisites

    Before we start, please install VirtualBox on your local machine. If you encounter any problems during installation on a Mac you might consult this article. Subsequently, create a folder for the Vagrant configuration (I created a folder in/vagrant my home directory). Install Vagrant (on my Mac I use brew cask install vagrant).

    Setting Up a simple Virtual Machine

    The file that contains the configuration is named Vagrantfile. Use a text editor to create a Vagrantfile with the following content:

    Vagrant.configure("2") do |config|
        config.vm.define "server1" do |web|
            web.vm.box = "ubuntu/xenial64"
        end
    end
    

    The (“2”) is the Vagrant version (the current version number is 2). The name encapsulated by the vertical lines is the name of the configuration (here “config”).

    web.vm.box = "ubuntu/xenial64" defines the so-called box that we want to install on our Virtual Machine (VirtualBox), in our case a basic Ubuntu Linux. A box is basically a package format for the different environments (from different Linux distributions to fully provisioned environments, e.g. Jenkins or ELK stack). You will find these boxes in the Vagrant Cloud.

    To install and run the VirtualBox, use

    vagrant up

    in the command line in the directory that contains the Vagrantfile. Usually, when you run a vagrant-command, Vagrant will climb up the directory tree and runs the first Vagrantfile it finds.

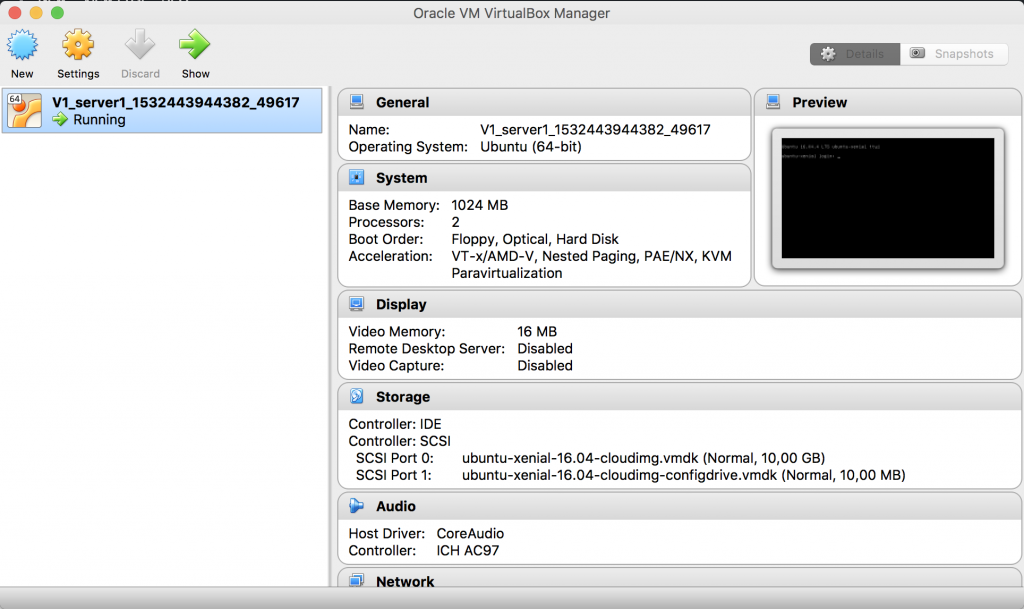
    It can take a couple of minutes for the box (ubuntu/xenial64) to be downloaded, set-up and run. Voilà, now you should have an Ubuntu Linux in VirtualBox up and running. The virtual machine configuration is located in .vagrant in your /vagrant.

    Vagrant Virtual Box
    Vagrant VirtualBox

    To see if your Virtual Box was created either open VirtualBox or by using

    vagrant status
    Current machine states:
    
    server1                   running (virtualbox)
    
    The VM is running. To stop this VM, you can run `vagrant halt` to
    shut it down forcefully, or you can run `vagrant suspend` to simply
    suspend the virtual machine. In either case, to restart it again,
    simply run `vagrant up`.

    To access the Virtual Machine use

    vagrant ssh

    To stop your VirtualBox, use

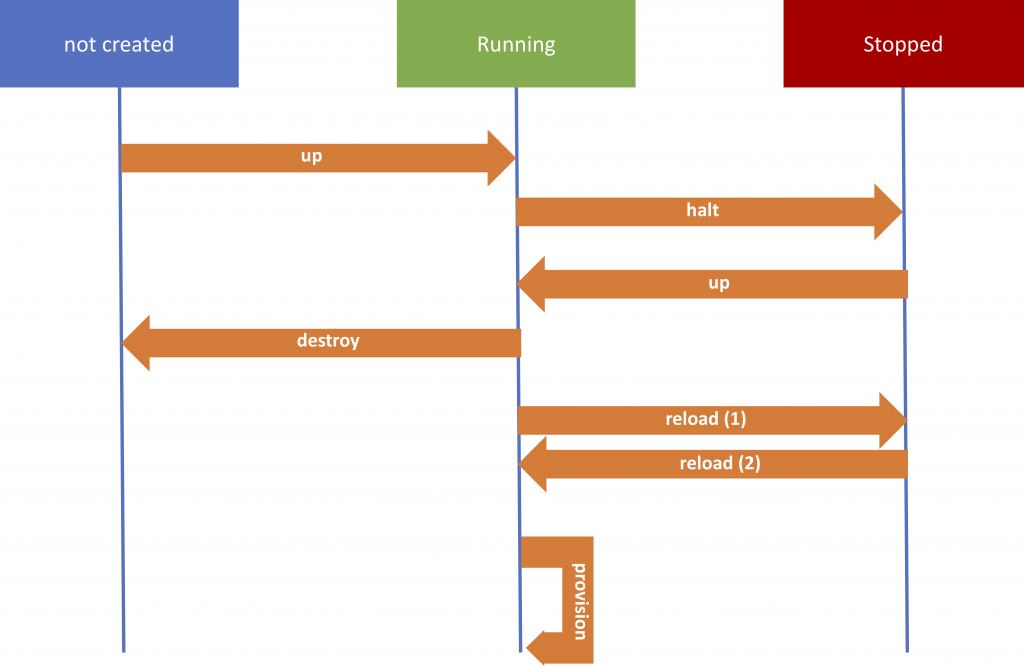
    vagrant halt

    Other command line instructions you will use are

    • vagrant destroy – to stop and delete the Virtual Machine
    • vagrant reload – to restart the environment and applying the settings in the Vagrantfile again, without destroying the Virtual Machine.
    • vagrant provision – executes the provision part in the Vagrantfile (to re-configure the environment)
    Vagrant State Diagram
    Vagrant State Diagram

    For more on Vagrant commands use vagrant --help or consult the documentation.

    The Vagrantfile

    Now we will use a Vagrantfile to create two Virtual Machines that we will later use to install Jenkins and SonarQube. I will first provide the Vagrantfile and go into more detail below.

    Vagrant.configure("2") do |config|
        config.vm.define "server1" do |web|
            web.vm.provider "virtualbox" do |vb|
               vb.memory = "2048"
               vb.cpus = "1"
            end
            web.vm.box = "ubuntu/xenial64"
            web.vm.hostname = "server1"
    
            web.vm.network "private_network", type: "dhcp"
    
            web.vm.provision "file", source: "~/.ssh/id_rsa.pub", destination: "~/.ssh/authorized_keys"
            web.vm.provision "shell", inline: "which python || sudo apt -y install python"
    
        end
    
        config.vm.define "server2" do |web|
            web.vm.provider "virtualbox" do |vb|
               vb.memory = "2048"
               vb.cpus = "2"
            end
            web.vm.box = "ubuntu/xenial64"
            web.vm.hostname = "server2"
    
            web.vm.network "private_network", type: "dhcp"
    
            web.vm.provision "file", source: "~/.ssh/id_rsa.pub", destination: "~/.ssh/authorized_keys"
            web.vm.provision "shell", inline: "which python || sudo apt -y install python"
    
        end
    
    end
    

    To install and run the two Virtual Machines, use

    vagrant up

    Using vagrant status you should now see something like this

    Current machine states:
    
    server1                   running (virtualbox)
    server2                   running (virtualbox)
    
    This environment represents multiple VMs. The VMs are all listed
    above with their current state. For more information about a specific
    VM, run `vagrant status NAME`.

    Instead of using vagrant ssh you should now be able to log into your newly created Virtual Machines using their IP-address and ports (vagrant is the default-user). I configured the Virtual Machines to retrieve the IP addresses via DHCP. You can obtain the ssh-information with

    vagrant ssh-config [server-name], e.g. vagrant ssh-config server1

    You should retrieve an output such as

    Host server1
      HostName 127.0.0.1
      User vagrant
      Port 2222
      UserKnownHostsFile /dev/null
      StrictHostKeyChecking no
      PasswordAuthentication no
      IdentityFile /Users/vividbreeze/vagrant/.vagrant/machines/server1/virtualbox/private_key
      IdentitiesOnly yes
      LogLevel FATAL

    Now you can log into server1 using (server2 respectively)

    ssh vagrant@127.0.0.1 -p2222

    The vagrant-user has sudo privileges by default. If you want to switch to the root user, simply use

    sudo su

    You can set/change the root-user password with

    sudo passwd root

    Provider Configuration

    We can configure our provider (VirtualBox) with specific parameters, in this case, the memory and the number of CPUs. More on the configuration of the different providers can be found in the Vagrant documentation.

    web.vm.provider "virtualbox" do |vb|
       vb.memory = "1024"
       vb.cpus = "1"
    end

    Network Settings

    In the example, I let the DCHP server assign an IP in the private network (not accessible from the Internet) to the Virtual Machine:

    config.vm.network "private_network", type: "dhcp"

    You can also assign static IP to the Virtual Machine using

    web.vm.network "private_network", ip: "192.168.33.11"
    

    In addition, you can define a public network, so your machine will be accessible from outside the host machine

    web.vm.network "public_network"

    If you have more than one network (which is often the case), you will be prompted to select a network after running vagrant up. You specify the network using (you need to provide the full name

    web.vm.network "public_network", bridge: "en0: Wi-Fi (AirPort)"

    Some providers, such as VirtualBox, can be run in a closed environment that is not accessible from the machine it is running on. Port Forwarding enables you to create rules to forward traffic from the host machine to the VirtualMachine.

    web.vm.network "forwarded_port", guest: 80, host: 8080

    For more about Network configuration, please consult the Vagrant documentation.

    Provisioning

    Provisioning means to configure the environments via shell scripts or configuration management tools such as Chef or Ansible. We will only do a basic configuration here. As I will use Ansible for provisioning the machine, Python has to be installed.

    web.vm.provision "file", source: "~/.ssh/id_rsa.pub", destination: "~/.ssh/authorized_keys"
    web.vm.provision "shell", inline: "which python || sudo apt -y install python"
    

    You can also call other provisioning tools, such as Ansible Playbooks directly from the Vagrantfile.

    web.vm.provision "ansible" do |ansible|
       ansible.playbook = "playbook.yml"
    end

    SSH

    Most of the Vagrant boxes come with two users – root and vagrant (password: vagrant). You can log into a box by using vagrant ssh [machine-name]. You can omit this when overwriting the ~/.ssh/authorized_keys file with a new file that includes the public key of your host machine. You then can log into the machine with ssh vagrant@[machine-url] -p [port].

    web.vm.provision "file", source: "~/.ssh/id_rsa.pub", destination: "~/.ssh/authorized_keys"
    

    Shared Folders

    Although not used in the example, you are able to share files between your Virtual Machine and your local environment.

    web.vm.synced_folder "./sync_folder", "/vagrant", create: true

    This allows you e.g. to store the configuration on your local machine to easily and quickly reconfigure the software running on your remote machines without connection the server via ssh.

    Further Remarks

    Vagrant is an easy way to design simple infrastructure as code, mainly used in development environments, e.g. you cannot design a large infrastructure with several components spanning different networks. In the latter case, I recommend using Terraform or Apache Mesos.

    I use Vagrant mainly for testing changes of a configuration before I roll it out in production, e.g. I use a local Jenkins VM, running with the same (virtual) hardware configuration as in production on my local machine. Hence, I test changes of the build pipeline or the configuration of plugins locally before rolling them out on the production system. I also use it for testing new software before I role it out in production.

    Tools that are in a way similar to Vagrant (for setting up infrastructure as code for a development environment) are Nanobox or Docker.

    Of course, this was only a short tutorial that should provide you with the basics to set-up a virtual machine in Vagrant. For further reading, I recommend the Vagrant Documentation.

    Links