The Docker Eco-System
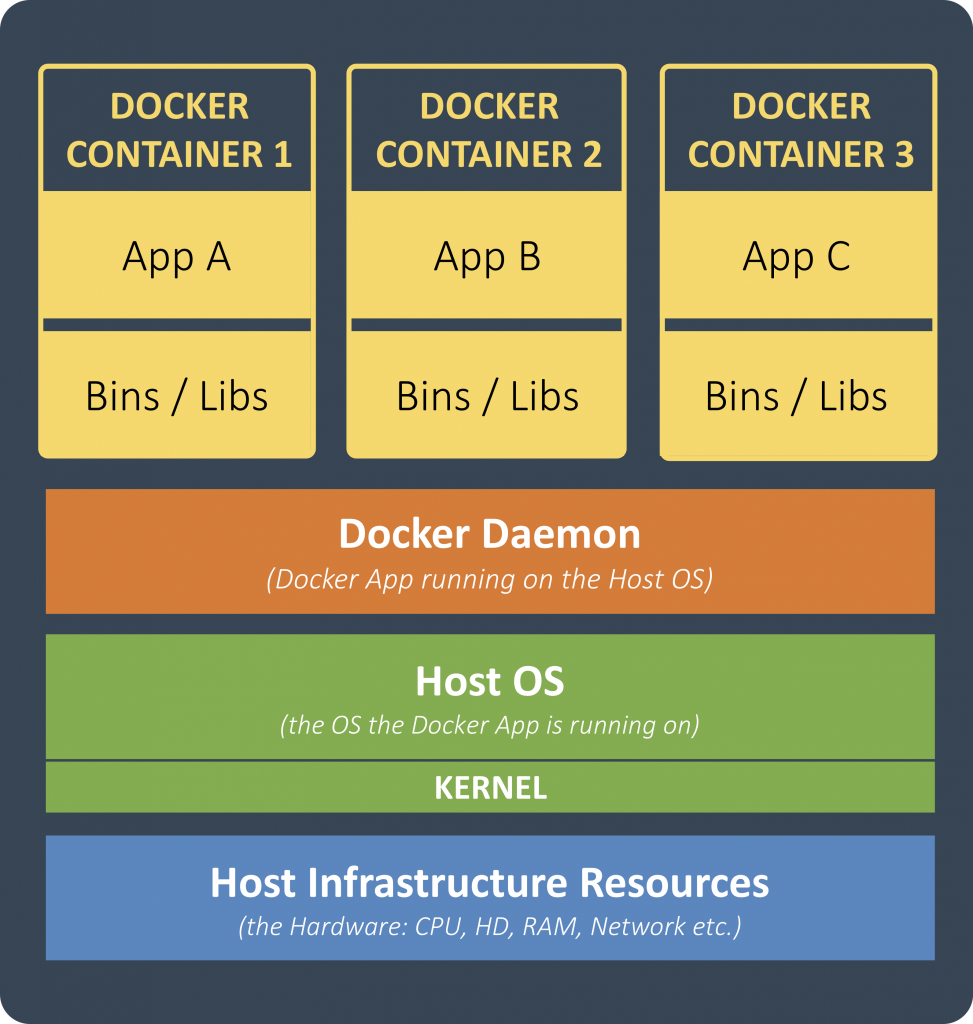
When we talk about Docker, we mainly talk about the Docker daemon, a process that runs on a host machine (in this tutorial most probably your computer). This Docker daemon is able to build images, run containers provide a network infrastructure and much more. The Docker daemon can be accessed via a REST interface. Docker provides a Command Line Interface (CLI), so you can access the Docker daemon directly from the command shell on the Docker host (docker COMMAND […|).

Docker is based on a Linux ecosystem. On a Mac or Windows, Docker will create a Virtual Machine (using HyperKit). The Docker daemon runs on this Virtual Machine. The CLI on your host will then communicate via the REST interface to the daemon on this Virtual Machine. Although you might not notice it, you should keep this in mind (see below).
Docker Images
Docker runs an instance of an image in a so-called container. These images contain an application (such as nginx, MySQL, Jenkins, or OS such as Ubuntu) as well as the ecosystem to run this application. The ecosystem consists of the libraries and binaries that are needed to execute the application on a Linux machine. Most of the images are based on Linux distributions, as they already come with the necessary libraries and binaries. However, applications do not need a fully fledged Linux distribution, such as Ubuntu. Hence, most images are based on of a light-weight distribution such as Alpine Linux and others.

It should be recalled, that only the libraries and binaries of the Linux distribution inside of the image are necessary for the application to run. These libraries communicate with the Operating System on the Docker Host, mostly the kernel that in turn communicates with hardware. So the Linux distribution inside of your containers does not have to be booted. This makes the start-up time of the container incredibly fast, compared to Virtual Machines, that run an operating system (that has to be booted first).
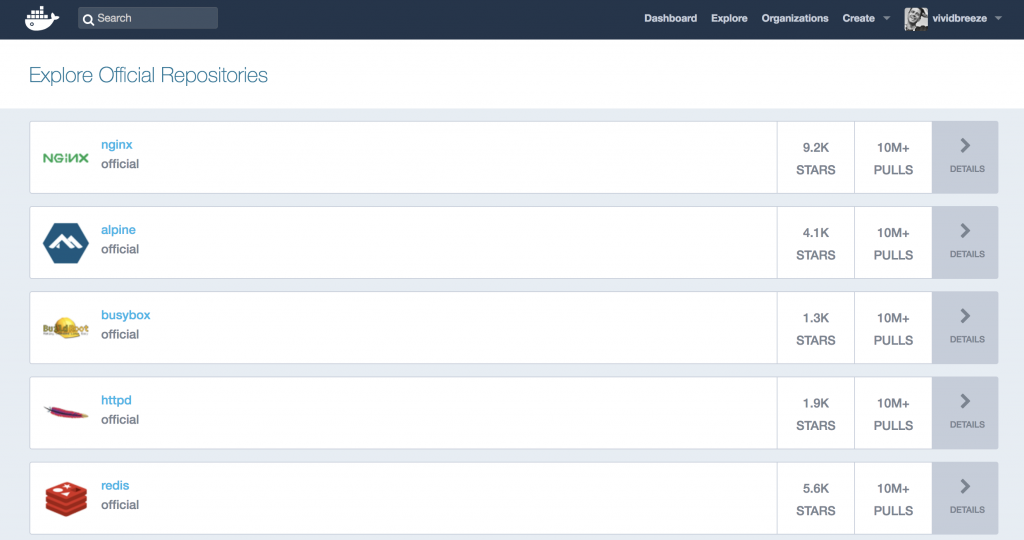
Image Registry
DockerHub is a place where you can find the images that are publicly available. Some of these images are official images, maintained by Docker, most of them are customised images, provided by the community (other developers or organisations who decided to make their images public). You can now (also) find these images in the new DockerStore.
Docker Containers
When you start a container you basically run an image. If Docker can’t find the image on your host, docker will download it from a registry (which is DockerHub as a default). On your host, you can see this image running as one or more processes.
The beauty of containers is, that you can run and configure an application, without touching your host system.
Prerequisites
You should have Docker (community edition) installed on the machine you are working with.
Basic Commands
Let us get started. In this introduction, we will run images that are available on DockerHub. In the next part, we will focus on custom-images. So let us build a container that contains a nginx web server.
docker run -d --name webserver -p 3001:80 nginx
What we are doing here is
- running the Docker image nginx (the latest version, as we didn’t specify a tag)
- mapping the port 80 (default port of nginx) to the port 3001 on the local host
- running the Docker container detached (the container runs in the background)
- naming the container webserver (so we can reference the container by its name for later operations)
If you are running Docker on a Linux OS, you should see two nginx processes in your process list. As mentioned above, if you are running Docker on MacOSX or Windows, Docker runs in a Virtual Machine. You can see the nginx process only when you log into this machine.
screen ~/Library/Containers/com.docker.docker/Data/com.docker.driver.amd64-linux/tty
or
docker run -it --privileged --pid=host debian nsenter -t 1 -m -u -n -i sh
ps -aux | grep nginx should then show the following two processes running (nginx master process and a nginx worker process)
10259 root       0:00 nginx: master process nginx -g daemon off;
10294 101        0:00 nginx: worker process
10679 root       0:00 grep nginx
When you call localhost:3001 in your web browser, you should see the nginx default page.
You can list containers by using (use -a to list all containers, running and stopped ones)
docker container ls
CONTAINER ID        IMAGE               COMMAND                  CREATED             STATUS              PORTS                  NAMES
590058dc3101        nginx               "nginx -g 'daemon of…"   22 minutes ago      Up 22 minutes       0.0.0.0:3001->80/tcp   webserver
You can now stop the container, run it again or even delete the container with
docker container stop webserver
docker container start webserver
docker container rm webserver (if the container is still running, use -f for force as an option)
You can verify the current state with docker container ls -a.
Bind Mounts
So far we can only see the default nginx welcome screen in our web browser. If we want to show our own content, we can use a so-called bind mount. A bind mount maps a file or directory on the host machine to a file or directory in a container.
The nginx image we are using uses /usr/share/nginx/html as the default home for its HTML-files. We will bind this directory to the directory ~/docker/html on our local host (you might have to delete the current webserver-container before).
docker run -d --name webserver -p 3001:80 -v ~/docker/html:/usr/share/nginx/html nginx
So if you write a simple HTML-file (or any other file) to~/docker/html, you are able to access it in the web browser immediately.
Bind mounts are file-system specific, e.g. MacOSX uses a different file system them Windows, so the location pointer might look differently, such as /Users/chris on MacOSX and //c/Users/chris on Windows.
Volumes
Imagine you need a MySQL database for a short test. You can have MySQL up and running in Docker in seconds.
docker run -d --name database mysql
You might notice, that MySQL is strangely not running. Let us have a why this might be
docker container logs database
error: database is uninitialized and password option is not specified
  You need to specify one of MYSQL_ROOT_PASSWORD, MYSQL_ALLOW_EMPTY_PASSWORD and MYSQL_RANDOM_ROOT_PASSWORD
As we could have seen in the official image description of MySQL, we needed to specify an environment variable that defines our initial password policy (mental note: always read the image description before you use it). Let us try this again (you might need to delete the container before: docker container rm database)
docker run -d -e MYSQL_ALLOW_EMPTY_PASSWORD=true --name database mysql
The database content will not be stored inside of the container but on the host as a so-called volume. You can list all volumes by using
docker volume ls
DRIVER              VOLUME NAME
local               2362207fdc3f4a128ccc37aa45e729d5f0b939ffd38e8068346fcdddcd89fee7
You can find out to which location on the Docker host this volume is mapped by using the volume name
docker volume inspect 2362207fdc3f4a128ccc37aa45e729d5f0b939ffd38e8068346fcdddcd89fee7
[
    {
        "CreatedAt": "2018-08-13T10:41:47Z",
        "Driver": "local",
        "Labels": null,
        "Mountpoint": "/var/lib/docker/volumes/2362207fdc3f4a128ccc37aa45e729d5f0b939ffd38e8068346fcdddcd89fee7/_data",
        "Name": "2362207fdc3f4a128ccc37aa45e729d5f0b939ffd38e8068346fcdddcd89fee7",
        "Options": null,
        "Scope": "local"
    }
]
Another way would be to inspect the database container with
docker container inspect database
In the REST response, you will find something like this
"Mounts": [
    {
        "Type": "volume",
        "Name": "2362207fdc3f4a128ccc37aa45e729d5f0b939ffd38e8068346fcdddcd89fee7",
        "Source": "/var/lib/docker/volumes/2362207fdc3f4a128ccc37aa45e729d5f0b939ffd38e8068346fcdddcd89fee7/_data",
        "Destination": "/var/lib/mysql",
        "Driver": "local",
        "Mode": "",
        "RW": true,
        "Propagation": ""
    }
],
When MySQL writes into or reads from /var/lib/mysql, it actually writes into and read from the volume above. If you run Docker on a Linux host, you can go to this directory /var/lib/docker/volumes/2362207fdc3f4a128ccc37aa45e729d5f0b939ffd38e8068346fcdddcd89fee7/_data. If you run Docker on MacOSX or Windows, you have to log into the Linux VM that runs the Docker daemon first (see above).
This volume will outlive the container, meaning, if you remove the container, the volume will still be there – which is good in case you need to back up the contents.
docker container rm -f database
docker volume ls
DRIVER              VOLUME NAME
local               2362207fdc3f4a128ccc37aa45e729d5f0b939ffd38e8068346fcdddcd89fee7
However, it can also leave lots of garbage on your computer, so make sure you delete volumes if you don’t use them. In addition, many containers create volumes but it is exhausting to find out which container a volume belongs to.
Another problem that remains is, that if you run a new MySQL container it will create a new volume. Of course, this makes sense, but what happens, if you just want to update to a new version of MySQL?
Same as bindings above, you can name volumes
docker run -d -e MYSQL_ALLOW_EMPTY_PASSWORD=true -v db1:/var/lib/mysql --name database mysql
So when you now look at your volumes now, you will see the new volume with the name db1
docker volume ls
DRIVER              VOLUME NAME
local               2362207fdc3f4a128ccc37aa45e729d5f0b939ffd38e8068346fcdddcd89fee7
local               db1
Connect to this database, e.g. using MySQL Workbench or any other database client, create a database, a table, and insert some data into this table.
(Another option would be to log into the container itself and start a mysql session to create a database: docker container exec -it database bash. This command executes bash in the container in an interactive terminal).
Now delete the container database
docker container rm -f database
You will notice (docker volume ls) that our volume is still there. Now create a new MySQL container with the identical volume
docker run -d -e MYSQL_ALLOW_EMPTY_PASSWORD=true -v db1:/var/lib/mysql --name database mysql
Use your database client to connect to MySQL. The database, table and its contents should still be there.
What is the different between a Volume and a Bind Mount
- a Volume is created by using the Docker file system, which is the same, not matter on which OS the Docker daemon is running. A volume can by anonymous (just referenced by an id) or named.
- a Bind Mount, on the other hand, binds a file or directory on the Docker host (which can be Linux, MacOSX or Windows) to a file or directory in the container. Bind Mounts rely on the specific directory structure of the filesystem on the host machine (which is different in Linux, MacOSX and Unix). Hence, Docker doesn’t allow to use bind mounts to create new images. You can only specify bind mounts in the command using the
-vparameter.
Further Remarks
This short tutorial just covered some basics to get around with Docker. I recommend to play a bit with the Docker CLI and also try the different options. In the next part, we will build and run a customised image.
Kommentare
Ein Kommentar zu „Docker Basics – Part I“
[…] this previous introduction, I explained the Docker basics. Now we will write a small web-service and deploy it inside of a Docker […]