I will explain how to connect to set-up and connect to a remote repository (Bitbucket and GitHub) and how to work with these repositories. I don’t want to complicate things, hence this tutorial gives you the basic understanding of how to work with Git. Before you start, you need to generate a SSH key-pair. In the following, I will explain how to set-up a repository at Bitbucket or GitHub. You only need one remote repository, either at Bitbucket or GitHub. Both providers offer free repositories. I prefer BitBucket as it offers free private repositories, which means that no other person can access my code. Nevertheless, you can change your repositories at any time.
Setting up a Bitbucket Repository
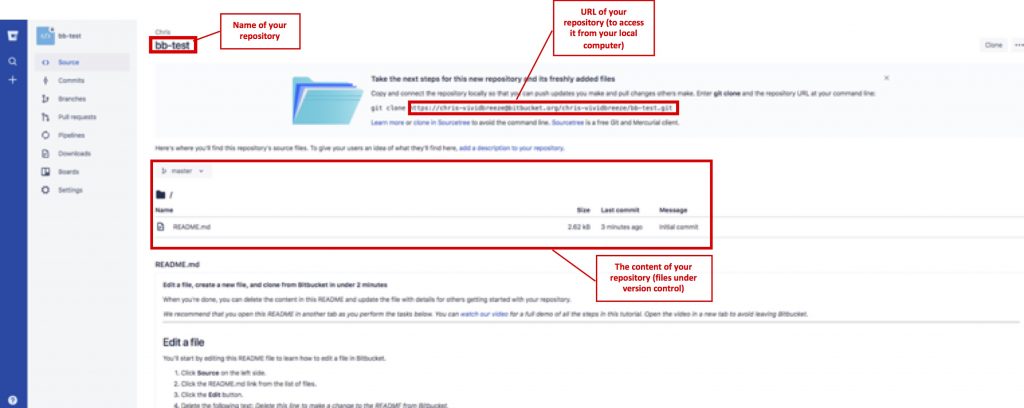
Bitbucket from Atlassian offers unlimited private repositories and up to 5 users for free. First, you have to create a Bitbucket account. At some point, you will be asked if you are „Flying solo?“ or „Plan to work with others?“. For this tutorial please choose the first. Next, I am asked to create a repository. I chose the name bb-test in this tutorial. Choose the default-options. Once your repository is created, you should see something like this.

After creating you see nothing more but an empty folder containing a README.md file. To access your Bitbucket repository you need to deposit your private key. Go to Settings → Access Key and choose Add Key. Copy your private key into your clipboard
cat ~/.ssh/id_rsa.pub | pbcopy
and then copy it into the Key-Textfield. As a label, you can add a name like „Chris‘ Dev Environment“ or similar (if you deposit more than one key, it helps you to distinguish them, e.g. when more people access this private repository). Below I will explain how to access this remote repository.
Setting up a GitHub Repository
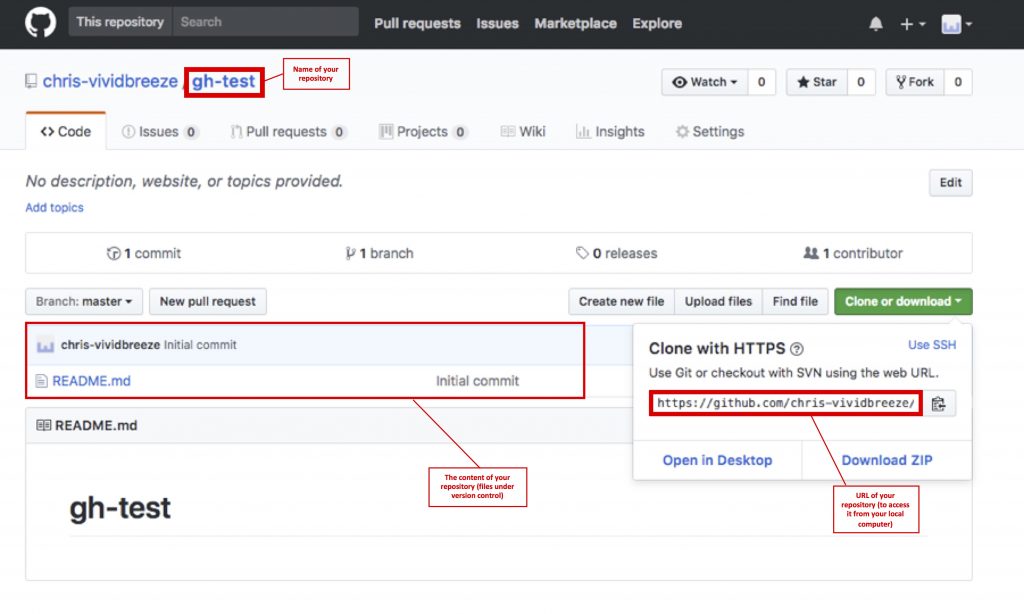
GitHub provides unlimited free repositories for unlimited users, however, all repositories are public. That means anyone has read-access to your repository. If you want to have a private repository you have to get a paid account. Again, please set-up an account first. After a few steps, you are asked to for the name of your new repository. I chose the name gh-test in this tutorial. Also, check the box „Initialize this repository with a README“ which automatically creates a README.md in your repository.

To access your GitHub repository you need to deposit your private key. Go to Settings → Deploy key and select Add deploy key. Copy your private key into your clipboard
cat ~/.ssh/id_rsa.pub | pbcopy
and then copy it into the Key-Textfield. As a label, you can add a name like „Chris‘ Dev Environment“ or similar (if you deposit more than one key, it helps you to distinguish them, e.g. when more people access this private repository). Check Allow write access as we also want to push our code into this repository. Below I will explain how to access this remote repository.
Cloning a remote repository
Once you have created a remote repository you want to access it from your computer. You do this by cloning the remote repository using git clone with the URL (see images above) of your remote repositories. Go to an empty directory and use either:
git clone https://chris-vividbreeze@bitbucket.org/chris-vividbreeze/bb-test.git
for Bitbucket repository or the following line for your GitHub repository
git clone https://github.com/chris-vividbreeze/gh-test.git
As your free Bitbucket account can be a private repository, you have to enter your Bitbucket password (not the passphrase of your private key). The free access to GitHub offers only a public repository, so anyone can clone it without using a password.
Basically, git clone calls git init before it copies the files from the remote directory. Thus, you should now find a copy of your remote repository on your local computer. In the directory, you can also see a .git, which is a directory that contains the git-configuration. If you are using the git-Plugin in zsh (or something similar for other command shells) you should see something like this:

Alternatively, you can connect to a git Repository by the Git protocol (with no authentication) or via ssh:
git://[host-name][:port]/[path-to-repository]ssh://[user@][host-name][:port]/[path-to-repository]
When you used git clone, your local repository will automatically point to the remote URL is was cloned from. Hence you don’t always have to enter the URL when you push contents from the local to the remote repository. You can also add the remote repository to your local git config with
git remote add [remote-repository-name] [remote-repository-URL]
Working with Remote Repositories
First, you should learn how to use git with local repositories to understand the basics. After you cloned the remote repository, changes will only be made on your local copy of the remote repository (so far). This means you are working with two independent repositories: the remote repository on the remote server and your local repository on your computer. This is contrary to SVN where there is a strong relationship between the remote repository and the working copy. This is why Git is called a distributed version control system.
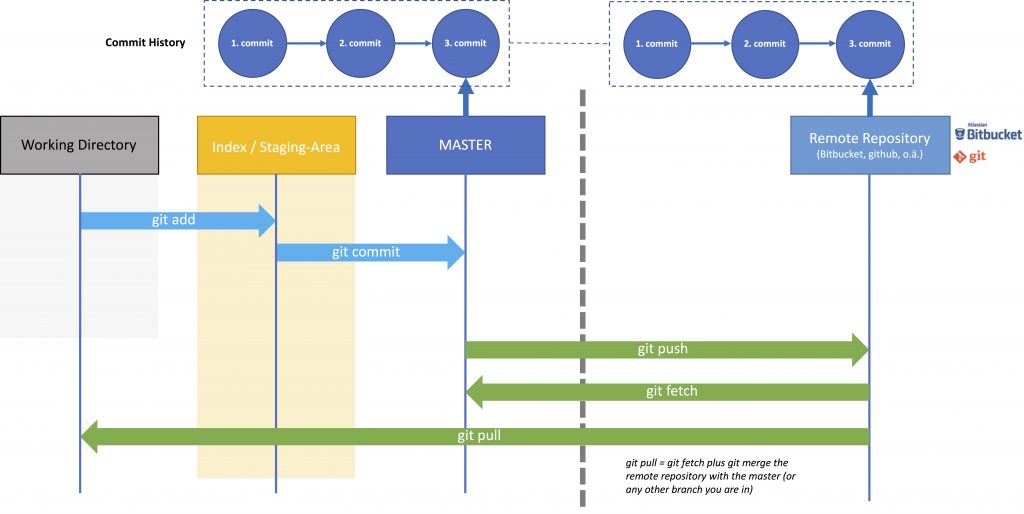
To work with remote repositories, you mostly will use git push, git pull or git fetch.
With git fetch you only copy the remote branch to the Local repository, it doesn’t update your Working Branch.
With git pull you pull the remote branch and merge the contents to your current branch, i.e. you update your local branch with the remote version. git pull is basically a git fetch with a subsequent git merge. So if you Working Directory references to the Master branch (git checkout master), the Master branch will be updated. If it references a branch A (git checkout A), branch A will be updated.
With git push you push your current local branch to your remote repository, i.e. you update the remote branch with the changes you made locally. You can also push a local branch to a remote-repository by using
git push -u [remote-repository-name] [local-branchname]
To delete a branch from the remote repository (e.g. after you made your changes and merged your branch into the master branch) use
git push origin --delete [branch-name]
This image shows the interaction between the remote repository, the local repository (in this case the Master) and the Working Directory.

Remarks
I recommend to get an account at Bitbucket or GitHub and experiment with Git before you are using it real projects. It sometimes can get a bit confusing to work with remote and local repositories, with remote and local branches etc. However, it’s important to understand these basics before working with others. In one of the next posts, I will take a look at different collaboration strategies.
Further Reading
GIT Tutorial – Working with Branches – Part I
Git Branches – Working with Branches – Part II (Merge Conflicts)
Git Branches – Working with Branches – Part III (Merging versus Rebasing)
Kommentare
2 Antworten zu „GIT Tutorial – Remote Repositories“
[…] GIT Tutorial – Remote Repositories […]
[…] GIT Tutorial – Remote Repositories […]